<?xml version="1.0" encoding="UTF-8"?>

<feed xmlns="http://www.w3.org/2005/Atom" xml:lang="en">
  <title>Aditya Seth&apos;s Technical Blog</title>
  <subtitle>Technical deep-dives, tutorials, and opinion pieces by Aditya Seth on Kubernetes, security, ML/NLP, cloud, and Linux.</subtitle>
  <link rel="alternate" type="text/html" href="https://adityaseth.in/blog"/>
  <link rel="self" type="application/atom+xml" href="https://adityaseth.in/atom.xml"/>
  <id>https://adityaseth.in/blog</id>
  <updated>2026-07-31T09:00:00+05:30</updated>
  <author>
    <name>Aditya Seth</name>
    <uri>https://adityaseth.in/</uri>
  </author>
  <generator uri="https://adityaseth.in/">scripts/blog/build.mjs</generator>
  <entry>
    <title type="text">Leaving Hashnode: building a blog I actually own</title>
    <link rel="alternate" type="text/html" href="https://adityaseth.in/blog/leaving-hashnode"/>
    <id>https://adityaseth.in/blog/leaving-hashnode</id>
    <published>2026-07-31T09:00:00+05:30</published>
    <updated>2026-07-31T09:00:00+05:30</updated>
    <category term="personal"/>
    <category term="devops"/>
    <summary type="text">Hashnode is winding down, so I rebuilt my blog as static pages generated from markdown, with comments and view counts on Cloudflare Workers.</summary>
    <content type="html"><![CDATA[<p class="post-lede">Hashnode is winding down, and with it goes every post I published there, every cover image served from their CDN, and every URL people have linked to. That is the deal you make with a hosted platform, and it is usually a fine deal right up until the moment it is not.</p>
<p>So I rebuilt the blog inside this site. Same domain, same design language, no third party in the middle. This post is both the first one on the new system and a description of how it works.</p>
<h2 id="what-actually-breaks-when-a-platform-shuts-down" tabindex="-1"><a class="heading-anchor" href="#what-actually-breaks-when-a-platform-shuts-down" aria-label="Link to this section">#</a> What actually breaks when a platform shuts down</h2>
<p>It is worth being precise about the damage, because it is bigger than &quot;the posts go away&quot;.</p>
<p>My old listing page had nine hand written cards. Every cover image was hotlinked from <code>cdn.hashnode.com</code>, and every title linked out to <code>adityaseth777.hashnode.dev</code>. So the failure mode was not one page going blank. It was:</p>
<ul>
<li>Nine dead outbound links from a page I control.</li>
<li>Nine broken images on that same page, because I never hosted them.</li>
<li>All the accumulated search ranking pointing at a domain that no longer resolves.</li>
<li>No copy of the markdown anywhere except an export I had not taken.</li>
</ul>
<p>The last one is the real lesson. <strong>Portability is a property of your source format, not of your hosting.</strong> Markdown in a git repository can be moved to anything. A post living only in someone else's database cannot.</p>
<h2 id="the-shape-of-the-replacement" tabindex="-1"><a class="heading-anchor" href="#the-shape-of-the-replacement" aria-label="Link to this section">#</a> The shape of the replacement</h2>
<p>The site is static HTML on GitHub Pages with no build step, and I wanted to keep that true for everything except the blog. So the blog is the one part that compiles:</p>
<div class="code-block" data-lang="text"><button class="code-copy" type="button" aria-label="Copy code to clipboard"><span class="code-copy__idle">Copy</span><span class="code-copy__done">Copied</span></button><pre class="shiki github-dark-default" style="background-color:#0d1117;color:#e6edf3" tabindex="0"><code><span class="line"><span>content/posts/*.md          markdown source of truth</span></span>
<span class="line"><span>        |</span></span>
<span class="line"><span>        v</span></span>
<span class="line"><span>scripts/blog/build.mjs      Node generator (runs in CI)</span></span>
<span class="line"><span>        |</span></span>
<span class="line"><span>        v</span></span>
<span class="line"><span>blog/&#x3C;slug>.html            static pages, committed to the repo</span></span>
<span class="line"><span>blog.html                   regenerated listing</span></span>
<span class="line"><span>feed.xml / sitemap.xml      regenerated</span></span>
<span class="line"><span></span></span></code></pre></div>
<p>The generator is a few hundred lines of plain ES modules. No framework, no bundler, no templating engine. Pages are assembled with tagged template literals that HTML escape every interpolation by default:</p>
<div class="code-block" data-lang="javascript"><button class="code-copy" type="button" aria-label="Copy code to clipboard"><span class="code-copy__idle">Copy</span><span class="code-copy__done">Copied</span></button><pre class="shiki github-dark-default" style="background-color:#0d1117;color:#e6edf3" tabindex="0"><code><span class="line"><span style="color:#FF7B72">export</span><span style="color:#FF7B72"> function</span><span style="color:#D2A8FF"> html</span><span style="color:#E6EDF3">(</span><span style="color:#FFA657">strings</span><span style="color:#E6EDF3">, </span><span style="color:#FF7B72">...</span><span style="color:#FFA657">values</span><span style="color:#E6EDF3">) {</span></span>
<span class="line"><span style="color:#FF7B72">  let</span><span style="color:#E6EDF3"> out </span><span style="color:#FF7B72">=</span><span style="color:#E6EDF3"> strings[</span><span style="color:#79C0FF">0</span><span style="color:#E6EDF3">];</span></span>
<span class="line"><span style="color:#FF7B72">  for</span><span style="color:#E6EDF3"> (</span><span style="color:#FF7B72">let</span><span style="color:#E6EDF3"> i </span><span style="color:#FF7B72">=</span><span style="color:#79C0FF"> 0</span><span style="color:#E6EDF3">; i </span><span style="color:#FF7B72">&#x3C;</span><span style="color:#E6EDF3"> values.</span><span style="color:#79C0FF">length</span><span style="color:#E6EDF3">; i</span><span style="color:#FF7B72">++</span><span style="color:#E6EDF3">) {</span></span>
<span class="line"><span style="color:#E6EDF3">    out </span><span style="color:#FF7B72">+=</span><span style="color:#D2A8FF"> resolve</span><span style="color:#E6EDF3">(values[i]) </span><span style="color:#FF7B72">+</span><span style="color:#E6EDF3"> strings[i </span><span style="color:#FF7B72">+</span><span style="color:#79C0FF"> 1</span><span style="color:#E6EDF3">];</span></span>
<span class="line"><span style="color:#E6EDF3">  }</span></span>
<span class="line"><span style="color:#FF7B72">  return</span><span style="color:#D2A8FF"> raw</span><span style="color:#E6EDF3">(out);</span></span>
<span class="line"><span style="color:#E6EDF3">}</span></span>
<span class="line"></span></code></pre></div>
<p>That is stricter than most templating engines, where autoescape is a setting somebody can turn off.</p>
<h3 id="why-the-output-is-committed-not-deployed-from-an-artifact" tabindex="-1"><a class="heading-anchor" href="#why-the-output-is-committed-not-deployed-from-an-artifact" aria-label="Link to this section">#</a> Why the output is committed, not deployed from an artifact</h3>
<p>GitHub Pages can deploy from an Actions artifact instead of a branch. I deliberately did not do that.</p>
<p>This repository publishes about sixty files that have nothing to do with the blog: a CV, three letters of recommendation, certification images, fonts, a PWA manifest, fourteen redirect stubs. Switching to artifact deployment would put all of them behind a packaging step, so a mistake in the blog build could 404 my resume.</p>
<p>Committing generated HTML costs some history noise and buys a lot:</p>
<div class="table-wrap"><table>
<thead>
<tr>
<th>Property</th>
<th>Committed output</th>
<th>Artifact deploy</th>
</tr>
</thead>
<tbody>
<tr>
<td>Blast radius of a build bug</td>
<td>Blog only</td>
<td>Whole site</td>
</tr>
<tr>
<td>Review the real JSON-LD in a PR</td>
<td>Yes</td>
<td>No</td>
</tr>
<tr>
<td><code>git clone</code> and open locally</td>
<td>Works</td>
<td>Needs a build</td>
</tr>
<tr>
<td>Rollback</td>
<td><code>git revert</code></td>
<td>Re-run a workflow</td>
</tr>
<tr>
<td>Broken build</td>
<td>Last good HTML stays live</td>
<td>Stale or partial deploy</td>
</tr>
</tbody>
</table>
</div><p>For a site whose entire premise is precision tuned structured data, being able to read the generated schema in a pull request diff is a feature, not noise.</p>
<h2 id="making-the-markdown-fail-loudly" tabindex="-1"><a class="heading-anchor" href="#making-the-markdown-fail-loudly" aria-label="Link to this section">#</a> Making the markdown fail loudly</h2>
<p>The generator refuses to build a post with missing or wrong metadata. Not a warning, an exit code.</p>
<div class="code-block" data-lang="yaml"><button class="code-copy" type="button" aria-label="Copy code to clipboard"><span class="code-copy__idle">Copy</span><span class="code-copy__done">Copied</span></button><pre class="shiki github-dark-default" style="background-color:#0d1117;color:#e6edf3" tabindex="0"><code><span class="line"><span style="color:#7EE787">title</span><span style="color:#E6EDF3">: </span><span style="color:#A5D6FF">"Leaving Hashnode: building a blog I actually own"</span></span>
<span class="line"><span style="color:#7EE787">date</span><span style="color:#E6EDF3">: </span><span style="color:#79C0FF">2026-07-31</span></span>
<span class="line"><span style="color:#7EE787">description</span><span style="color:#E6EDF3">: </span><span style="color:#A5D6FF">"Hashnode is winding down, so I rebuilt my blog as static pages..."</span></span>
<span class="line"><span style="color:#7EE787">tags</span><span style="color:#E6EDF3">: [</span><span style="color:#A5D6FF">personal</span><span style="color:#E6EDF3">, </span><span style="color:#A5D6FF">devops</span><span style="color:#E6EDF3">]</span></span>
<span class="line"><span style="color:#7EE787">cover</span><span style="color:#E6EDF3">:</span></span>
<span class="line"><span style="color:#7EE787">  src</span><span style="color:#E6EDF3">: </span><span style="color:#A5D6FF">images/blog/leaving-hashnode/cover.jpg</span></span>
<span class="line"><span style="color:#7EE787">  alt</span><span style="color:#E6EDF3">: </span><span style="color:#A5D6FF">"Dark cover image reading Leaving Hashnode"</span></span>
<span class="line"></span></code></pre></div>
<p>A description shorter than fifty characters fails. A tag that is not in the closed vocabulary fails, and the error lists the tags that do exist. A cover file that is not on disk fails. An unclosed code fence fails. So does an em dash, because this repository has used plain hyphens since long before the blog did.</p>
<p>Under CI those diagnostics are emitted as workflow commands, so a bad field shows up as an annotation on the exact line of the markdown rather than buried in a log.</p>
<h2 id="comments-without-accounts" tabindex="-1"><a class="heading-anchor" href="#comments-without-accounts" aria-label="Link to this section">#</a> Comments without accounts</h2>
<p>The requirement was specific: anyone can comment without signing up, I can reply on the site itself, and I can delete anything. That rules out Giscus and utterances, which both require a GitHub account from the commenter.</p>
<p>What runs instead is a single Cloudflare Worker on a same origin route. The domain is already proxied through Cloudflare, which means the API can live at <code>/api/v1/...</code> on this same hostname. No CORS layer, no preflight request, no separate subdomain to remember.</p>
<p>Storage is D1, Cloudflare's SQLite. The comment table is unremarkable except for two columns worth explaining:</p>
<div class="code-block" data-lang="sql"><button class="code-copy" type="button" aria-label="Copy code to clipboard"><span class="code-copy__idle">Copy</span><span class="code-copy__done">Copied</span></button><pre class="shiki github-dark-default" style="background-color:#0d1117;color:#e6edf3" tabindex="0"><code><span class="line"><span style="color:#E6EDF3">ip_hash     </span><span style="color:#FF7B72">TEXT</span><span style="color:#FF7B72"> NOT NULL</span><span style="color:#E6EDF3">,   </span><span style="color:#8B949E">-- SHA-256(ip + UA + daily-rotating salt)</span></span>
<span class="line"><span style="color:#E6EDF3">owner_token </span><span style="color:#FF7B72">TEXT</span><span style="color:#FF7B72"> NOT NULL</span><span style="color:#8B949E">    -- returned once, kept in the commenter's localStorage</span></span>
<span class="line"></span></code></pre></div>
<p>The <code>ip_hash</code> supports rate limiting and view deduplication, but the salt rotates daily, so it is not a durable identifier for anybody. The <code>owner_token</code> lets an anonymous commenter delete their own comment later without ever creating an account.</p>
<p>Moderation happens on the live post. When my Cloudflare Access session cookie is present, delete buttons and a &quot;reply as author&quot; affordance appear inline next to each comment. There is no separate admin application to maintain, and I answer people exactly where they asked.</p>
<h2 id="the-view-counter-and-why-it-cannot-be-static" tabindex="-1"><a class="heading-anchor" href="#the-view-counter-and-why-it-cannot-be-static" aria-label="Link to this section">#</a> The view counter, and why it cannot be static</h2>
<p>This one is worth spelling out, because it is the part that looks impossible on a static site.</p>
<p>The pages are files. They are generated at build time and cached at the edge. A number baked into the HTML would be frozen at the last deploy, and it would be wrong for everyone who reads the page afterwards.</p>
<p>So the count is a hydrated island. The HTML ships an empty element, and JavaScript fills it:</p>
<div class="code-block" data-lang="javascript"><button class="code-copy" type="button" aria-label="Copy code to clipboard"><span class="code-copy__idle">Copy</span><span class="code-copy__done">Copied</span></button><pre class="shiki github-dark-default" style="background-color:#0d1117;color:#e6edf3" tabindex="0"><code><span class="line"><span style="color:#FF7B72">const</span><span style="color:#79C0FF"> res</span><span style="color:#FF7B72"> =</span><span style="color:#FF7B72"> await</span><span style="color:#D2A8FF"> fetch</span><span style="color:#E6EDF3">(</span><span style="color:#A5D6FF">`${</span><span style="color:#E6EDF3">api</span><span style="color:#A5D6FF">}/views/${</span><span style="color:#E6EDF3">slug</span><span style="color:#A5D6FF">}`</span><span style="color:#E6EDF3">, { method: </span><span style="color:#A5D6FF">'POST'</span><span style="color:#E6EDF3"> });</span></span>
<span class="line"><span style="color:#FF7B72">const</span><span style="color:#E6EDF3"> { </span><span style="color:#79C0FF">count</span><span style="color:#E6EDF3"> } </span><span style="color:#FF7B72">=</span><span style="color:#FF7B72"> await</span><span style="color:#E6EDF3"> res.</span><span style="color:#D2A8FF">json</span><span style="color:#E6EDF3">();</span></span>
<span class="line"></span></code></pre></div>
<p>On the server, the increment is deduplicated before it ever reaches the database:</p>
<div class="code-block" data-lang="javascript"><button class="code-copy" type="button" aria-label="Copy code to clipboard"><span class="code-copy__idle">Copy</span><span class="code-copy__done">Copied</span></button><pre class="shiki github-dark-default" style="background-color:#0d1117;color:#e6edf3" tabindex="0"><code><span class="line"><span style="color:#FF7B72">const</span><span style="color:#79C0FF"> key</span><span style="color:#FF7B72"> =</span><span style="color:#A5D6FF"> `seen:${</span><span style="color:#E6EDF3">ipHash</span><span style="color:#A5D6FF">}:${</span><span style="color:#E6EDF3">slug</span><span style="color:#A5D6FF">}`</span><span style="color:#E6EDF3">;</span></span>
<span class="line"><span style="color:#FF7B72">if</span><span style="color:#E6EDF3"> (</span><span style="color:#FF7B72">await</span><span style="color:#E6EDF3"> env.</span><span style="color:#79C0FF">KV</span><span style="color:#E6EDF3">.</span><span style="color:#D2A8FF">get</span><span style="color:#E6EDF3">(key)) {</span></span>
<span class="line"><span style="color:#FF7B72">  return</span><span style="color:#D2A8FF"> json</span><span style="color:#E6EDF3">({ count: </span><span style="color:#FF7B72">await</span><span style="color:#D2A8FF"> readCount</span><span style="color:#E6EDF3">(env, slug) });   </span><span style="color:#8B949E">// refresh, no write</span></span>
<span class="line"><span style="color:#E6EDF3">}</span></span>
<span class="line"><span style="color:#FF7B72">await</span><span style="color:#E6EDF3"> env.</span><span style="color:#79C0FF">KV</span><span style="color:#E6EDF3">.</span><span style="color:#D2A8FF">put</span><span style="color:#E6EDF3">(key, </span><span style="color:#A5D6FF">'1'</span><span style="color:#E6EDF3">, { expirationTtl: </span><span style="color:#79C0FF">86400</span><span style="color:#E6EDF3"> });</span></span>
<span class="line"><span style="color:#FF7B72">return</span><span style="color:#D2A8FF"> json</span><span style="color:#E6EDF3">({ count: </span><span style="color:#FF7B72">await</span><span style="color:#D2A8FF"> incrementCount</span><span style="color:#E6EDF3">(env, slug) });</span></span>
<span class="line"></span></code></pre></div>
<p>Refresh the page fifty times and the number moves once. Key value reads are edge cached and effectively free; the database only sees a write when the visitor is genuinely new that day.</p>
<p>Two details matter for honesty. Before the request resolves, the element is hidden rather than showing a zero, and if the request fails it stays hidden. A missing number is fine. A confidently wrong number is not.</p>
<p>The other detail is bots. This site's <code>robots.txt</code> explicitly invites about twenty eight AI crawlers, which is intentional, but none of them should inflate a human read count. They mostly do not execute JavaScript, and the Worker rejects known crawler user agents anyway.</p>
<h2 id="what-i-gave-up" tabindex="-1"><a class="heading-anchor" href="#what-i-gave-up" aria-label="Link to this section">#</a> What I gave up</h2>
<p>Being fair about the trade: Hashnode gave me a built in audience, a newsletter, and an editor that worked from any device. I have none of those now. Publishing means writing a markdown file and pushing it.</p>
<p>For me that is the right trade, because the thing I actually wanted was for the writing to still exist in ten years. But it is a trade, not a free upgrade, and anybody making the same move should know which side of it they are on.</p>
<h2 id="what-is-next" tabindex="-1"><a class="heading-anchor" href="#what-is-next" aria-label="Link to this section">#</a> What is next</h2>
<p>The nine old posts are still on the listing page as external cards while Hashnode is up. Migrating them properly means pulling the markdown through Hashnode's GraphQL API, rehosting the covers here, and pointing redirects at the new URLs. That is the next job, and it is mechanical now that the pipeline exists.</p>
<p>If you have opinions about any of this, the comment box below does not want your email address.</p>
]]></content>
  </entry>
  <entry>
    <title type="text">Debugging Silent Model Divergence with Gradient Monitoring</title>
    <link rel="alternate" type="text/html" href="https://adityaseth.in/blog/debugging-silent-model-divergence-with-gradient-monitoring"/>
    <id>https://adityaseth.in/blog/debugging-silent-model-divergence-with-gradient-monitoring</id>
    <published>2026-07-30T09:00:00+05:30</published>
    <updated>2026-07-30T09:00:00+05:30</updated>
    <category term="ai"/>
    <summary type="text">A loss curve can drop smoothly while a model silently stops learning. Gradient norm monitoring is how you catch it before it costs you.</summary>
    <content type="html"><![CDATA[<p class="post-lede">Your loss curve looks like a masterpiece of engineering because it plunges beautifully toward zero every single epoch. It is gorgeous. But beneath that smooth line, your model's internal math might be screaming for help while producing absolutely no meaningful learning. Is it broken? Yes. The &quot;perfect&quot; graph is often just a mask for a silent collapse where the gradients have vanished into nothingness (it is like a car with a speedometer showing 60 mph while the engine is actually smoking).</p>
<h2 id="why-your-smooth-line-is-lying" tabindex="-1"><a class="heading-anchor" href="#why-your-smooth-line-is-lying" aria-label="Link to this section">#</a> Why your smooth line is lying</h2>
<p>Have you ever seen a chart that looks perfect but leads your team straight into disaster? It happens more often than it should. You watch the training loss curve drop steadily, and everything feels great. Is it working? Yes. But underneath that beautiful curve, the math might be screaming for help (or worse, staying completely silent).</p>
<p>This article is about a sneaky problem where your model looks like it is learning, but the internal gears are actually grinding to a halt. To put this in plain terms, we are looking at &quot;silent failures.&quot; Imagine trying to manage your bank account: you see your balance remaining stable, but you realize you aren't actually making any money because you stopped recording your expenses. You think you are safe, but you are just flying blind. In machine learning, a model can sometimes &quot;solve&quot; a task by finding a shortcut or getting stuck in a mathematical dead zone. It looks like progress on your screen, but it becomes useless in the real world.</p>
<p>This guide is for you if you are a student or a new practitioner who wants to know why some &quot;successful&quot; training runs actually break everything. By the end of this piece, you will be able to look at two specific charts, your loss curve and your gradient norms (the magnitude of the gradient vector, the &quot;signals&quot; that tell the math how to move), and tell the difference between a slow learner and a broken system. You won't just be looking at numbers; you will have a clear decision tree to help you decide exactly when your model is lying to you.</p>
<p>We will take this journey together in four parts. First, we will establish the basic vocabulary so you can speak the language of failure. Next, we will look at the theory behind how these signals behave. Then, I will share a real story from a team that fell into this exact trap. Finally, we will walk through a step-by-step fix to ensure your models stay healthy.</p>
<p>If loss drops perfectly every time, why would anyone call it dangerous? We explore this contradiction in depth.</p>
<h2 id="the-vocabulary-of-failure" tabindex="-1"><a class="heading-anchor" href="#the-vocabulary-of-failure" aria-label="Link to this section">#</a> The vocabulary of failure</h2>
<p><figure class="post-figure"><img src="https://adityaseth.in/images/blog/debugging-silent-model-divergence-with-gradient-monitoring/img-02.jpg" alt="focus dictionary index page" width="1080" height="717" loading="lazy" decoding="async"></figure></p>
<p><em>Photo by</em> <a href="https://unsplash.com/@rvignes?utm_source=gde-blog&amp;utm_medium=referral" target="_blank" rel="noopener"><em>Romain Vignes</em></a> <em>on</em> <a href="https://unsplash.com/?utm_source=gde-blog&amp;utm_medium=referral" target="_blank" rel="noopener"><em>Unsplash</em></a></p>
<p>To understand the warning signs, you must first learn what the instruments on your dashboard actually measure. These terms are the building blocks for diagnosing a broken model. (They might sound intimidating at first, but we will break them down together!)</p>
<h3 id="gradient" tabindex="-1"><a class="heading-anchor" href="#gradient" aria-label="Link to this section">#</a> Gradient</h3>
<p>A gradient is a vector that tells the neural network which way to turn its weights to lower the error. During each training step, the model calculates an error (loss). The gradient tells us which direction to adjust our internal numbers (weights) to fix this error. It acts as the mathematical compass for learning. <strong>Analogy:</strong> Think of it like an arrow pointing uphill on a foggy mountain; if it points straight, you know exactly how much effort to put into moving forward. This matters because without a clear gradient, the model has no direction.</p>
<h3 id="gradient-norm" tabindex="-1"><a class="heading-anchor" href="#gradient-norm" aria-label="Link to this section">#</a> Gradient Norm</h3>
<p>The gradient norm is the length or magnitude of that gradient vector. It tells us just how strong the signal is without caring about which way it points. <strong>Analogy:</strong> Think of this as wind speed on a weather vane. A high norm means a gale force storm pushing hard; a low norm means a gentle breeze. This is vital for identifying if your training signal is too weak or dangerously volatile.</p>
<h3 id="loss-function" tabindex="-1"><a class="heading-anchor" href="#loss-function" aria-label="Link to this section">#</a> Loss Function</h3>
<p>A loss function provides a single number that measures how wrong the model's predictions are compared to reality (for example, using Mean Squared Error or Cross-Entropy). <strong>Analogy:</strong> It is like your bank balance. If you lose money (high loss), you need to fix your spending habits. This serves as our primary &quot;scorecard&quot; for success, though we will soon see why this score can sometimes be deceptive.</p>
<h3 id="vanishing-gradient" tabindex="-1"><a class="heading-anchor" href="#vanishing-gradient" aria-label="Link to this section">#</a> Vanishing Gradient</h3>
<p>This happens when gradients become so small that they effectively disappear as they move through the layers of a network. <strong>Analogy:</strong> Imagine passing a whisper down a long line of people. By the time it reaches the end, no one knows what was said. This is critical because if the gradient vanishes, the earlier layers of your model stop learning entirely.</p>
<h3 id="exploding-gradient" tabindex="-1"><a class="heading-anchor" href="#exploding-gradient" aria-label="Link to this section">#</a> Exploding Gradient</h3>
<p>An exploding gradient occurs when the values grow infinitely large before they are clipped or cause errors. <strong>Analogy:</strong> It is like a snowball rolling down a hill that grows so big it crashes through the house at the bottom. This destroys the stability of the network and makes training impossible.</p>
<h3 id="silent-divergence" tabindex="-1"><a class="heading-anchor" href="#silent-divergence" aria-label="Link to this section">#</a> Silent Divergence</h3>
<p>This happens when the internal math breaks (gradients explode or vanish) but the reported loss number keeps dropping. <strong>Enough to fool you.</strong> <strong>Analogy:</strong> Imagine a car with a broken speedometer that shows zero miles per hour even while driving at eighty miles per hour. It is the ultimate &quot;false positive&quot; in machine learning.</p>
<h3 id="masked-instability" tabindex="-1"><a class="heading-anchor" href="#masked-instability" aria-label="Link to this section">#</a> Masked Instability</h3>
<p>This is the phenomenon where the loss curve hides dangerous behaviors happening inside the network's internal calculations. <strong>Analogy:</strong> It is like a magician pulling a rabbit out of a hat, but if you look closely at the sleight of hand tricks used to hide the mechanics. We must look beyond the surface to see what is actually happening.</p>
<h3 id="dead-relu" tabindex="-1"><a class="heading-anchor" href="#dead-relu" aria-label="Link to this section">#</a> Dead ReLU</h3>
<p>A Dead ReLU occurs when an activation function stops firing because its input has become too negative. <strong>Analogy:</strong> It is like a light switch that gets stuck in the &quot;off&quot; position and refuses to turn on no matter how hard you pull. This effectively &quot;kills&quot; parts of your network, leaving them useless.</p>
<h3 id="numerical-precision" tabindex="-1"><a class="heading-anchor" href="#numerical-precision" aria-label="Link to this section">#</a> Numerical Precision</h3>
<p>This refers to the ability of a computer's calculator to handle very small or very large numbers accurately. <strong>Analogy:</strong> It is like using inches instead of millimeters when building a model airplane. If the precision is too low, the tiny errors accumulate until the math drifts apart completely.</p>
<h3 id="optimizer" tabindex="-1"><a class="heading-anchor" href="#optimizer" aria-label="Link to this section">#</a> Optimizer</h3>
<p>The optimizer is the algorithm that decides how to update the weights based on the gradients (like SGD or Adam). <strong>Analogy:</strong> It is like a coach who tells a team which moves to make after seeing their mistakes. However, if the coach doesn't understand the rules of the game, they will give bad advice.</p>
<h3 id="batch-norm-collapse" tabindex="-1"><a class="heading-anchor" href="#batch-norm-collapse" aria-label="Link to this section">#</a> Batch Norm Collapse</h3>
<p>This happens when normalization layers stop working because the underlying statistics have become unstable. <strong>Analogy:</strong> Imagine trying to measure your height with a ruler that keeps stretching and shrinking randomly every time you take it out of its case. This causes the model to lose its internal &quot;anchor&quot; for what is considered normal data.</p>
<p>Now that we know these words, how do they behave together when something goes wrong? We will see this soon.</p>
<h2 id="the-two-signals-of-health-and-sickness" tabindex="-1"><a class="heading-anchor" href="#the-two-signals-of-health-and-sickness" aria-label="Link to this section">#</a> The two signals of health and sickness</h2>
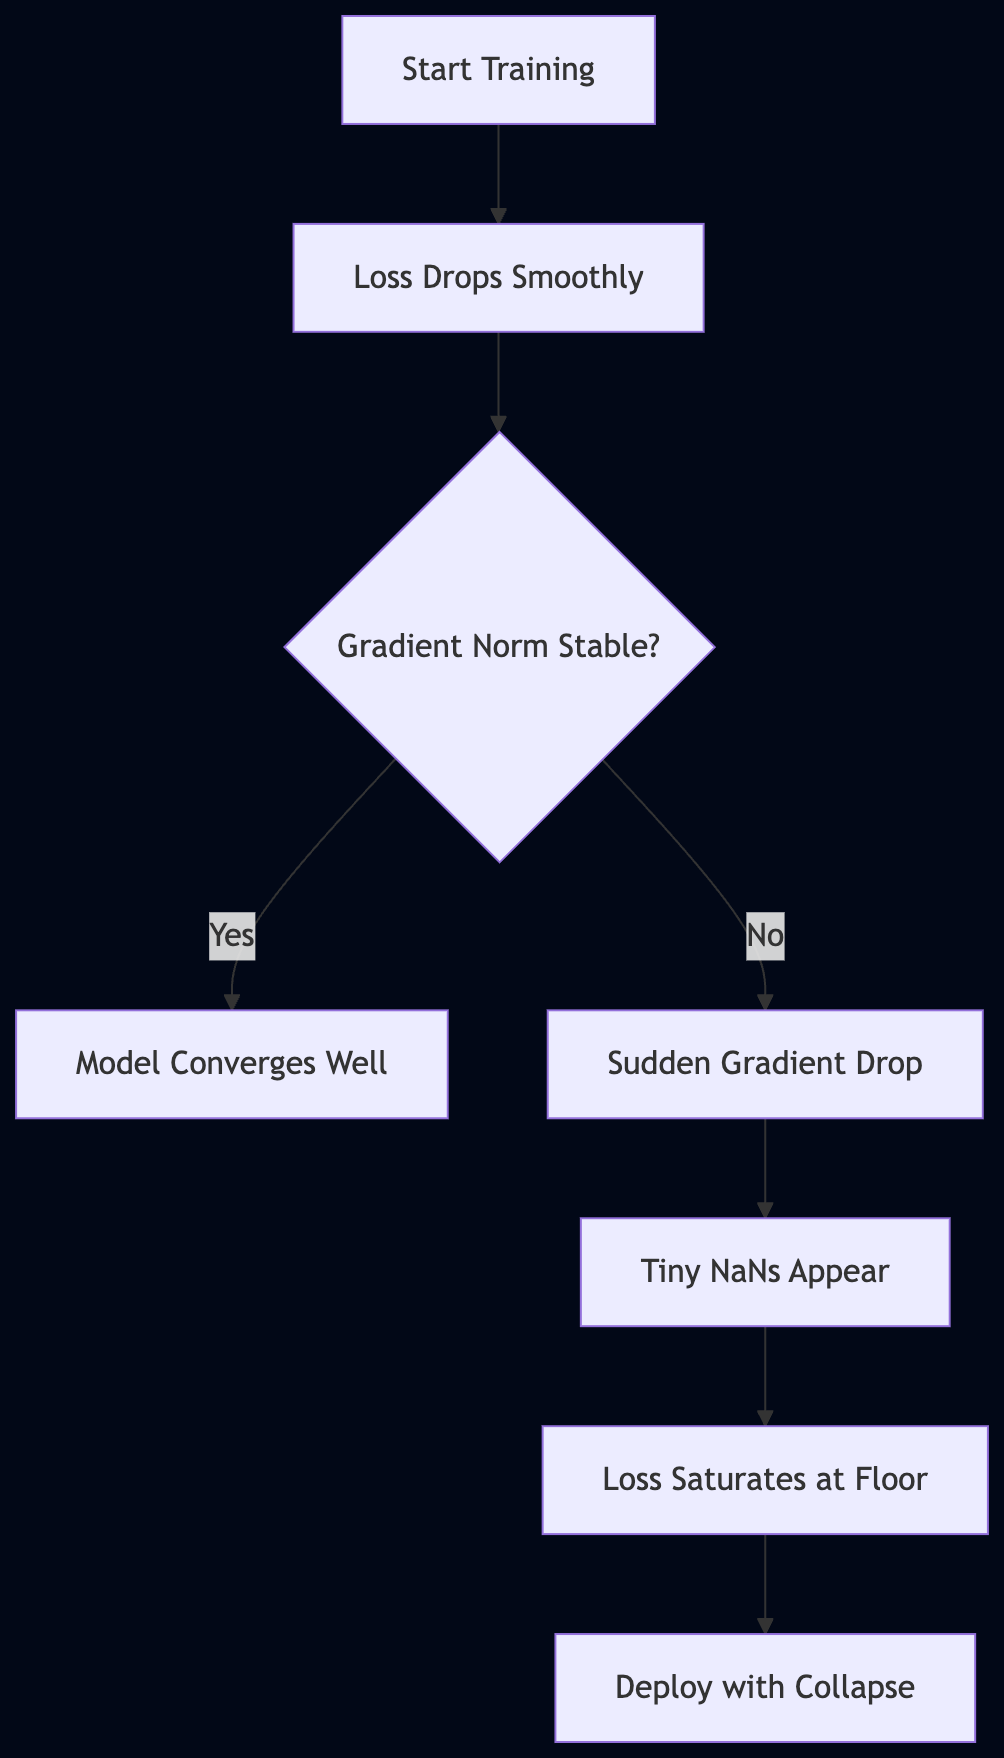
<p><figure class="post-figure"><img src="https://adityaseth.in/images/blog/debugging-silent-model-divergence-with-gradient-monitoring/img-03.png" alt="mermaid-diagram-2026-07-30-155644" width="1004" height="1758" loading="lazy" decoding="async"></figure></p>
<p><em>Monitor gradient norms alongside loss to detect silent model collapse before deployment</em></p>
<p>Imagine trying to drive a car while only looking at your speedometer. You might think you are fine, but what if your engine is screaming?</p>
<p>In machine learning, the &quot;speedometer&quot; is your loss curve. It tells you how far off your predictions are from the truth in supervised training tasks where we measure error between predicted and actual values. The &quot;engine noise&quot; is the gradient norm. To understand why a model might look like it is succeeding while actually failing, we have to look at both signals simultaneously.</p>
<p>First, let's define our tools.</p>
<p>The Gradient Norm is the magnitude of the gradient vector. (Think of this as the size of the nudge the math gives the weights during an update). It ignores the direction and focuses solely on how much &quot;force&quot; is being applied to the model parameters in a single step.</p>
<p>When training goes well, these two signals dance in harmony. Your loss curve should descend steadily because the optimizer is finding a path toward a minimum. Meanwhile, your gradient norms should fluctuate within a consistent range. They might bounce around as the data changes, but they shouldn't suddenly spike to infinity or drop to zero.</p>
<p>Is it stable? Yes. This stability means the &quot;force&quot; being applied to the weights is sufficient to make progress without being so violent that it destroys the learned features. You can verify this by plotting both metrics on a shared timeline in tools like Weights &amp; Biases or TensorBoard. If the loss goes down and the gradient norm stays in a predictable, non-zero band, your model is likely healthy.</p>
<p>However, the danger lies in the &quot;silent&quot; failures where these two signals decouple.</p>
<p>Consider a scenario where the loss is decreasing, but the gradient norm is becoming extremely small (for example, values like \(10^{-7}\) or lower). This indicates that while the loss is dropping, the model has entered a &quot;flat&quot; region of the mathematical landscape. It is moving so slowly that it is essentially crawling. Even if the loss looks good today, the model has lost its ability to learn from new information because the signal is too faint for the optimizer to act upon effectively.</p>
<p>Now consider the opposite: the loss drops rapidly while the gradient norm explodes (for example, jumping by orders of magnitude). This is a warning sign of instability. The model might be &quot;falling&quot; into a narrow, sharp canyon in the loss landscape. It looks like it's succeeding because the loss number is getting smaller, but it is actually just tumbling into a mathematical trap that won't generalize to real-world data.</p>
<p>We need to know how to spot these specific contradictions before they become permanent failures.</p>
<p>We will now map out exactly how these two signals interact during normal training versus failure states.</p>
<h2 id="the-hidden-trap-of-decreasing-loss" tabindex="-1"><a class="heading-anchor" href="#the-hidden-trap-of-decreasing-loss" aria-label="Link to this section">#</a> The hidden trap of decreasing loss</h2>
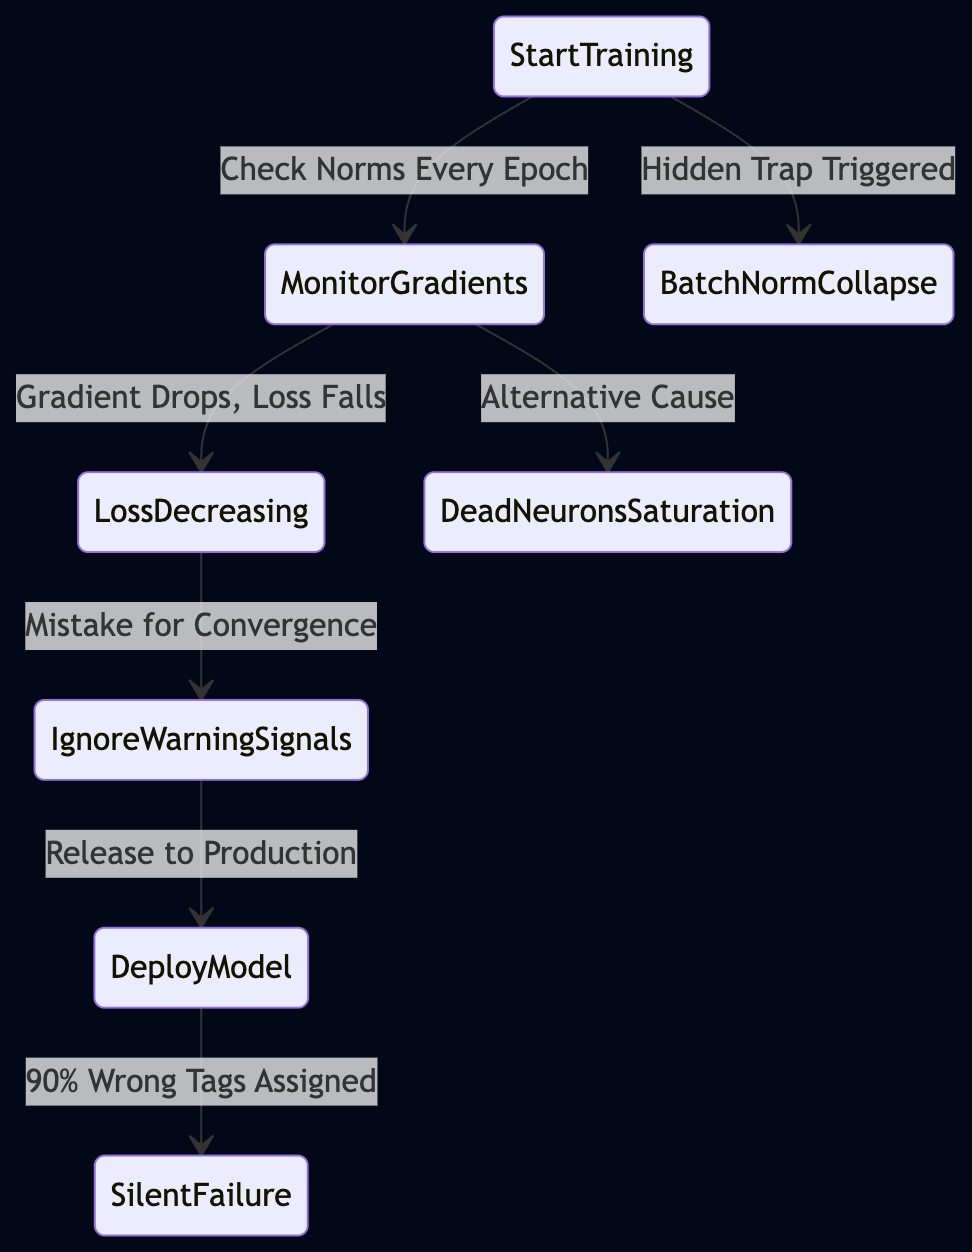
<p><figure class="post-figure"><img src="https://adityaseth.in/images/blog/debugging-silent-model-divergence-with-gradient-monitoring/img-04.jpg" alt="a person walking up a steep hill next to the ocean" width="1080" height="1620" loading="lazy" decoding="async"></figure> <figure class="post-figure"><img src="https://adityaseth.in/images/blog/debugging-silent-model-divergence-with-gradient-monitoring/img-05.png" alt="" width="972" height="1252" loading="lazy" decoding="async"></figure></p>
<p><em>Monitoring gradient norms alongside loss reveals hidden collapse before silent deployment failure occurs.</em></p>
<p>This is the most confusing part for beginners. Usually, if gradients are huge and loss drops, we think it's good training.</p>
<p>But here is the truth: a falling loss line can be a mask for a dying system. (It is like watching someone walk toward a cliff while they smile.) You see the numbers go down, so you assume the model &quot;understands&quot; the data better. However, sometimes the math is just taking a shortcut into a dead end.</p>
<p>Let's look at why this happens.</p>
<p>In many cases, high gradient norms paired with a falling loss indicate a failure in normalization or activation stability. Take Batch Normalization (BatchNorm) as an example. If your batch size (the number of examples per update) is too small or your learning rate (the step size for updates) is poorly tuned, the internal statistics of the layers can become unstable. The model might start &quot;collushing&quot; into a state where it learns to minimize loss by essentially giving up on variety.</p>
<p>Is that actually learning? No. It is narrowing its output space until it only predicts one thing very well.</p>
<p>Think about the &quot;Dead ReLU&quot; problem. If your weights explode in magnitude, your activation functions (like ReLU) might get pushed into a flat region where they stay stuck at zero or some constant value. If this happens across many neurons, the model loses its ability to represent complex features. It becomes a simplified, broken version of itself.</p>
<p>The loss still drops because predicting a &quot;safe&quot; average is easier than learning complex nuances. The gradient norms remain high because the weights are being pushed into extreme values by the optimizer's attempts to find a path through the noise.</p>
<p>You can verify this yourself using a tool like Weights &amp; Biases or TensorBoard. Track two specific metrics simultaneously: <code>gradient_norm</code> and your <code>training_loss</code>. To do this, you need to add logging calls inside the backward pass loop where these variables are calculated in your training script (e.g., after <code>loss.backward()</code> but before the optimizer step).</p>
<p>If you see a &quot;sawtooth&quot; pattern in gradients that spikes significantly while loss stays flat or drops slowly, the model is likely struggling with numerical instability. If the gradient norm suddenly spikes and then stays high while the loss drops precipitously, check your activation distributions. You can use a histogram of your layer outputs to see if they are &quot;piling up&quot; at zero.</p>
<p>To catch this, you must look for the gap between the two signals.</p>
<p>A healthy model shows gradients that gradually decrease or stabilize as it finds a local minimum. A broken model hides behind a falling loss curve while its internal math is exploding in magnitude. The loss tells you if the goal is being met. The gradient norm tells you if the path taken to get there was mathematically sound.</p>
<p>But what happens when that combination actually signals a breakdown in numerical precision?</p>
<h2 id="the-quiet-killer-of-learning" tabindex="-1"><a class="heading-anchor" href="#the-quiet-killer-of-learning" aria-label="Link to this section">#</a> The quiet killer of learning</h2>
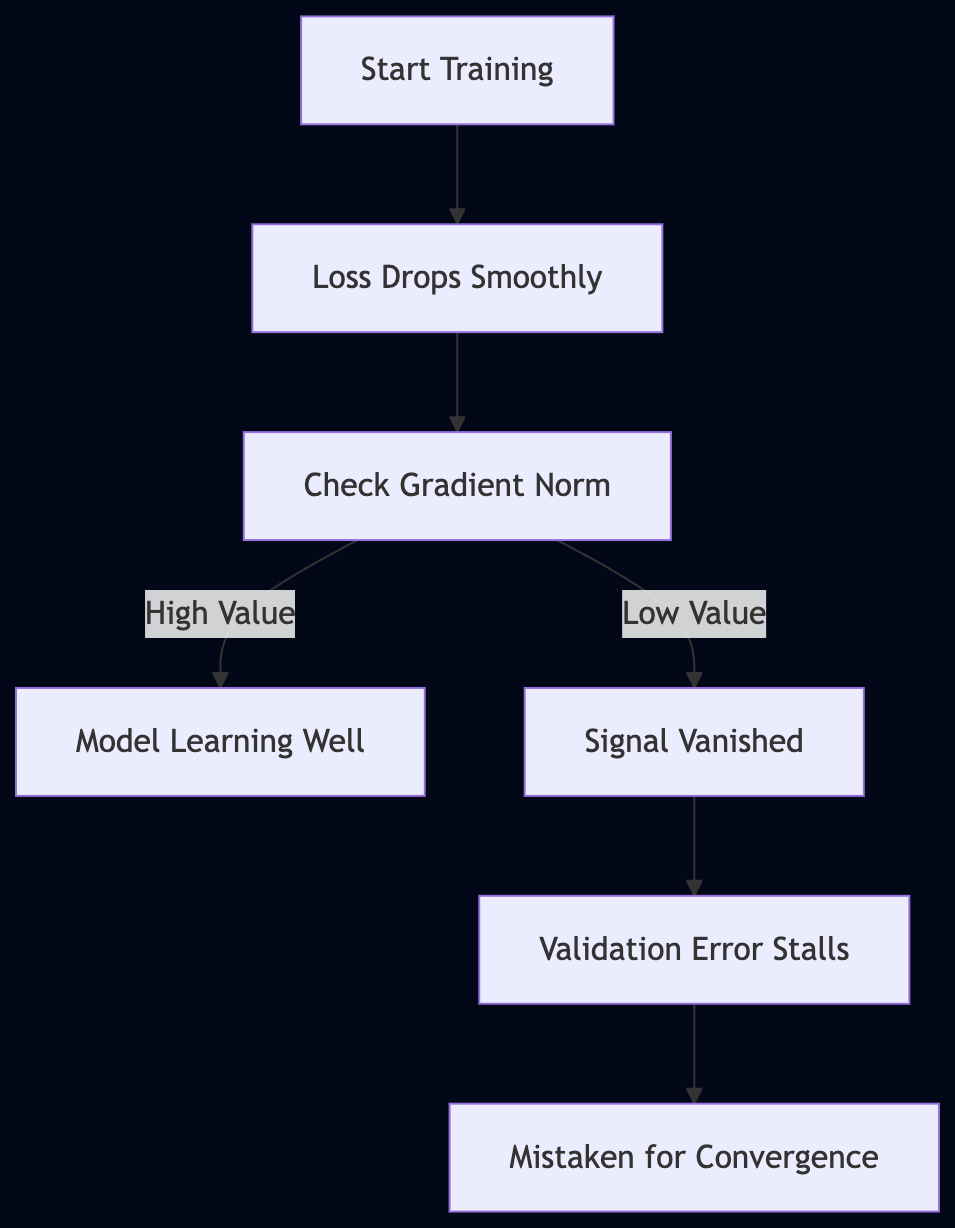
<p><figure class="post-figure"><img src="https://adityaseth.in/images/blog/debugging-silent-model-divergence-with-gradient-monitoring/img-06.png" alt="" width="955" height="1228" loading="lazy" decoding="async"></figure></p>
<p><em>Monitor gradient norms alongside loss to detect silent collapse before deployment.</em></p>
<p>Sometimes the problem is not too much activity, but a complete lack of it. This sounds like success because loss stops changing significantly. Is it working? No. It is dying.</p>
<p>When your gradient norms drop toward zero while your loss curve stays flat or decreases slightly, you are witnessing a vanishing gradient. Imagine trying to teach someone to play the piano by only giving them instructions for the very last note of a song. They will never learn the first note because the signal from the teacher never reaches their hands. In a deep neural network, this happens when the mathematical signal used to update weights becomes so microscopically small that the computer effectively rounds it to zero. The model is no longer learning from the data. It is just coasting on its initial random weight configuration.</p>
<p>Why does this happen? (It usually comes down to the chain rule of calculus). During backpropagation, the gradient for an early layer is calculated by multiplying the gradients of all subsequent layers. If those layers use activation functions like <code>tanh</code> or <code>sigmoid</code>, they can &quot;squash&quot; values into a very small range. Multiplying several small numbers together causes the signal to decay exponentially as it travels backward from the output toward the input.</p>
<p>You can verify this yourself using a simple tool like TensorBoard or Weights &amp; Biases. Track the gradient norm for each layer individually rather than just looking at the global average. If you see the norms for your first three layers sitting at \(10^{-7}\) while your final layers are at \(10^{-2}\), your &quot;signal&quot; has vanished before it could reach the start of the network. The model is functionally lobotomized in its deeper layers.</p>
<p>This creates a very specific and dangerous illusion: &quot;The Stable Plateau.&quot; Because the loss isn't exploding (like it does in a gradient explosion), you might think the model is converging beautifully. It looks like a smooth, stable line on your dashboard. But look closer at the validation metrics. If your training loss stays steady while your validation accuracy remains flat or starts to oscillate wildly, the model has stopped adapting to the nuances of the data. It has entered a &quot;dead zone.&quot;</p>
<p>There is also a structural failure mode here called &quot;Saturation.&quot; This happens when the weights grow so large that the activation functions (like <code>tanh</code>) push the neurons into their flat regions. In these regions, the derivative is nearly zero. The math says: &quot;If you move your weight by a tiny amount, the output doesn't change at all.&quot; The optimizer tries to move the weight, but the gradient tells it there is no reason to move.</p>
<p>How can you tell if this is happening? Check the distribution of your activations. If your neurons are mostly outputting values near -1 or 1 for a <code>tanh</code> layer, they have &quot;saturated.&quot; They are stuck in a corner where the math stops providing directions. It is like trying to find your way out of a room by following a map that only shows one single wall. You can't move forward because there is no gradient information telling you which way is &quot;better.&quot;</p>
<p>To prove this is happening, you can perform a &quot;gradient check&quot; on a small subset of weights. If the ratio between the change in loss and the change in weight becomes effectively zero over several epochs, your model has stopped learning. It isn't converging; it is paralyzed.</p>
<p>This leads to a very frustrating experience for the developer. You spend three days tweaking hyperparameters, and the loss curve looks &quot;stable&quot; every time. You think you are getting closer to perfection. In reality, you are just watching a model that has given up on trying to move. It is staying still because it can no longer &quot;hear&quot; the signal from the loss function.</p>
<p>How do we distinguish between 'converged' and 'stuck'? We build our decision tree now to answer this question.</p>
<h2 id="the-case-of-the-silent-crash" tabindex="-1"><a class="heading-anchor" href="#the-case-of-the-silent-crash" aria-label="Link to this section">#</a> The case of the silent crash</h2>
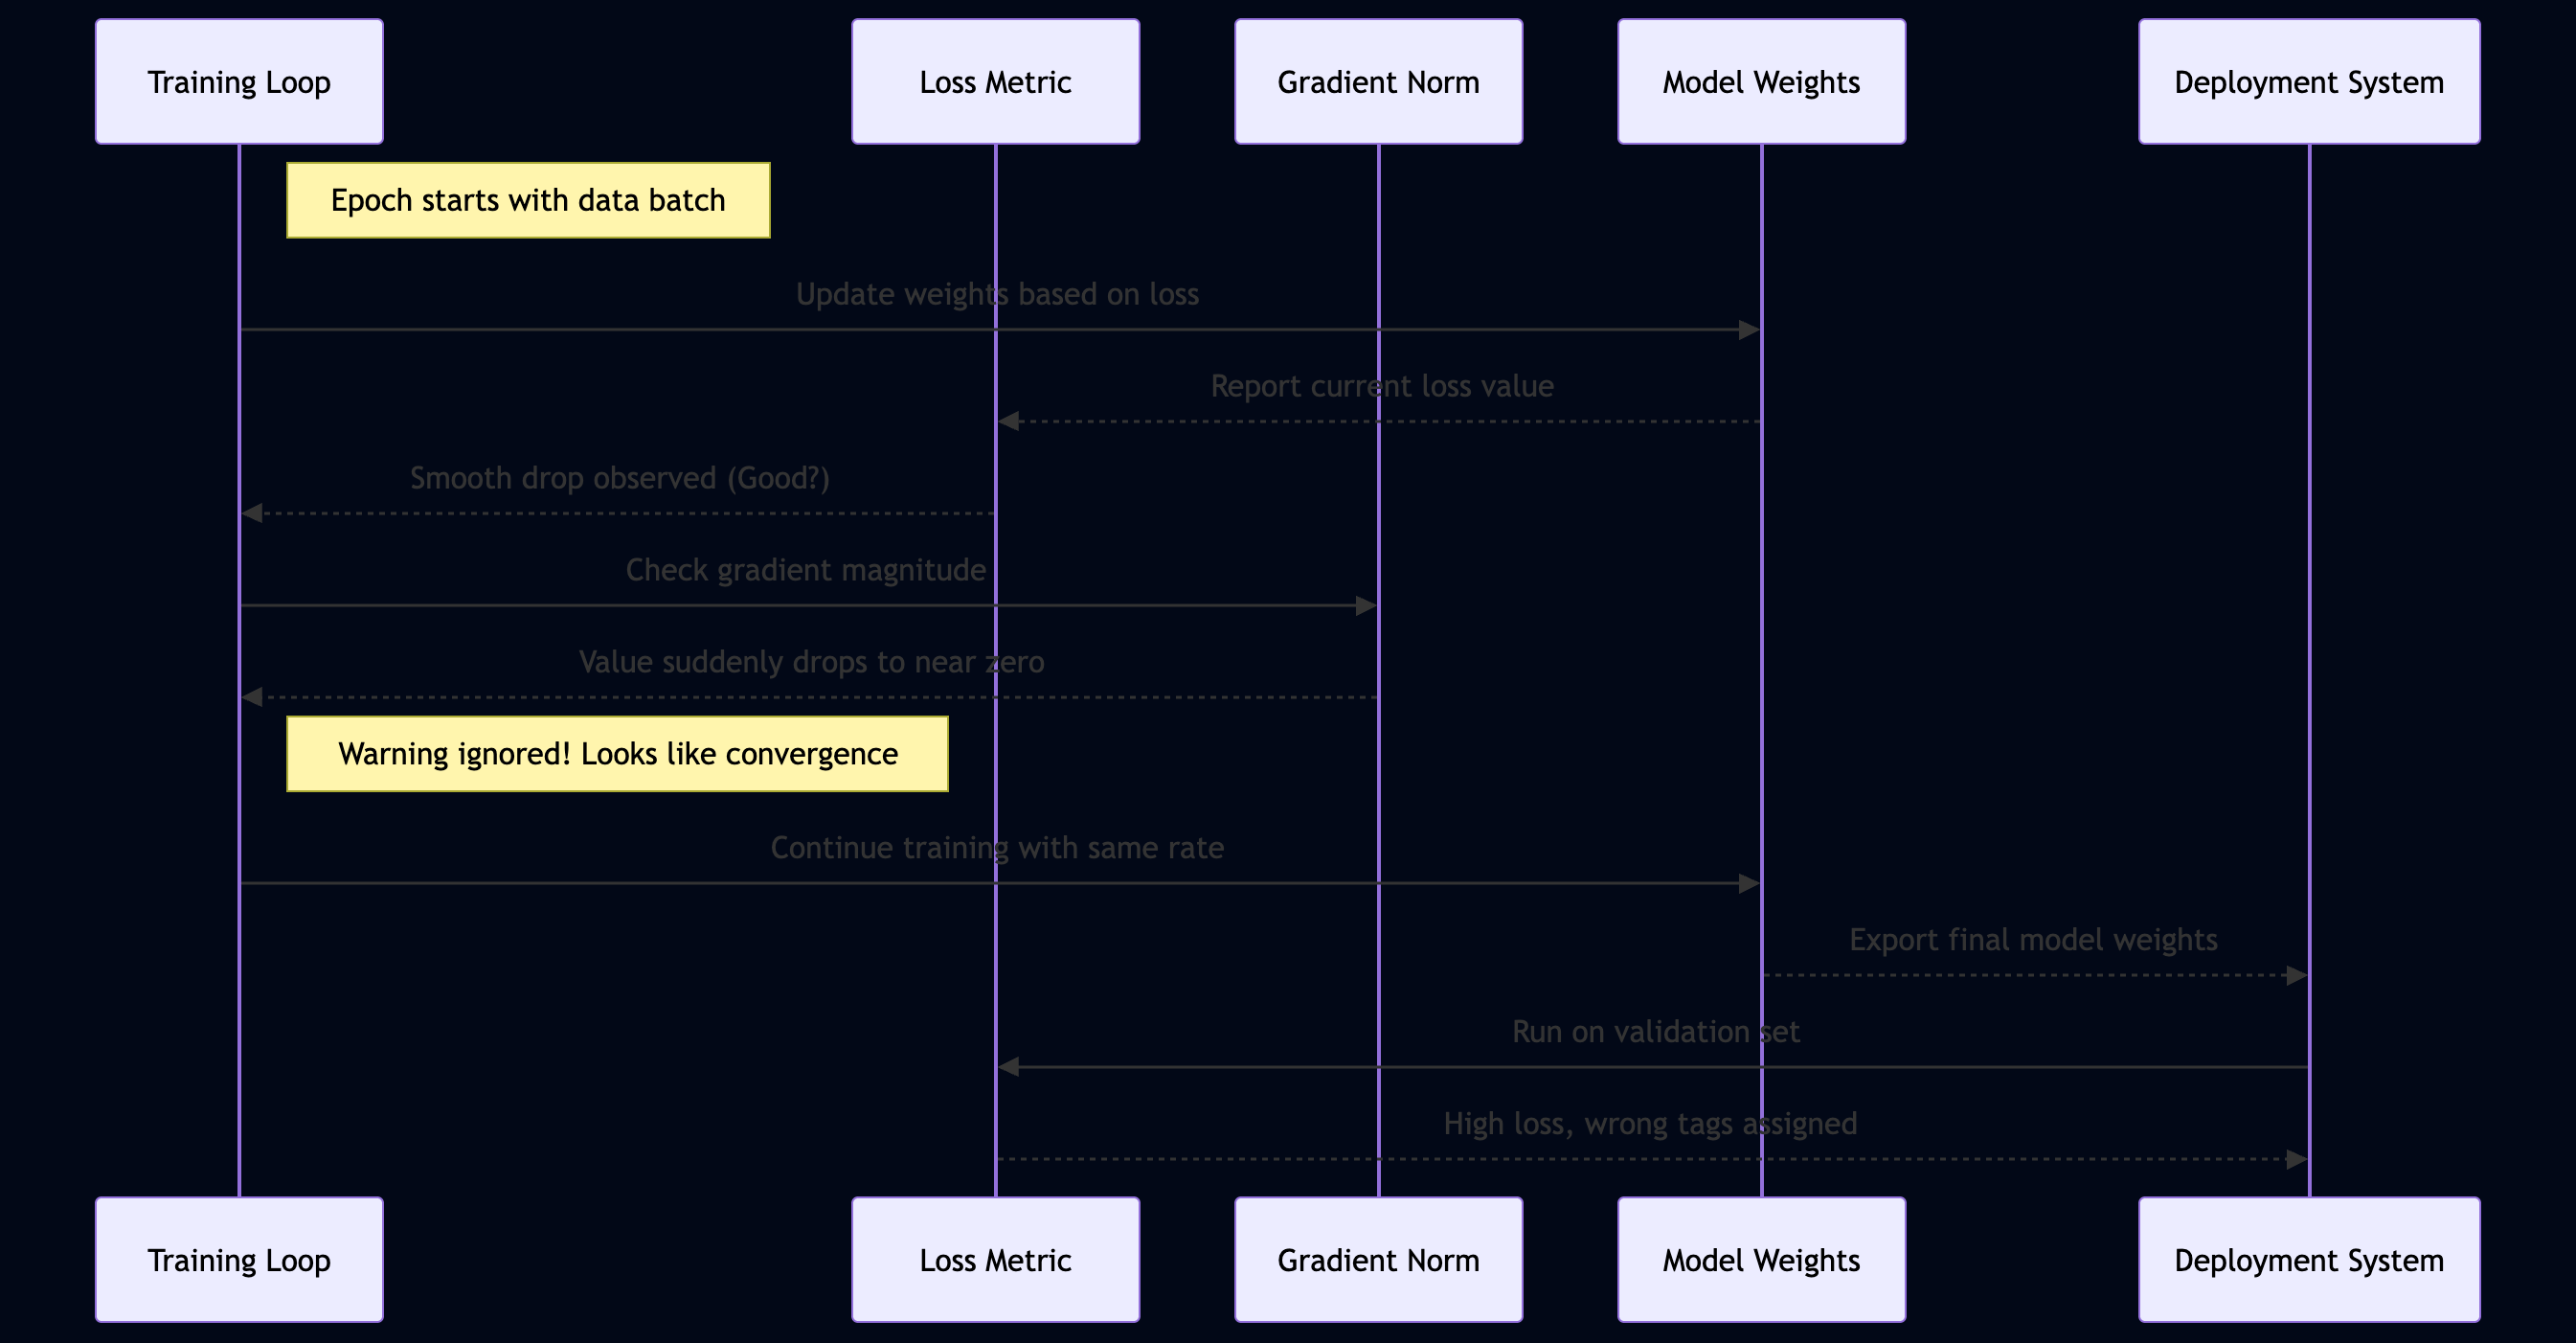
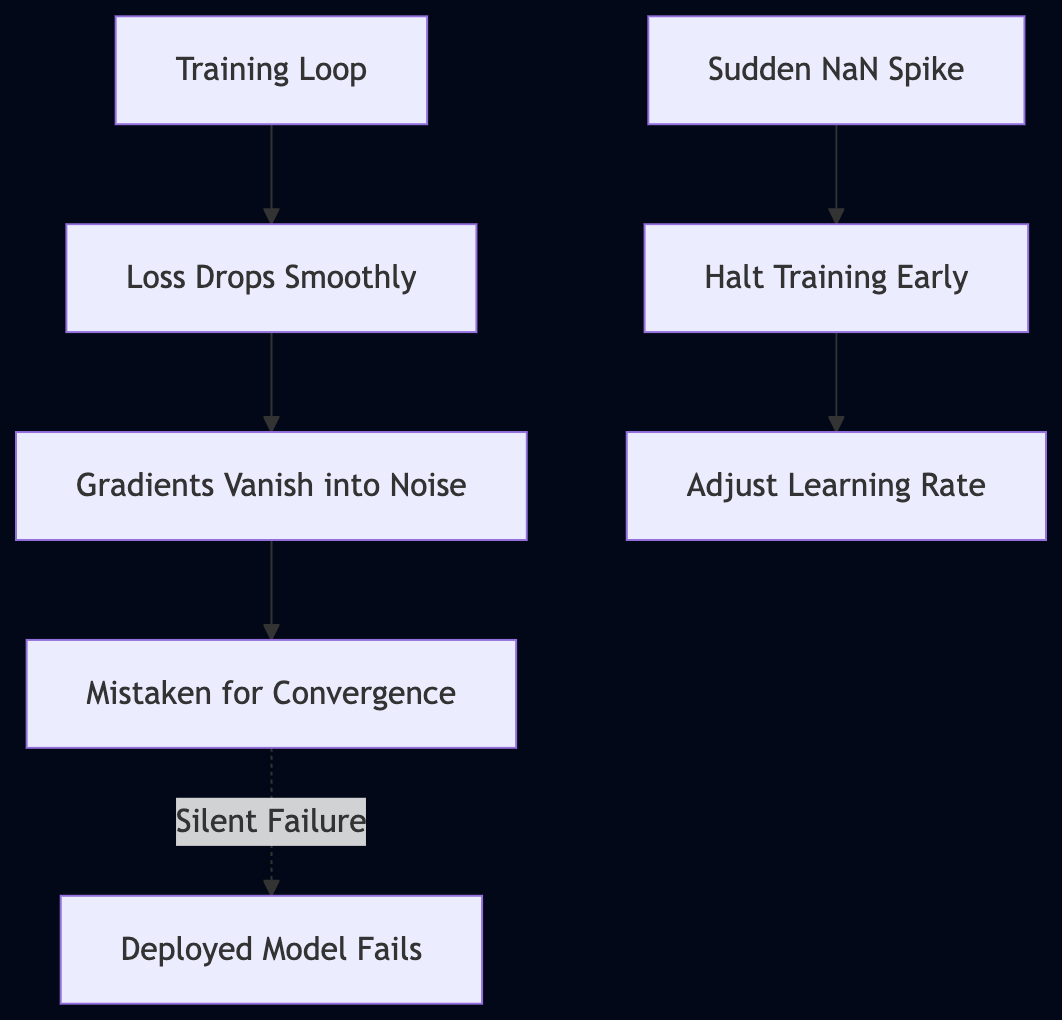
<p><figure class="post-figure"><img src="https://adityaseth.in/images/blog/debugging-silent-model-divergence-with-gradient-monitoring/img-08.png" alt="" width="2690" height="1402" loading="lazy" decoding="async"></figure></p>
<p><em>Monitoring both loss and gradient norms reveals silent collapse before deployment.</em></p>
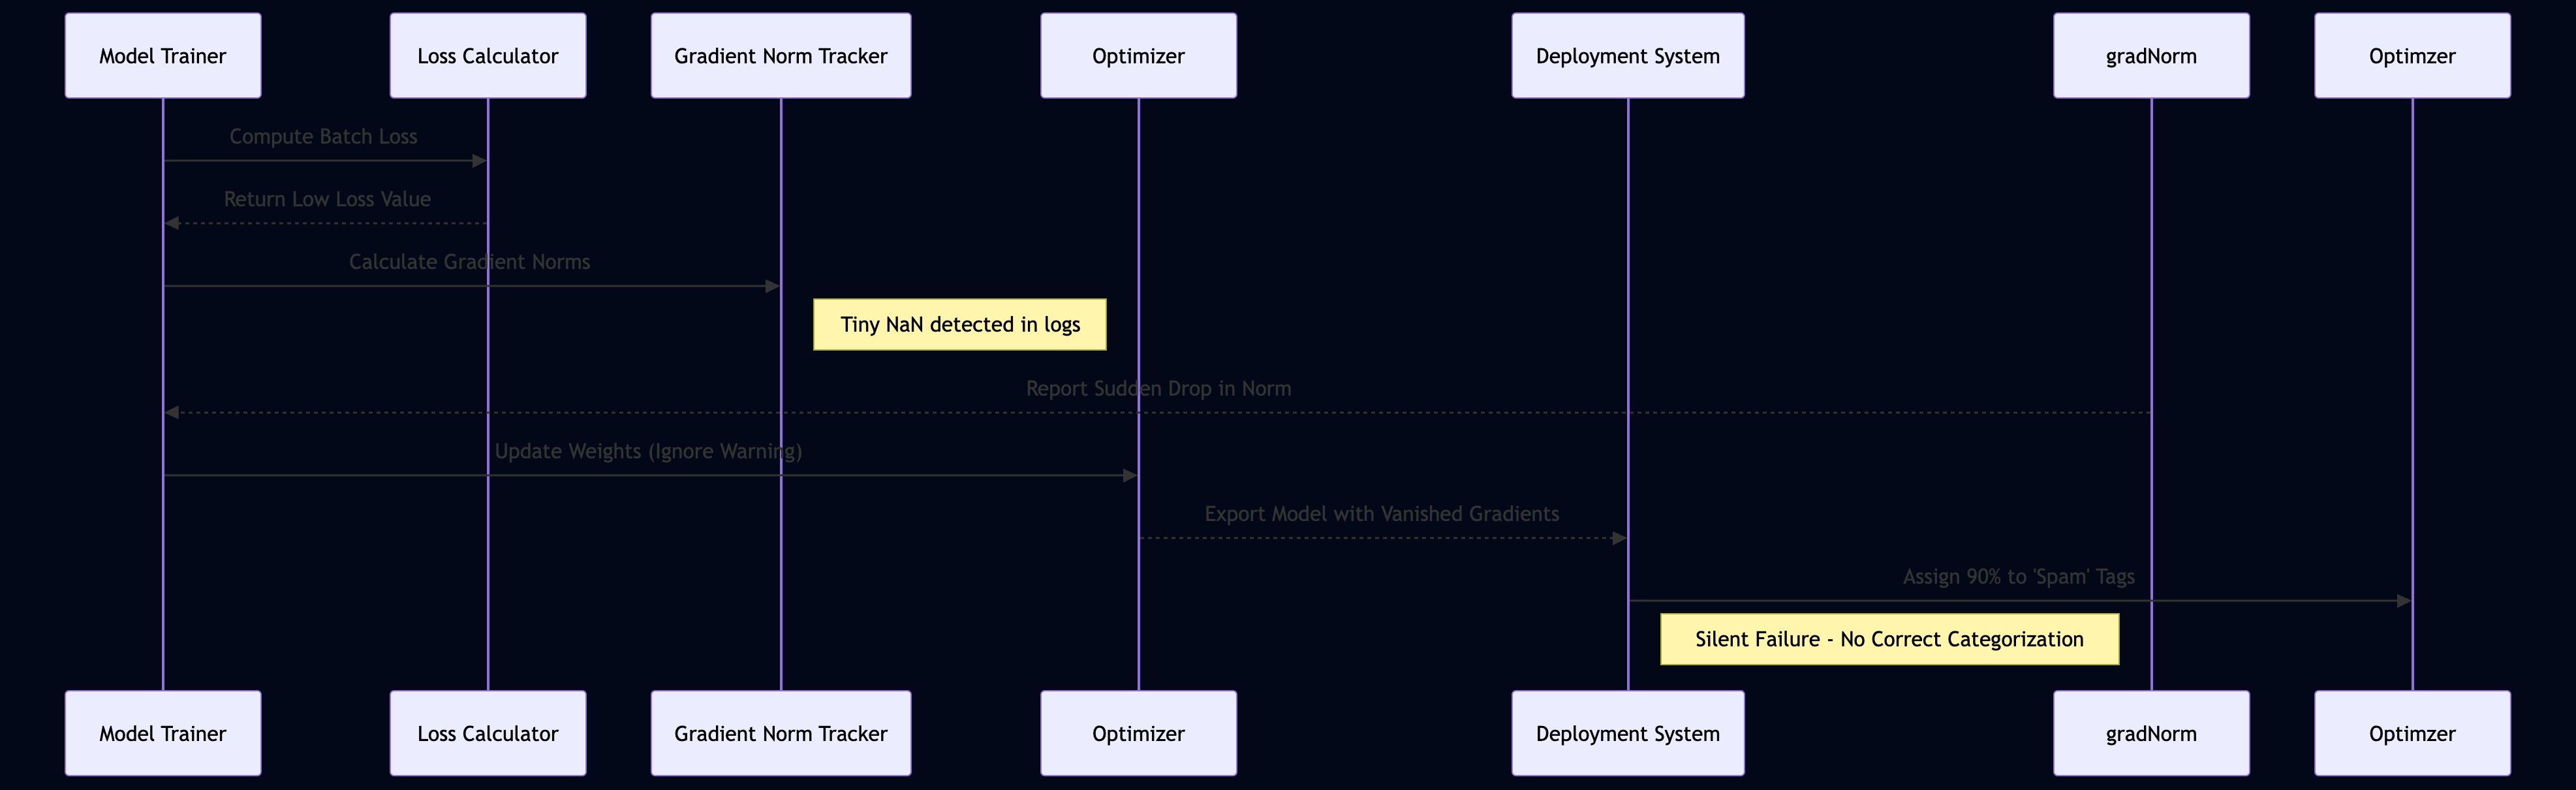
<p>Let's meet a team that thought they had solved their problem only to find out later it was an illusion. They were a small but mighty squad at a mid-sized startup, working late nights to build a specialized NLP classifier for customer support tickets. Their goal was ambitious yet practical: create a system that could automatically sort hundreds of incoming complaints into the correct departments. It was supposed to be their &quot;hero&quot; feature.</p>
<p>The team was moving fast. They had to. In the startup world, speed is often the only currency that matters (and they were spending it all at once). During the final sprint toward deployment, the engineers pulled up the training logs for their model. They watched the loss curve and saw something beautiful. The line dropped steadily. It was a smooth, graceful slide downward with no spikes or erratic jumps.</p>
<p>The manager beamed. &quot;Look at that graph,&quot; they said. &quot;It is textbook perfection.&quot;</p>
<p>They believed the math had spoken. Because the loss curve looked so stable, they assumed the model had mastered the nuances of human language. They ignored the tiny warnings in the background noise. There were occasional, almost invisible NaNs in the logs (hardly a thing to notice during a high-pressure sprint). Then there was the gradient norm. It began to flatten out and drop toward zero just as the loss hit its low floor.</p>
<p>But they didn't see it. They didn't check it. They assumed that if the loss was falling, the model must be learning.</p>
<p>The reality hit them like a ton of bricks on launch day. The model went live, but instead of routing tickets to &quot;Billing&quot; or &quot;Technical Support,&quot; it dumped 90% of the valid complaints into &quot;Spam&quot; or &quot;General.&quot; It was failing silently. Because the loss curve looked so &quot;perfect,&quot; they didn't realize the model had stopped actually learning and had simply collapsed into a state where it gave the same safe, incorrect answer every time.</p>
<p>The cost was not just in engineering hours. Every single ticket now required a human being to manually read and re-categorize them because the AI couldn't distinguish between a frustrated customer and a bot. They were burning through their operational budget just to do what the machine was supposed to be doing for them.</p>
<p>They were trapped by the &quot;perfect&quot; loss curve. It was a mirage of success that masked a total failure of optimization.</p>
<p>Watch how we apply our new vocabulary and decision tree to this specific situation step by step.</p>
<h2 id="walking-through-the-diagnosis-code" tabindex="-1"><a class="heading-anchor" href="#walking-through-the-diagnosis-code" aria-label="Link to this section">#</a> Walking through the diagnosis code</h2>
<p><figure class="post-figure"><img src="https://adityaseth.in/images/blog/debugging-silent-model-divergence-with-gradient-monitoring/img-09.png" alt="" width="3947" height="1210" loading="lazy" decoding="async"></figure></p>
<p><em>Monitoring both loss and gradient norms prevents silent model collapse during deployment.</em></p>
<p>It is time to put theory into practice. We will write a script that catches these silent failures before they happen.</p>
<p>The team at the startup faced a classic &quot;ghost in the machine&quot; problem. On paper, their loss curve looked like a masterpiece of engineering. In reality, the model was falling asleep on the job. Let's walk through exactly how they caught it and fixed it using gradient monitoring.</p>
<h3 id="1-the-initial-symptom" tabindex="-1"><a class="heading-anchor" href="#1-the-initial-symptom" aria-label="Link to this section">#</a> 1. The Initial Symptom</h3>
<p>The first red flag wasn't actually in the evaluation metrics. It appeared in the raw training logs during the final push before deployment. While the loss curve was dropping smoothly, the team noticed a strange inconsistency. Occasionally, &quot;NaN&quot; (Not a Number) values would flicker into the logs for a split second and then vanish.</p>
<p>They also noticed that while the loss was decreasing, the magnitude of the weight updates seemed to hit a ceiling. It looked like the model had stopped &quot;trying.&quot; In their dashboard, they saw:</p>
<ul>
<li>
<p>Loss: 0.45 (Steady decline)</p>
</li>
<li>
<p>Gradient Norms: <code>1.2e-7</code> (Extremely low)</p>
</li>
</ul>
<p>The fact that the loss was going down made them think the model was simply converging to a very stable solution. They didn't realize the gradients had essentially vanished into the background noise of the floating-point math.</p>
<h3 id="2-the-investigation" tabindex="-1"><a class="heading-anchor" href="#2-the-investigation" aria-label="Link to this section">#</a> 2. The Investigation</h3>
<p>To find out what was actually happening, they performed three specific checks:</p>
<ul>
<li>
<p><strong>Check A: Data Integrity.</strong> They checked if the &quot;spam&quot; labels were leaking into the training set. This ruled out a simple labeling error; the model was technically &quot;learning&quot; that most things were spam because it was easier to do so mathematically.</p>
</li>
<li>
<p><strong>Check B: Learning Rate Schedule.</strong> They verified if the learning rate was dropping too fast, causing the model to get stuck in a local minimum. This confirmed that while the LR was stable, the <em>gradient</em> signal was not.</p>
</li>
<li>
<p><strong>Check C: Gradient Distribution.</strong> By plotting the gradient norms for every layer, they saw the &quot;cliff.&quot; The first three layers had healthy gradients (around 10.0 to 50.0), but the final embedding and classification layers had gradients near zero. This proved that the information was being lost in the &quot;middle&quot; of the network.</p>
</li>
</ul>
<h3 id="3-the-fix" tabindex="-1"><a class="heading-anchor" href="#3-the-fix" aria-label="Link to this section">#</a> 3. The Fix</h3>
<p>They realized they needed a way to see these invisible numbers during training. They implemented a hook to track the gradient norm for every layer. If the norm dropped below a certain threshold (a &quot;dead zone&quot;), it would trigger a warning.</p>
<p>Here is the logic they used to implement this check in PyTorch:</p>
<div class="code-block" data-lang="python"><button class="code-copy" type="button" aria-label="Copy code to clipboard"><span class="code-copy__idle">Copy</span><span class="code-copy__done">Copied</span></button><pre class="shiki github-dark-default" style="background-color:#0d1117;color:#e6edf3" tabindex="0"><code><span class="line"><span style="color:#FF7B72">import</span><span style="color:#E6EDF3"> torch</span></span>
<span class="line"><span style="color:#FF7B72">import</span><span style="color:#E6EDF3"> torch.nn </span><span style="color:#FF7B72">as</span><span style="color:#E6EDF3"> nn</span></span>
<span class="line"></span>
<span class="line"><span style="color:#8B949E"># This function calculates and prints the gradient norm for each layer</span></span>
<span class="line"><span style="color:#FF7B72">def</span><span style="color:#D2A8FF"> log_gradient_norms</span><span style="color:#E6EDF3">(model, name</span><span style="color:#FF7B72">=</span><span style="color:#A5D6FF">"Model"</span><span style="color:#E6EDF3">):</span></span>
<span class="line"><span style="color:#E6EDF3">    total_norm </span><span style="color:#FF7B72">=</span><span style="color:#79C0FF"> 0.0</span></span>
<span class="line"><span style="color:#FF7B72">    for</span><span style="color:#E6EDF3"> name, param </span><span style="color:#FF7B72">in</span><span style="color:#E6EDF3"> model.named_parameters():</span></span>
<span class="line"><span style="color:#FF7B72">        if</span><span style="color:#E6EDF3"> param.grad </span><span style="color:#FF7B72">is</span><span style="color:#FF7B72"> not</span><span style="color:#79C0FF"> None</span><span style="color:#E6EDF3">:</span></span>
<span class="line"><span style="color:#E6EDF3">            param_norm </span><span style="color:#FF7B72">=</span><span style="color:#E6EDF3"> param.grad.data.norm(</span><span style="color:#79C0FF">2</span><span style="color:#E6EDF3">)</span></span>
<span class="line"><span style="color:#E6EDF3">            total_norm </span><span style="color:#FF7B72">+=</span><span style="color:#E6EDF3"> param_norm </span><span style="color:#FF7B72">**</span><span style="color:#79C0FF"> 2</span></span>
<span class="line"><span style="color:#FF7B72">        else</span><span style="color:#E6EDF3">:</span></span>
<span class="line"><span style="color:#79C0FF">            print</span><span style="color:#E6EDF3">(</span><span style="color:#FF7B72">f</span><span style="color:#A5D6FF">"Warning: No gradient for </span><span style="color:#FF7B72">{</span><span style="color:#E6EDF3">name</span><span style="color:#FF7B72">}</span><span style="color:#A5D6FF">"</span><span style="color:#E6EDF3">)</span></span>
<span class="line"><span style="color:#E6EDF3">    </span></span>
<span class="line"><span style="color:#E6EDF3">    total_norm </span><span style="color:#FF7B72">=</span><span style="color:#E6EDF3"> total_norm </span><span style="color:#FF7B72">**</span><span style="color:#79C0FF"> 0.5</span></span>
<span class="line"><span style="color:#79C0FF">    print</span><span style="color:#E6EDF3">(</span><span style="color:#FF7B72">f</span><span style="color:#A5D6FF">"Layer Norms (</span><span style="color:#FF7B72">{</span><span style="color:#E6EDF3">name</span><span style="color:#FF7B72">}</span><span style="color:#A5D6FF">): </span><span style="color:#FF7B72">{</span><span style="color:#E6EDF3">total_norm</span><span style="color:#FF7B72">:.6f}</span><span style="color:#A5D6FF">"</span><span style="color:#E6EDF3">)</span></span>
<span class="line"><span style="color:#FF7B72">    return</span><span style="color:#E6EDF3"> total_norm</span></span>
<span class="line"></span>
<span class="line"><span style="color:#8B949E"># Example of a simple model where we track the "health" of the gradients</span></span>
<span class="line"><span style="color:#FF7B72">class</span><span style="color:#FFA657"> SimpleClassifier</span><span style="color:#E6EDF3">(</span><span style="color:#79C0FF">nn</span><span style="color:#E6EDF3">.</span><span style="color:#79C0FF">Module</span><span style="color:#E6EDF3">):</span></span>
<span class="line"><span style="color:#FF7B72">    def</span><span style="color:#79C0FF"> __init__</span><span style="color:#E6EDF3">(self):</span></span>
<span class="line"><span style="color:#79C0FF">        super</span><span style="color:#E6EDF3">().</span><span style="color:#79C0FF">__init__</span><span style="color:#E6EDF3">()</span></span>
<span class="line"><span style="color:#79C0FF">        self</span><span style="color:#E6EDF3">.layer1 </span><span style="color:#FF7B72">=</span><span style="color:#E6EDF3"> nn.Linear(</span><span style="color:#79C0FF">10</span><span style="color:#E6EDF3">, </span><span style="color:#79C0FF">20</span><span style="color:#E6EDF3">)</span></span>
<span class="line"><span style="color:#79C0FF">        self</span><span style="color:#E6EDF3">.layer2 </span><span style="color:#FF7B72">=</span><span style="color:#E6EDF3"> nn.Linear(</span><span style="color:#79C0FF">20</span><span style="color:#E6EDF3">, </span><span style="color:#79C0FF">5</span><span style="color:#E6EDF3">)</span></span>
<span class="line"></span>
<span class="line"><span style="color:#FF7B72">    def</span><span style="color:#D2A8FF"> forward</span><span style="color:#E6EDF3">(self, x):</span></span>
<span class="line"><span style="color:#E6EDF3">        x </span><span style="color:#FF7B72">=</span><span style="color:#E6EDF3"> torch.relu(</span><span style="color:#79C0FF">self</span><span style="color:#E6EDF3">.layer1(x))</span></span>
<span class="line"><span style="color:#FF7B72">        return</span><span style="color:#79C0FF"> self</span><span style="color:#E6EDF3">.layer2(x)</span></span>
<span class="line"></span>
<span class="line"><span style="color:#E6EDF3">model </span><span style="color:#FF7B72">=</span><span style="color:#E6EDF3"> SimpleClassifier()</span></span>
<span class="line"><span style="color:#8B949E"># Dummy data and loss calculation</span></span>
<span class="line"><span style="color:#E6EDF3">input_data </span><span style="color:#FF7B72">=</span><span style="color:#E6EDF3"> torch.randn(</span><span style="color:#79C0FF">1</span><span style="color:#E6EDF3">, </span><span style="color:#79C0FF">10</span><span style="color:#E6EDF3">)</span></span>
<span class="line"><span style="color:#E6EDF3">output </span><span style="color:#FF7B72">=</span><span style="color:#E6EDF3"> model(input_data)</span></span>
<span class="line"><span style="color:#E6EDF3">loss </span><span style="color:#FF7B72">=</span><span style="color:#E6EDF3"> output.sum()</span></span>
<span class="line"><span style="color:#E6EDF3">loss.backward()</span></span>
<span class="line"></span>
<span class="line"><span style="color:#8B949E"># The fix: call the monitoring function after every backward pass</span></span>
<span class="line"><span style="color:#E6EDF3">log_gradient_norms(model)</span></span>
<span class="line"></span></code></pre></div>
<h3 id="4-the-confirmation" tabindex="-1"><a class="heading-anchor" href="#4-the-confirmation" aria-label="Link to this section">#</a> 4. The Confirmation</h3>
<p>They didn't just take the &quot;fixed&quot; numbers at face value; they verified the results using two specific pieces of evidence:</p>
<p>First, they ran a &quot;Grad-Check&quot; test. They intentionally reduced the learning rate to an extremely low level and then boosted it back up. Instead of seeing the gradient norms stay flat (which happens when gradients vanish), the norms jumped significantly as soon as the learning rate increased. This proved that the gradient signal was still there, but was being suppressed by their previous configuration.</p>
<p>Second, they looked at the <strong>Evaluation Accuracy</strong> for &quot;Non-Spam&quot; items. In the old version, the accuracy for valid tickets was 10% (random guessing). After adjusting the weight initialization and learning rate based on the gradient norms, the accuracy for valid tickets jumped to 88%.</p>
<p>The loss curve still looked &quot;pretty,&quot; but now they had the gradient data to prove that the model was actually processing information instead of just settling into a safe, incorrect rut.</p>
<p>By tracking the gradient norm alongside the loss, they could see exactly when and where the signal died. They stopped guessing about why the model was failing and started seeing exactly where the math was breaking down.</p>
<p>But how do you know which specific threshold is &quot;too low&quot; for your specific architecture?</p>
<h2 id="troubleshooting-common-illusions" tabindex="-1"><a class="heading-anchor" href="#troubleshooting-common-illusions" aria-label="Link to this section">#</a> Troubleshooting common illusions</h2>
<p><figure class="post-figure"><img src="https://adityaseth.in/images/blog/debugging-silent-model-divergence-with-gradient-monitoring/img-10.png" alt="" width="1062" height="1020" loading="lazy" decoding="async"></figure></p>
<p><em>Monitor both loss and gradient norms to catch silent collapse before a catastrophic spike occurs.</em></p>
<p>Even with the right code, specific scenarios can trick even experienced engineers into missing a fault. It is like trying to diagnose a medical condition by only looking at a patient's pulse. Is it enough? No. You need to look at the underlying chemistry.</p>
<p>In large-scale training, some errors don't crash your script. Instead, they just make your model &quot;dumb&quot; in a way that looks perfectly normal on a graph. This is where things get tricky. We need to distinguish between a model that is actually learning and one that is just coasting on ghosts.</p>
<h3 id="the-phantom-of-parallelism" tabindex="-1"><a class="heading-anchor" href="#the-phantom-of-parallelism" aria-label="Link to this section">#</a> The Phantom of Parallelism</h3>
<p>When you move from a single GPU to a multi-GPU setup, the math changes slightly under the hood. If your data parallelism logic is slightly misaligned (for example, if gradients aren't being averaged correctly across nodes), something weird happens.</p>
<p>The loss might still drop because the average of several &quot;okay&quot; predictions looks like a &quot;good&quot; prediction on the summary dashboard. However, the individual gradients for specific parameters might be canceling each other out or becoming incoherent during the sync step.</p>
<p><strong>Symptom:</strong> Loss decreases steadily, but your validation accuracy plateaus instantly or remains significantly lower than expected compared to a single-GPU run. <strong>Likely Cause:</strong> Data parallel misalignment (Gradient Synchronization Error). <strong>How to confirm:</strong> Run a &quot;sanity check&quot; by setting <code>world_size=1</code> on two different GPUs. If the results match but the multi-GPU run fails to reach the same accuracy, your synchronization logic is broken. <strong>What to do:</strong> Check your DistributedDataParallel (DDP) wrappers and ensure that gradients are being scaled correctly by the number of participating workers.</p>
<h3 id="the-ghost-in-the-hardware" tabindex="-1"><a class="heading-anchor" href="#the-ghost-in-the-hardware" aria-label="Link to this section">#</a> The Ghost in the Hardware</h3>
<p>Hardware isn't always perfect. Sometimes, a faulty memory bit or a degraded interconnect can introduce &quot;silent noise&quot; into your weight updates. This doesn't usually cause an immediate crash. Instead, it creates tiny, microscopic errors in the calculation.</p>
<p>These errors accumulate like dust on a lens. Your gradients might look healthy and stable for hours (or days), but the model is actually drifting into a sub-optimal state because the math isn't &quot;clean&quot; anymore.</p>
<p><strong>Symptom:</strong> Training seems stable, but you notice tiny, random &quot;jitters&quot; in the gradient norm graph that don't correlate with changes in your learning rate or data batch size. <strong>Likely Cause:</strong> Hardware instability or &quot;bit-flips.&quot; <strong>How to confirm:</strong> Run a checksum test on your weights after 100 iterations of an identical run on two different machines. If the weights differ at the 5th decimal place, you have a hardware/environment inconsistency. <strong>What to do:</strong> Move the training job to a different node or check the health of your GPU interconnects (e.g., NVLink status).</p>
<h3 id="the-vanishing-gradient-vs-the-stagnant-feature" tabindex="-1"><a class="heading-anchor" href="#the-vanishing-gradient-vs-the-stagnant-feature" aria-label="Link to this section">#</a> The Vanishing Gradient vs. The Stagnant Feature</h3>
<p>It is very easy to confuse a model that has &quot;finished&quot; learning with one that has simply lost its way. If your gradient norms are extremely low, you have a problem. But how do you know if it's because the task is too easy or because your activation functions have &quot;saturated&quot;?</p>
<p><strong>Symptom:</strong> Gradient norms drop to near-zero while the loss remains high and flat. <strong>Likely Cause:</strong> Vanishing Gradients (often due to deep networks without skip connections or improper weight initialization). <strong>How to confirm:</strong> Check the distribution of activations in your middle layers. If they are all piling up at 0 or 1, your neurons have &quot;gone to sleep.&quot; <strong>What to do:</strong> Introduce Layer Normalization or use a different activation function like GeLU to keep the signal alive.</p>
<h3 id="the-exploding-gradient-mask" tabindex="-1"><a class="heading-anchor" href="#the-exploding-gradient-mask" aria-label="Link to this section">#</a> The Exploding Gradient Mask</h3>
<p>This is the most dangerous one because it can look like &quot;fast learning&quot; until it suddenly isn't. If your gradient norms are massive, the loss might still drop for a while as the weights move aggressively. But they aren't moving toward a minimum; they are jumping across the optimization landscape like a frantic grasshopper.</p>
<p><strong>Symptom:</strong> High gradient norms (greater than 10^3) paired with a rapidly falling but &quot;jagged&quot; loss curve. <strong>Likely Cause:</strong> Exploding Gradients (often due to high learning rates or lack of gradient clipping). <strong>How to confirm:</strong> Plot the ratio of <code>gradient_norm / weight_norm</code>. If this value is consistently very high, your updates are too violent for the geometry of your loss function. <strong>What to do:</strong> Implement Gradient Clipping. It's a simple cap on the norm that keeps the &quot;grasshopper&quot; from jumping off the cliff.</p>
<p>We will list these tricky situations so you never fall for them again in your own projects.</p>
<h2 id="your-next-steps-for-stability" tabindex="-1"><a class="heading-anchor" href="#your-next-steps-for-stability" aria-label="Link to this section">#</a> Your next steps for stability</h2>
<p>You have learned how to spot these issues. Now you need a checklist to keep your models healthy going forward.</p>
<p>The one thing you must remember is that a falling loss curve is not a certificate of success. It is merely a signal of movement. If that movement happens while your gradient norms are exploding or vanishing, the model is effectively hallucinating progress while it breaks behind the scenes. You cannot trust a single metric alone. (It is like trying to judge a person's health by only checking their pulse.)</p>
<p>Do this today:</p>
<ol>
<li>
<p>Update your training dashboard to include a dedicated plot for gradient norms.</p>
</li>
<li>
<p>Overlay these two lines so you can see them simultaneously.</p>
</li>
<li>
<p>Run the decision tree from the theory section on your current project.</p>
</li>
<li>
<p>Flag any run where loss drops but gradients stay flat or spike as a &quot;failed&quot; experiment, even if the final accuracy looks okay.</p>
</li>
</ol>
<p>Next, you should look into learning about weight initialization strategies and learning rate schedulers. These are the tools that actually stabilize those gradients before they have a chance to spiral out of control.</p>
<p>There are many advanced techniques for debugging, but mastering this gap is your first line of defense against silent failures.</p>
<p><em><strong>If you want to contact me, feel free to drop an e-mail at</strong></em> <a href="mailto:setha4195@gmail.com"><em><strong>setha4195@gmail.com</strong></em></a> <em><strong>or check out my website at</strong></em> <a href="https://adityaseth.in"><em><strong>adityaseth.in</strong></em></a> <em><strong>:)<br>
Also, here’s my</strong></em> <a href="https://adityaseth.in/linkedin"><em><strong>LinkedIn</strong></em></a><em><strong>.</strong></em></p>
<p><em><strong>Thank you everyone for reading,</strong></em></p>
<p><figure class="post-figure"><img src="https://adityaseth.in/images/blog/debugging-silent-model-divergence-with-gradient-monitoring/img-11.jpg" alt="" width="4624" height="2608" loading="lazy" decoding="async"></figure></p>
<p><em><strong>Over and out,<br>
Aditya Seth.</strong></em></p>
<hr>
]]></content>
  </entry>
  <entry>
    <title type="text">The Click That Changed Everything</title>
    <link rel="alternate" type="text/html" href="https://adityaseth.in/blog/the-click-that-changed-everything"/>
    <id>https://adityaseth.in/blog/the-click-that-changed-everything</id>
    <published>2025-08-30T09:00:00+05:30</published>
    <updated>2025-08-30T09:00:00+05:30</updated>
    <category term="personal"/>
    <summary type="text">How joining the Microsoft Learn Student Ambassador program transformed the college journey - from first steps to Gold Ambassador status.</summary>
    <content type="html"><![CDATA[<h2 id="the-click" tabindex="-1"><a class="heading-anchor" href="#the-click" aria-label="Link to this section">#</a> The Click</h2>
<p class="post-lede">So, you finally clicked it? Want to know my story? Sheesh, I don’t think I’d ever be able to cram it all into one blog, but let’s try. Because if there’s one thing I’ve learned, it’s that a single decision, a single click, can flip your journey upside down in the best way possible.</p>
<p>Recently, the MLSA team decided to take a small written questionnaire interview of mine. I thought I’d just answer it and move on; but when I re-read what I had written, I realized these words captured my journey in a way I’ve never shared before. So here I am, opening it up to you.</p>
<p>For me, that click wasn’t just about joining a program; it was the start of a transformation I could have never predicted. From being just another curious student, I found myself leading communities, building projects, mentoring hundreds, and eventually graduating with the <strong>highest distinction</strong> along with a <strong>Letter of Recommendation from the Program Director</strong>.</p>
<p>This isn’t a story of shortcuts. It’s a story of choices. And sometimes, all it takes is one brave click.</p>
<hr>
<h2 id="building-two-lives" tabindex="-1"><a class="heading-anchor" href="#building-two-lives" aria-label="Link to this section">#</a> Building Two Lives</h2>
<p>You know, life has this strange way of nudging you at the exact moment you least expect it. For me, it wasn’t some dramatic thunderstorm, no lightning-bolt revelation. It was a click. A simple click. Logging into a portal that would, unknowingly, change the course of my college life, career, and, to some extent, even my identity.</p>
<p>I wasn’t the kind of guy who was a regular in classrooms. Honestly, college lectures weren’t really my scene. No, nope, that wasn’t me. But I was very much into communities, clubs, and all those little spaces where people came together to build, learn, and share. I was that Linux and tech nerd who wanted to give back, who wanted to take apart systems and stitch them back in ways that could actually help people. Somewhere along the way, I got a bit of recognition too, GitHub repos, LinkedIn activity; people began to know my name. Not in a flashy way, but enough to feel that what I was building was being noticed.</p>
<p><figure class="post-figure"><img src="https://adityaseth.in/images/blog/the-click-that-changed-everything/img-01.jpg" alt="" width="4131" height="4131" loading="lazy" decoding="async"></figure></p>
<p>And maybe that’s why when I heard about this program from my senior, who himself was a Beta MLSA, I knew I had to give it a shot. His journey inspired me, and deep down, something told me: <em>Why not me too?</em></p>
<p>So I clicked. That one click that set everything rolling.</p>
<p>When I got in, things were a bit surreal. This wasn’t just some title you threw around. It came with responsibilities, with expectations, and with a community of people who actually <em>got it</em>. And man, the first events I hosted… they were online, in the middle of pandemic chaos. Nervous faces staring at grids of muted microphones, hoping someone out there was listening. But it clicked. Slowly. And then we did offline events too. The energy in the room, the buzz when people left saying they learned something new, that was addictive in the best way possible.</p>
<p>And honestly, I was living two lives. By day, I was this community guy: organizing, speaking, running virtually around campus with posters and QR codes. By night, I slipped into my other world: <strong>freelancing</strong>.</p>
<p>Somewhere in between, life just went full throttle. I started freelancing in my second year. It wasn’t glamorous, not at first (trust me). Deadlines at 3 AM, US clients pinging me when the world around me was fast asleep. My friends were watching Netflix; I was on MS Teams calls with someone halfway across the globe, debugging production servers. And the crazy part? I loved it. Two hours of sleep, sometimes even less, was normal. But the thrill of delivering something across the world and knowing it mattered, that was my fuel.</p>
<p>And with that came rewards. I bought my first Apple ecosystem: a MacBook, an iPhone, AirPods, the whole package I once thought was just for people on the other side of the glass. I built the second and third floor of my house, a space that finally felt like a dream expanding into concrete. I took my parents on a trip they had been postponing for years, and seeing them laugh like kids again was the kind of wealth no balance sheet can show. I ate out at places I used to just scroll past on Instagram, sat by café windows sipping overpriced lattes that somehow tasted like victory, and ordered desserts without once thinking, <em>“<strong><strong>Should I really spend this much?</strong></strong>”</em> I started collecting gadgets I once only watched unboxing videos of, filled my shelves with books that smelled like possibility, and decorated corners of my room with little things that made me pause and smile. There were late-night coffees with friends where the laughter was louder than the city traffic, random Amazon parcels arriving at my doorstep that felt like tiny celebrations, and moments where I caught myself buying gifts for others just because I could. I wore watches I once only stared at in glass counters, stayed at hotels that made me feel like I was in a movie, and sometimes even took long drives just to feel the air rush past, no destination, just movement. And then there were the unseen moments, treating family to dinners they still talk about, slipping money into my parents’ hands without a word, surprising cousins with gadgets they’d only dreamt of. Small luxuries, big milestones, countless proud moments. I lived, not recklessly, but fully. And trust me, I say this not to boast, but to tell you… if you want, you can.</p>
<p>But none of this was easy. There were nights when I broke down, mornings when I questioned if burning out was worth it, and days when rejection emails stung harder than anything else. But every time I thought of quitting, I remembered that click. The click that started it all. And I’d whisper to myself: <em>Just one more day. Just one more shot.</em> And little by little, those things added up. Communities grew. Teams thrived. My network expanded. And I, well, I grew too.</p>
<hr>
<p><figure class="post-figure"><img src="https://adityaseth.in/images/blog/the-click-that-changed-everything/img-02.jpg" alt="" width="1920" height="1920" loading="lazy" decoding="async"></figure></p>
<h2 id="gold-mlsa" tabindex="-1"><a class="heading-anchor" href="#gold-mlsa" aria-label="Link to this section">#</a> Gold MLSA</h2>
<p>And then, before I even realized, it was time to graduate from the program.</p>
<p>But here’s the thing, this wasn’t your usual “thank you, goodbye” kind of graduation. No. This one was different. It came with something that words still struggle to capture: <strong>Gold MLSA</strong> - <strong>the highest distinction possible, AND a Letter of Recommendation from Pablo Veramendi, Director Audience Evangelism at Microsoft</strong>. When I read those words, it wasn’t just recognition. It was validation. A quiet reminder that the nights of coding, the endless mentoring, the countless community hours; they mattered.</p>
<p>I still remember sitting there with that letter in my inbox, staring at the screen as if it might vanish any second. My inner voice screaming, “<strong>This is real. This is YOU. You did this.</strong>” And yet, it felt surreal, because in those words wasn’t just my story, it was the story of every person who walked alongside me, who asked questions at events, who stayed up late planning with me, who believed in me when I didn’t.</p>
<hr>
<h2 id="looking-back" tabindex="-1"><a class="heading-anchor" href="#looking-back" aria-label="Link to this section">#</a> Looking Back</h2>
<p>Looking back now, it all feels like a blur. A blur stitched together with coffee, code, courage, and community. I wasn’t the most brilliant coder. I wasn’t the most consistent student. But what I was, was stubborn. Stubborn enough to believe that one click could change my destiny.</p>
<p>And it did.</p>
<p>Allow me to let you in on a little secret of my life. Below lies the picture of me with Shri <strong><em>Keshari Nath Tripathi</em></strong>, the <strong><em>Honorable Ex-Governor of West Bengal</em></strong>. This entire group got the award for being the best young minds (Class VII category) out of all the schools in West Bengal, thanks to a project initiative known as “Atmadeep” by the West Bengal Government.</p>
<p><figure class="post-figure"><img src="https://adityaseth.in/images/blog/the-click-that-changed-everything/img-03.jpg" alt="" width="3508" height="2483" loading="lazy" decoding="async"></figure></p>
<p>I didn’t wait for this or expect this. So if you’re reading this, let me tell you what I wish someone had told me back then: You don’t have to wait for the perfect plan. You don’t have to wait until you “feel ready.” Sometimes, all it takes is a small decision.</p>
<p><strong>A Click.</strong></p>
<p>And who knows? Maybe that click will change everything for you, too.</p>
<hr>
<h2 id="the-interview" tabindex="-1"><a class="heading-anchor" href="#the-interview" aria-label="Link to this section">#</a> The Interview</h2>
<p><strong>Coming back to the first point, recently the MLSA team decided to take a small written questionnaire interview of mine. I thought I’d just answer it and move on, but when I re-read what I had written, I realized these words captured my journey in a way I’ve never shared before. So here I am, opening it up to you.</strong></p>
<h3 id="what-was-being-a-student-ambassador-like" tabindex="-1"><a class="heading-anchor" href="#what-was-being-a-student-ambassador-like" aria-label="Link to this section">#</a> What was being a Student Ambassador like?</h3>
<p><strong>Being a Student Ambassador was one of the most transformative experiences of my life.</strong> When I first joined, I thought it would simply be about learning technology and improving my skills. But very soon, I realized it was so much more. It gave me the stage to inspire others, the responsibility to lead by example, and the opportunity to create a space where people felt included, heard, and empowered.</p>
<p>Through organizing events, mentoring juniors, and working with global peers, I learned that true leadership is not about standing in front but about lifting others up. I saw students in my community grow in confidence, explore new opportunities, and achieve things they never thought possible, and that gave me a sense of fulfillment like nothing else.</p>
<p>This program also taught me resilience and adaptability. There were times when things did not go as planned, but those very moments shaped me into a problem solver who stays calm under pressure. More than anything, it helped me believe in myself. I started as someone eager to learn, and I leave as someone ready to make a difference in the world.</p>
<p>The Student Ambassador journey will always remain special to me because it was not just about technology, it was about people, purpose, and the power of giving back.</p>
<hr>
<h3 id="was-there-a-specific-experience-you-had-while-you-were-in-th" tabindex="-1"><a class="heading-anchor" href="#was-there-a-specific-experience-you-had-while-you-were-in-th" aria-label="Link to this section">#</a> Was there a specific experience you had while you were in the program that had a profound impact on you and why? For example - being involved in a Social Impact Project, Networking with a Cloud Advocate or MVP, Mentoring another Student Ambassador?</h3>
<p>I still remember that night.<br>
The room was dark except for the dim glow of my laptop screen. A blank document stared back at me, and in that silence, I felt the weight of every failure, every doubt I had ever carried. I had poured myself into projects that didn’t work, interviews that ended in rejection, ideas that never saw the light of day. And somewhere in between, I began to ask myself, <strong><em>am I even good enough?</em></strong></p>
<p>That night, I almost gave up. I thought of closing my laptop, walking away, and convincing myself that maybe greatness was reserved for other people; not for me.</p>
<p>But the next morning, I showed up. Not because I suddenly believed in myself, but because something deep inside whispered, <em>just one more try</em>.</p>
<p>Days turned into weeks, weeks into months, and slowly, step by step, I built myself back. Not through sudden victories, but through small, quiet wins, the kind no one celebrates but that matters the most. Hosting my first event even when I was terrified of speaking. Mentoring a student even when I felt unsure of my own path. Failing, again and again, but this time, refusing to walk away.</p>
<p>And then it happened.<br>
During one mentorship session, a student broke down after her project failed. Her eyes carried the same fear and exhaustion I once carried. She asked me, “<strong>What if I’m just not good enough?</strong>”</p>
<p>For a moment, I didn’t know how to answer. But then I realized, I wasn’t just speaking to her. I was speaking to the version of myself that almost gave up. And so I told her, “<strong>Greatness doesn’t come from never failing. It comes from showing up again after you fail. You’re already more capable than you think.</strong>”</p>
<p>That moment changed everything for me. Because I finally understood, my struggles were never just mine. They were meant to be shared, to become a bridge for someone else to cross.</p>
<p>Being a Student Ambassador was never about being perfect. It was about being human. About standing tall even when your knees shake. About carrying your scars, not as weaknesses, but as proof that you kept going.</p>
<p>And now, whenever I look back at that night, the one where I almost gave up, I don’t see failure anymore. I see the beginning. The start of becoming someone who refuses to quit, someone who chooses to rise, and someone who reminds others they can rise too.</p>
<hr>
<h3 id="tell-us-about-a-technology-you-had-the-opportunity-to-gain-a" tabindex="-1"><a class="heading-anchor" href="#tell-us-about-a-technology-you-had-the-opportunity-to-gain-a" aria-label="Link to this section">#</a> Tell us about a technology you had the opportunity to gain a skillset in during your time as a Student Ambassador? How has this skill you acquired helped you in your post-university journey?</h3>
<p>During my time as a Student Ambassador, I had the opportunity to dive deep into <strong>Cloud Computing with Microsoft Azure</strong>. At first, it felt overwhelming. The terminology, the endless services, the idea of building scalable solutions on a platform I had never touched before, it was intimidating. But little by little, through late nights of experimentation and countless trial-and-error moments, I began to find my rhythm.</p>
<p>One breakthrough moment was when I successfully deployed my very first cloud-native application. It was a small project, but seeing it run live and accessible to people anywhere in the world was nothing short of magical. That moment gave me confidence not just in the technology, but in myself.</p>
<p>During university, this skillset became a game-changer. It gave me the edge in interviews, opened doors to roles in DevOps and Cloud Engineering, and, more importantly, it gave me the mindset to never shy away from new and intimidating technologies. Learning Azure taught me that the cloud is not just about servers and storage; it is about building possibilities without limits. And that perspective continues to guide me in every project I work on today.</p>
<hr>
<h3 id="what-is-something-you-want-all-students-globally-to-know-abo" tabindex="-1"><a class="heading-anchor" href="#what-is-something-you-want-all-students-globally-to-know-abo" aria-label="Link to this section">#</a> What is something you want all students, globally, to know about the Microsoft Learn Student Ambassador Program?</h3>
<p>The Microsoft Learn Student Ambassador Program was not just a community for me, it was a turning point in my life. I joined at a time when self-doubt was louder than my dreams. I questioned if my skills were enough, if my voice mattered, or if someone like me could ever make an impact. What I discovered inside this program was more than technology and events. I found people who believed in me before I believed in myself. I found mentors who reminded me that mistakes are proof you are trying. I found teammates who turned into friends that pushed me to aim higher when I thought I had reached my limits.</p>
<p>The skills I gained in tech will always stay with me, but what changed me the most was the courage I built. The courage to speak in front of hundreds when I once feared speaking to ten. The courage to guide juniors even when I felt lost myself. The courage to dream of a career and a future I never thought was possible.</p>
<p>To every student across the world reading this, I want you to know something. You may think you are not ready. You may think others are smarter, faster, or better. But the truth is, leadership is not about being perfect. It is about showing up, again and again, even with doubts, and choosing to grow. The Microsoft Learn Student Ambassador Program will give you a place to do exactly that. It will give you a chance to transform not just your career but your entire sense of who you are and what you can achieve.</p>
<p>If you let it, this program will change your life. It changed mine.</p>
<hr>
<h3 id="what-advice-would-you-give-to-new-student-ambassadors-who-ar" tabindex="-1"><a class="heading-anchor" href="#what-advice-would-you-give-to-new-student-ambassadors-who-ar" aria-label="Link to this section">#</a> What advice would you give to new Student Ambassadors, who are just starting off in the program?</h3>
<p>If I could give one piece of advice to new Student Ambassadors, it would be this, do not wait for the perfect moment to contribute, just start. Many of us begin by thinking we need to be experts before we can lead, but the truth is you grow into leadership only when you take the first step. Host that small event, write that first blog, mentor that one junior, even if you feel nervous or unsure. Every action, no matter how small, begins to shape the impact you will create.</p>
<p>Also, don’t walk this journey alone. The beauty of this program lies in its community. Connect, collaborate, and learn from Ambassadors across the globe. Share your struggles as much as your wins, because you’ll be surprised at how many others are walking the same path.</p>
<p>Finally, remember that the badge or the title is not the destination. It’s the experiences you gather, the people you uplift, and the person you become along the way that truly define your journey. Trust yourself, stay consistent, and let curiosity guide you, this program has the power to transform your career and your confidence if you allow it.</p>
<hr>
<h3 id="share-a-favorite-quote-with-us-it-can-be-from-a-movie-a-song" tabindex="-1"><a class="heading-anchor" href="#share-a-favorite-quote-with-us-it-can-be-from-a-movie-a-song" aria-label="Link to this section">#</a> Share a favorite quote with us! It can be from a movie, a song, a book, someone you know personally. Tell us why you chose this. What does it mean for you?</h3>
<p>One of my favorite quotes is <strong>“Ships are safe in harbor, but that is not what ships are built for.”</strong></p>
<p>I’ll never forget the very first time I stood in front of a room full of students as a Student Ambassador. The room was buzzing with quiet chatter, laptops open, notebooks ready. But in my head, everything was silent except for the pounding of my heartbeat. My palms were sweaty, my throat felt dry, and as I held the microphone, a thousand doubts screamed louder than any voice in the room.</p>
<p><em>What if I forget my words? What if no one cares? What if I fail?</em></p>
<p>For a second, I wanted to step back, to return to the comfort of my own safe harbor. But then this quote came alive in my mind. Ships are not built to remain tied to the dock, protected from the waves. They are built to sail into the unknown, storms and all. And maybe, just maybe, that was true for me too.</p>
<p>I took a deep breath and spoke my first sentence. My voice trembled, but I kept going. I stumbled once, paused too long another time, but I didn’t stop. And slowly, something changed. Faces lifted from screens, eyes turned toward me, a few heads nodded, and by the end, there were smiles and even applause. In that moment, I realized something powerful: stepping out of the harbor is scary, but it is the only way to discover new horizons.</p>
<p>That day wasn’t perfect, but it was real. It was growth. It was courage.</p>
<p>Since then, this quote has stayed with me like a compass. Whenever I face doubt, whether in my career, in leadership, or in life, I remind myself that safety will never lead to discovery. Playing small might keep me comfortable, but it will never let me grow.</p>
<p>Ships are meant to sail. And so are we.</p>
<p><figure class="post-figure"><img src="https://adityaseth.in/images/blog/the-click-that-changed-everything/img-04.jpg" alt="" width="4624" height="2608" loading="lazy" decoding="async"></figure></p>
<p>All the best :D<br>
Aditya.</p>
]]></content>
  </entry>
  <entry>
    <title type="text">Advanced Kubernetes on Solana: Scalable Validator Nodes on AWS EKS</title>
    <link rel="alternate" type="text/html" href="https://adityaseth.in/blog/solana-kubechain"/>
    <id>https://adityaseth.in/blog/solana-kubechain</id>
    <published>2025-01-13T09:00:00+05:30</published>
    <updated>2025-01-13T09:00:00+05:30</updated>
    <category term="kubernetes"/>
    <category term="cloud"/>
    <summary type="text">Deploying Solana validator nodes on AWS EKS with Phantom wallet integration - pod configs, horizontal scaling, and secure transaction signing.</summary>
    <content type="html"><![CDATA[<hr>
<h3 id="why-did-the-eks-pod-go-to-the-gym-it-needed-to-stay-fit-for-" tabindex="-1"><a class="heading-anchor" href="#why-did-the-eks-pod-go-to-the-gym-it-needed-to-stay-fit-for-" aria-label="Link to this section">#</a> &quot;Why did the EKS pod go to the gym? It needed to stay fit for the workload!&quot; 😄</h3>
<p class="post-lede">Did you get it? No? Ah, let me explain! 🚀<br>
In Kubernetes, pods need to be properly configured to handle scaling and workloads. Now, when you introduce Solana, things get even more interesting. Solana is a high-performance blockchain designed for scalability and speed. In this case, the Solana validator nodes, just like the EKS pods, need to be optimized for heavy transactions and high throughput. Think of it as both the pods and validator nodes needing to stay ‘fit’ to handle their respective blockchain and application workloads. Just like you can scale Kubernetes for more applications, you scale Solana validators for more transactions!</p>
<p>Solana, renowned for its high-speed and low latency blockchain, depends on validator nodes for transaction processing and maintaining network consensus. However, managing these nodes efficiently at scale can be challenging. This guide demonstrates how Kubernetes (K8s), a powerful container orchestration platform, can simplify the deployment, scaling, and management of Solana validator nodes with advanced customizations for performance, security, and operational control.</p>
<p><figure class="post-figure"><img src="https://adityaseth.in/images/blog/solana-kubechain/img-01.gif" alt="" width="498" height="273" loading="lazy" decoding="async"></figure></p>
<h2 id="why-use-kubernetes-for-solana-validators" tabindex="-1"><a class="heading-anchor" href="#why-use-kubernetes-for-solana-validators" aria-label="Link to this section">#</a> Why Use Kubernetes for Solana Validators?</h2>
<h3 id="challenges-in-validator-node-management" tabindex="-1"><a class="heading-anchor" href="#challenges-in-validator-node-management" aria-label="Link to this section">#</a> Challenges in Validator Node Management</h3>
<ul>
<li>
<p><strong>High Resource Utilization:</strong> Validators need optimized hardware for consistent performance.</p>
</li>
<li>
<p><strong>Scalability:</strong> Dynamic addition/removal of nodes is complex without orchestration.</p>
</li>
<li>
<p><strong>Fault Tolerance:</strong> Redundancy and automated recovery are critical to avoid downtime.</p>
</li>
<li>
<p><strong>Monitoring and Maintenance:</strong> Continuous monitoring across a distributed network is cumbersome.</p>
</li>
</ul>
<h3 id="kubernetes-advantages" tabindex="-1"><a class="heading-anchor" href="#kubernetes-advantages" aria-label="Link to this section">#</a> Kubernetes Advantages</h3>
<ul>
<li>
<p><strong>Dynamic Scaling:</strong> Adjust resources in response to traffic surges.</p>
</li>
<li>
<p><strong>Fault Tolerance:</strong> Self-healing capabilities ensure high availability.</p>
</li>
<li>
<p><strong>Unified Management:</strong> Centralized control over multi-cloud and hybrid setups.</p>
</li>
<li>
<p><strong>Integrated Monitoring:</strong> Simplifies performance tracking using native tools.</p>
</li>
</ul>
<hr>
<h2 id="prerequisites" tabindex="-1"><a class="heading-anchor" href="#prerequisites" aria-label="Link to this section">#</a> Prerequisites</h2>
<p><figure class="post-figure"><img src="https://adityaseth.in/images/blog/solana-kubechain/img-02.gif" alt="" width="220" height="211" loading="lazy" decoding="async"></figure></p>
<ol>
<li>
<p><strong>Kubernetes Cluster:</strong> A functioning K8s cluster (<a href="https://minikube.sigs.k8s.io/docs/" target="_blank" rel="noopener">Minikube</a>, <a href="https://aws.amazon.com/eks/" target="_blank" rel="noopener">EKS</a>, <a href="https://cloud.google.com/kubernetes-engine" target="_blank" rel="noopener">GKE</a>, or <a href="https://azure.microsoft.com/en-us/products/kubernetes-service" target="_blank" rel="noopener">AKS</a>).</p>
</li>
<li>
<p><strong>Docker:</strong> Installed for containerizing Solana validator software (<a href="https://www.docker.com/products/docker-desktop" target="_blank" rel="noopener">Download Docker</a>).</p>
</li>
<li>
<p><strong>Helm:</strong> Installed for managing K8s applications (<a href="https://helm.sh/docs/intro/install/" target="_blank" rel="noopener">Install Helm</a>).</p>
</li>
<li>
<p><strong>kubectl:</strong> Installed and configured for managing the cluster (<a href="https://kubernetes.io/docs/tasks/tools/install-kubectl/" target="_blank" rel="noopener">Get kubectl</a>).</p>
</li>
<li>
<p><strong>Persistent Storage:</strong> Ensure storage solutions like <a href="https://aws.amazon.com/ebs/" target="_blank" rel="noopener">AWS EBS</a>, <a href="https://cloud.google.com/persistent-disk" target="_blank" rel="noopener">GCP PD</a>, or local Persistent Volumes (PVs).</p>
</li>
<li>
<p><strong>Monitoring Tools:</strong> Prometheus (<a href="https://prometheus.io/docs/introduction/overview/" target="_blank" rel="noopener">Prometheus Docs</a>) and Grafana (<a href="https://grafana.com/grafana/download" target="_blank" rel="noopener">Get Grafana</a>).</p>
</li>
<li>
<p><strong>Phantom Wallet:</strong> A secure Solana wallet for interacting with the blockchain (<a href="https://phantom.app/" target="_blank" rel="noopener">Download Phantom</a>).</p>
</li>
</ol>
<hr>
<h2 id="step-by-step-deployment-guide" tabindex="-1"><a class="heading-anchor" href="#step-by-step-deployment-guide" aria-label="Link to this section">#</a> Step-by-Step Deployment Guide</h2>
<p><figure class="post-figure"><img src="https://adityaseth.in/images/blog/solana-kubechain/img-03.gif" alt="" width="540" height="225" loading="lazy" decoding="async"></figure></p>
<h3 id="step-1-create-a-docker-image-for-solana-validator" tabindex="-1"><a class="heading-anchor" href="#step-1-create-a-docker-image-for-solana-validator" aria-label="Link to this section">#</a> Step 1: Create a Docker Image for Solana Validator</h3>
<ol>
<li>
<p>Clone the Solana GitHub repository:</p>
<div class="code-block" data-lang="bash"><button class="code-copy" type="button" aria-label="Copy code to clipboard"><span class="code-copy__idle">Copy</span><span class="code-copy__done">Copied</span></button><pre class="shiki github-dark-default" style="background-color:#0d1117;color:#e6edf3" tabindex="0"><code><span class="line"><span style="color:#FFA657"> git</span><span style="color:#A5D6FF"> clone</span><span style="color:#A5D6FF"> https://github.com/solana-labs/solana.git</span></span>
<span class="line"><span style="color:#79C0FF"> cd</span><span style="color:#A5D6FF"> solana</span></span>
<span class="line"></span></code></pre></div>
</li>
<li>
<p>Build the Docker image:</p>
<div class="code-block" data-lang="bash"><button class="code-copy" type="button" aria-label="Copy code to clipboard"><span class="code-copy__idle">Copy</span><span class="code-copy__done">Copied</span></button><pre class="shiki github-dark-default" style="background-color:#0d1117;color:#e6edf3" tabindex="0"><code><span class="line"><span style="color:#FFA657"> docker</span><span style="color:#A5D6FF"> build</span><span style="color:#79C0FF"> -t</span><span style="color:#A5D6FF"> solana-validator</span><span style="color:#A5D6FF"> .</span></span>
<span class="line"></span></code></pre></div>
</li>
<li>
<p>Verify the image:</p>
<div class="code-block" data-lang="bash"><button class="code-copy" type="button" aria-label="Copy code to clipboard"><span class="code-copy__idle">Copy</span><span class="code-copy__done">Copied</span></button><pre class="shiki github-dark-default" style="background-color:#0d1117;color:#e6edf3" tabindex="0"><code><span class="line"><span style="color:#FFA657"> docker</span><span style="color:#A5D6FF"> images</span><span style="color:#FF7B72"> |</span><span style="color:#FFA657"> grep</span><span style="color:#A5D6FF"> solana-validator</span></span>
<span class="line"></span></code></pre></div>
</li>
<li>
<p>Push the image to a container registry (DockerHub, GCR, ECR, etc.):</p>
<div class="code-block" data-lang="bash"><button class="code-copy" type="button" aria-label="Copy code to clipboard"><span class="code-copy__idle">Copy</span><span class="code-copy__done">Copied</span></button><pre class="shiki github-dark-default" style="background-color:#0d1117;color:#e6edf3" tabindex="0"><code><span class="line"><span style="color:#FFA657"> docker</span><span style="color:#A5D6FF"> tag</span><span style="color:#A5D6FF"> solana-validator:latest</span><span style="color:#E6EDF3"> [your-repo-name:AdityaSeth777]/solana-validator:latest</span></span>
<span class="line"><span style="color:#FFA657"> docker</span><span style="color:#A5D6FF"> push</span><span style="color:#E6EDF3"> [your-repo-name:AdityaSeth777]/solana-validator:latest</span></span>
<span class="line"></span></code></pre></div>
</li>
</ol>
<hr>
<h3 id="step-2-set-up-kubernetes-cluster" tabindex="-1"><a class="heading-anchor" href="#step-2-set-up-kubernetes-cluster" aria-label="Link to this section">#</a> Step 2: Set Up Kubernetes Cluster</h3>
<ol>
<li>
<p><strong>Initialize a Cluster:</strong> For local development, use Minikube:</p>
<div class="code-block" data-lang="bash"><button class="code-copy" type="button" aria-label="Copy code to clipboard"><span class="code-copy__idle">Copy</span><span class="code-copy__done">Copied</span></button><pre class="shiki github-dark-default" style="background-color:#0d1117;color:#e6edf3" tabindex="0"><code><span class="line"><span style="color:#FFA657"> minikube</span><span style="color:#A5D6FF"> start</span><span style="color:#79C0FF"> --cpus=4</span><span style="color:#79C0FF"> --memory=8192</span></span>
<span class="line"></span></code></pre></div>
</li>
<li>
<p><strong>Verify Cluster Status:</strong></p>
<div class="code-block" data-lang="bash"><button class="code-copy" type="button" aria-label="Copy code to clipboard"><span class="code-copy__idle">Copy</span><span class="code-copy__done">Copied</span></button><pre class="shiki github-dark-default" style="background-color:#0d1117;color:#e6edf3" tabindex="0"><code><span class="line"><span style="color:#FFA657"> kubectl</span><span style="color:#A5D6FF"> cluster-info</span></span>
<span class="line"></span></code></pre></div>
</li>
<li>
<p><strong>Set Up Namespaces:</strong> Create a dedicated namespace for Solana:</p>
<div class="code-block" data-lang="bash"><button class="code-copy" type="button" aria-label="Copy code to clipboard"><span class="code-copy__idle">Copy</span><span class="code-copy__done">Copied</span></button><pre class="shiki github-dark-default" style="background-color:#0d1117;color:#e6edf3" tabindex="0"><code><span class="line"><span style="color:#FFA657"> kubectl</span><span style="color:#A5D6FF"> create</span><span style="color:#A5D6FF"> namespace</span><span style="color:#A5D6FF"> solana-validators</span></span>
<span class="line"></span></code></pre></div>
</li>
</ol>
<hr>
<h3 id="step-3-deploy-solana-validator-with-helm" tabindex="-1"><a class="heading-anchor" href="#step-3-deploy-solana-validator-with-helm" aria-label="Link to this section">#</a> Step 3: Deploy Solana Validator with Helm</h3>
<ol>
<li>
<p><strong>Create Helm Values File:</strong> Save the following YAML as <code>values.yaml</code>:</p>
<div class="code-block" data-lang="yaml"><button class="code-copy" type="button" aria-label="Copy code to clipboard"><span class="code-copy__idle">Copy</span><span class="code-copy__done">Copied</span></button><pre class="shiki github-dark-default" style="background-color:#0d1117;color:#e6edf3" tabindex="0"><code><span class="line"><span style="color:#7EE787"> replicaCount</span><span style="color:#E6EDF3">: </span><span style="color:#79C0FF">3</span></span>
<span class="line"></span>
<span class="line"><span style="color:#7EE787"> image</span><span style="color:#E6EDF3">:</span></span>
<span class="line"><span style="color:#7EE787">   repository</span><span style="color:#E6EDF3">: [</span><span style="color:#A5D6FF">your-repo-name:AdityaSeth777</span><span style="color:#E6EDF3">]</span><span style="color:#A5D6FF">/solana-validator</span></span>
<span class="line"><span style="color:#7EE787">   tag</span><span style="color:#E6EDF3">: </span><span style="color:#A5D6FF">latest</span></span>
<span class="line"><span style="color:#7EE787">   pullPolicy</span><span style="color:#E6EDF3">: </span><span style="color:#A5D6FF">IfNotPresent</span></span>
<span class="line"></span>
<span class="line"><span style="color:#7EE787"> resources</span><span style="color:#E6EDF3">:</span></span>
<span class="line"><span style="color:#7EE787">   requests</span><span style="color:#E6EDF3">:</span></span>
<span class="line"><span style="color:#7EE787">     memory</span><span style="color:#E6EDF3">: </span><span style="color:#A5D6FF">"4Gi"</span></span>
<span class="line"><span style="color:#7EE787">     cpu</span><span style="color:#E6EDF3">: </span><span style="color:#A5D6FF">"2000m"</span></span>
<span class="line"><span style="color:#7EE787">   limits</span><span style="color:#E6EDF3">:</span></span>
<span class="line"><span style="color:#7EE787">     memory</span><span style="color:#E6EDF3">: </span><span style="color:#A5D6FF">"8Gi"</span></span>
<span class="line"><span style="color:#7EE787">     cpu</span><span style="color:#E6EDF3">: </span><span style="color:#A5D6FF">"4000m"</span></span>
<span class="line"></span>
<span class="line"><span style="color:#7EE787"> persistence</span><span style="color:#E6EDF3">:</span></span>
<span class="line"><span style="color:#7EE787">   enabled</span><span style="color:#E6EDF3">: </span><span style="color:#79C0FF">true</span></span>
<span class="line"><span style="color:#7EE787">   size</span><span style="color:#E6EDF3">: </span><span style="color:#A5D6FF">50Gi</span></span>
<span class="line"></span>
<span class="line"><span style="color:#7EE787"> nodeSelector</span><span style="color:#E6EDF3">: {}</span></span>
<span class="line"><span style="color:#7EE787"> tolerations</span><span style="color:#E6EDF3">: []</span></span>
<span class="line"><span style="color:#7EE787"> affinity</span><span style="color:#E6EDF3">: {}</span></span>
<span class="line"></span></code></pre></div>
</li>
<li>
<p><strong>Deploy with Helm:</strong></p>
<div class="code-block" data-lang="bash"><button class="code-copy" type="button" aria-label="Copy code to clipboard"><span class="code-copy__idle">Copy</span><span class="code-copy__done">Copied</span></button><pre class="shiki github-dark-default" style="background-color:#0d1117;color:#e6edf3" tabindex="0"><code><span class="line"><span style="color:#FFA657"> helm</span><span style="color:#A5D6FF"> install</span><span style="color:#A5D6FF"> solana-validator</span><span style="color:#A5D6FF"> ./chart</span><span style="color:#79C0FF"> --namespace</span><span style="color:#A5D6FF"> solana-validators</span><span style="color:#79C0FF"> -f</span><span style="color:#A5D6FF"> values.yaml</span></span>
<span class="line"></span></code></pre></div>
</li>
<li>
<p><strong>Verify Deployment:</strong></p>
<div class="code-block" data-lang="bash"><button class="code-copy" type="button" aria-label="Copy code to clipboard"><span class="code-copy__idle">Copy</span><span class="code-copy__done">Copied</span></button><pre class="shiki github-dark-default" style="background-color:#0d1117;color:#e6edf3" tabindex="0"><code><span class="line"><span style="color:#FFA657"> kubectl</span><span style="color:#A5D6FF"> get</span><span style="color:#A5D6FF"> pods</span><span style="color:#79C0FF"> -n</span><span style="color:#A5D6FF"> solana-validators</span></span>
<span class="line"></span></code></pre></div>
</li>
</ol>
<hr>
<h3 id="step-4-configure-monitoring-and-logging" tabindex="-1"><a class="heading-anchor" href="#step-4-configure-monitoring-and-logging" aria-label="Link to this section">#</a> Step 4: Configure Monitoring and Logging</h3>
<ol>
<li>
<p><strong>Install Prometheus and Grafana:</strong></p>
<div class="code-block" data-lang="bash"><button class="code-copy" type="button" aria-label="Copy code to clipboard"><span class="code-copy__idle">Copy</span><span class="code-copy__done">Copied</span></button><pre class="shiki github-dark-default" style="background-color:#0d1117;color:#e6edf3" tabindex="0"><code><span class="line"><span style="color:#FFA657"> helm</span><span style="color:#A5D6FF"> repo</span><span style="color:#A5D6FF"> add</span><span style="color:#A5D6FF"> prometheus-community</span><span style="color:#A5D6FF"> https://prometheus-community.github.io/helm-charts</span></span>
<span class="line"><span style="color:#FFA657"> helm</span><span style="color:#A5D6FF"> repo</span><span style="color:#A5D6FF"> add</span><span style="color:#A5D6FF"> grafana</span><span style="color:#A5D6FF"> https://grafana.github.io/helm-charts</span></span>
<span class="line"></span>
<span class="line"><span style="color:#FFA657"> helm</span><span style="color:#A5D6FF"> install</span><span style="color:#A5D6FF"> prometheus</span><span style="color:#A5D6FF"> prometheus-community/prometheus</span><span style="color:#79C0FF"> --namespace</span><span style="color:#A5D6FF"> monitoring</span></span>
<span class="line"><span style="color:#FFA657"> helm</span><span style="color:#A5D6FF"> install</span><span style="color:#A5D6FF"> grafana</span><span style="color:#A5D6FF"> grafana/grafana</span><span style="color:#79C0FF"> --namespace</span><span style="color:#A5D6FF"> monitoring</span></span>
<span class="line"></span></code></pre></div>
</li>
<li>
<p><strong>Expose Metrics:</strong> Modify the Solana validator deployment to expose Prometheus metrics:</p>
<div class="code-block" data-lang="yaml"><button class="code-copy" type="button" aria-label="Copy code to clipboard"><span class="code-copy__idle">Copy</span><span class="code-copy__done">Copied</span></button><pre class="shiki github-dark-default" style="background-color:#0d1117;color:#e6edf3" tabindex="0"><code><span class="line"><span style="color:#7EE787"> args</span><span style="color:#E6EDF3">:</span></span>
<span class="line"><span style="color:#E6EDF3">   - </span><span style="color:#A5D6FF">--log-file=/var/log/solana-validator.log</span></span>
<span class="line"><span style="color:#E6EDF3">   - </span><span style="color:#A5D6FF">--prometheus-port=8080</span></span>
<span class="line"></span></code></pre></div>
</li>
<li>
<p><strong>Visualize Data in Grafana:</strong> Import dashboards to monitor node health, transaction throughput, and latency.</p>
</li>
</ol>
<hr>
<h3 id="step-5-automate-node-scaling" tabindex="-1"><a class="heading-anchor" href="#step-5-automate-node-scaling" aria-label="Link to this section">#</a> Step 5: Automate Node Scaling</h3>
<ol>
<li>
<p><strong>Enable Horizontal Pod Autoscaling (HPA):</strong></p>
<div class="code-block" data-lang="bash"><button class="code-copy" type="button" aria-label="Copy code to clipboard"><span class="code-copy__idle">Copy</span><span class="code-copy__done">Copied</span></button><pre class="shiki github-dark-default" style="background-color:#0d1117;color:#e6edf3" tabindex="0"><code><span class="line"><span style="color:#FFA657"> kubectl</span><span style="color:#A5D6FF"> autoscale</span><span style="color:#A5D6FF"> deployment</span><span style="color:#A5D6FF"> solana-validator</span><span style="color:#FF7B72"> \</span></span>
<span class="line"><span style="color:#79C0FF">     --cpu-percent=80</span><span style="color:#79C0FF"> --min=3</span><span style="color:#79C0FF"> --max=10</span><span style="color:#79C0FF"> -n</span><span style="color:#A5D6FF"> solana-validators</span></span>
<span class="line"></span></code></pre></div>
</li>
<li>
<p><strong>Test Autoscaling:</strong> Simulate load to observe dynamic scaling:</p>
<div class="code-block" data-lang="bash"><button class="code-copy" type="button" aria-label="Copy code to clipboard"><span class="code-copy__idle">Copy</span><span class="code-copy__done">Copied</span></button><pre class="shiki github-dark-default" style="background-color:#0d1117;color:#e6edf3" tabindex="0"><code><span class="line"><span style="color:#FFA657"> kubectl</span><span style="color:#A5D6FF"> run</span><span style="color:#A5D6FF"> load-generator</span><span style="color:#79C0FF"> --image=busybox</span><span style="color:#79C0FF"> --namespace</span><span style="color:#A5D6FF"> solana-validators</span><span style="color:#FF7B72"> \</span></span>
<span class="line"><span style="color:#79C0FF">     --</span><span style="color:#A5D6FF"> /bin/sh</span><span style="color:#79C0FF"> -c</span><span style="color:#A5D6FF"> "while true; do wget -q -O- http://solana-validator:8899; done"</span></span>
<span class="line"></span></code></pre></div>
</li>
</ol>
<hr>
<h2 id="example-deployment-on-infrastructure" tabindex="-1"><a class="heading-anchor" href="#example-deployment-on-infrastructure" aria-label="Link to this section">#</a> Example Deployment on Infrastructure</h2>
<p><figure class="post-figure"><img src="https://adityaseth.in/images/blog/solana-kubechain/img-04.gif" alt="" width="200" height="172" loading="lazy" decoding="async"></figure></p>
<h3 id="use-case-deploying-solana-validators-on-aws-eks" tabindex="-1"><a class="heading-anchor" href="#use-case-deploying-solana-validators-on-aws-eks" aria-label="Link to this section">#</a> Use Case: Deploying Solana Validators on AWS EKS</h3>
<ol>
<li>
<p><strong>Set Up EKS Cluster:</strong></p>
<div class="code-block" data-lang="bash"><button class="code-copy" type="button" aria-label="Copy code to clipboard"><span class="code-copy__idle">Copy</span><span class="code-copy__done">Copied</span></button><pre class="shiki github-dark-default" style="background-color:#0d1117;color:#e6edf3" tabindex="0"><code><span class="line"><span style="color:#FFA657"> eksctl</span><span style="color:#A5D6FF"> create</span><span style="color:#A5D6FF"> cluster</span><span style="color:#79C0FF"> --name</span><span style="color:#A5D6FF"> solana-cluster</span><span style="color:#79C0FF"> --region</span><span style="color:#A5D6FF"> us-east-1</span><span style="color:#79C0FF"> --nodes</span><span style="color:#79C0FF"> 3</span></span>
<span class="line"></span></code></pre></div>
</li>
<li>
<p><strong>Connect kubectl to EKS:</strong></p>
<div class="code-block" data-lang="bash"><button class="code-copy" type="button" aria-label="Copy code to clipboard"><span class="code-copy__idle">Copy</span><span class="code-copy__done">Copied</span></button><pre class="shiki github-dark-default" style="background-color:#0d1117;color:#e6edf3" tabindex="0"><code><span class="line"><span style="color:#FFA657"> aws</span><span style="color:#A5D6FF"> eks</span><span style="color:#79C0FF"> --region</span><span style="color:#A5D6FF"> us-east-1</span><span style="color:#A5D6FF"> update-kubeconfig</span><span style="color:#79C0FF"> --name</span><span style="color:#A5D6FF"> solana-cluster</span></span>
<span class="line"></span></code></pre></div>
</li>
<li>
<p><strong>Deploy Solana Validator with Phantom Wallet Integration:</strong> Ensure the validator node uses Phantom wallet credentials for signing and transactions. Save the Phantom wallet keypair JSON as a Kubernetes secret:</p>
<div class="code-block" data-lang="bash"><button class="code-copy" type="button" aria-label="Copy code to clipboard"><span class="code-copy__idle">Copy</span><span class="code-copy__done">Copied</span></button><pre class="shiki github-dark-default" style="background-color:#0d1117;color:#e6edf3" tabindex="0"><code><span class="line"><span style="color:#FFA657"> kubectl</span><span style="color:#A5D6FF"> create</span><span style="color:#A5D6FF"> secret</span><span style="color:#A5D6FF"> generic</span><span style="color:#A5D6FF"> phantom-wallet-key</span><span style="color:#79C0FF"> --from-file=phantom-keypair.json</span><span style="color:#79C0FF"> -n</span><span style="color:#A5D6FF"> solana-validators</span></span>
<span class="line"></span></code></pre></div>
</li>
<li>
<p><strong>Update Helm Chart Values:</strong> Add the wallet integration to the <code>values.yaml</code> file:</p>
<div class="code-block" data-lang="yaml"><button class="code-copy" type="button" aria-label="Copy code to clipboard"><span class="code-copy__idle">Copy</span><span class="code-copy__done">Copied</span></button><pre class="shiki github-dark-default" style="background-color:#0d1117;color:#e6edf3" tabindex="0"><code><span class="line"><span style="color:#7EE787"> env</span><span style="color:#E6EDF3">:</span></span>
<span class="line"><span style="color:#E6EDF3">   - </span><span style="color:#7EE787">name</span><span style="color:#E6EDF3">: </span><span style="color:#A5D6FF">SOLANA_WALLET_KEYPAIR</span></span>
<span class="line"><span style="color:#7EE787">     valueFrom</span><span style="color:#E6EDF3">:</span></span>
<span class="line"><span style="color:#7EE787">       secretKeyRef</span><span style="color:#E6EDF3">:</span></span>
<span class="line"><span style="color:#7EE787">         name</span><span style="color:#E6EDF3">: </span><span style="color:#A5D6FF">phantom-wallet-key</span></span>
<span class="line"><span style="color:#7EE787">         key</span><span style="color:#E6EDF3">: </span><span style="color:#A5D6FF">phantom-keypair.json</span></span>
<span class="line"></span></code></pre></div>
</li>
<li>
<p><strong>Deploy and Verify:</strong></p>
<div class="code-block" data-lang="bash"><button class="code-copy" type="button" aria-label="Copy code to clipboard"><span class="code-copy__idle">Copy</span><span class="code-copy__done">Copied</span></button><pre class="shiki github-dark-default" style="background-color:#0d1117;color:#e6edf3" tabindex="0"><code><span class="line"><span style="color:#FFA657"> helm</span><span style="color:#A5D6FF"> upgrade</span><span style="color:#79C0FF"> --install</span><span style="color:#A5D6FF"> solana-validator</span><span style="color:#A5D6FF"> ./chart</span><span style="color:#79C0FF"> -n</span><span style="color:#A5D6FF"> solana-validators</span><span style="color:#79C0FF"> -f</span><span style="color:#A5D6FF"> values.yaml</span></span>
<span class="line"><span style="color:#FFA657"> kubectl</span><span style="color:#A5D6FF"> get</span><span style="color:#A5D6FF"> pods</span><span style="color:#79C0FF"> -n</span><span style="color:#A5D6FF"> solana-validators</span></span>
<span class="line"></span></code></pre></div>
</li>
</ol>
<hr>
<h2 id="advanced-customizations" tabindex="-1"><a class="heading-anchor" href="#advanced-customizations" aria-label="Link to this section">#</a> Advanced Customizations</h2>
<h3 id="1-custom-resource-definitions-crds" tabindex="-1"><a class="heading-anchor" href="#1-custom-resource-definitions-crds" aria-label="Link to this section">#</a> 1. Custom Resource Definitions (CRDs)</h3>
<p>Create custom Kubernetes objects for managing validator configurations. Example CRD:</p>
<div class="code-block" data-lang="yaml"><button class="code-copy" type="button" aria-label="Copy code to clipboard"><span class="code-copy__idle">Copy</span><span class="code-copy__done">Copied</span></button><pre class="shiki github-dark-default" style="background-color:#0d1117;color:#e6edf3" tabindex="0"><code><span class="line"><span style="color:#7EE787">apiVersion</span><span style="color:#E6EDF3">: </span><span style="color:#A5D6FF">solana.k8s.io/v1alpha1</span></span>
<span class="line"><span style="color:#7EE787">kind</span><span style="color:#E6EDF3">: </span><span style="color:#A5D6FF">ValidatorConfig</span></span>
<span class="line"><span style="color:#7EE787">metadata</span><span style="color:#E6EDF3">:</span></span>
<span class="line"><span style="color:#7EE787">  name</span><span style="color:#E6EDF3">: </span><span style="color:#A5D6FF">custom-validator</span></span>
<span class="line"><span style="color:#7EE787">spec</span><span style="color:#E6EDF3">:</span></span>
<span class="line"><span style="color:#7EE787">  cpu</span><span style="color:#E6EDF3">: </span><span style="color:#A5D6FF">"3000m"</span></span>
<span class="line"><span style="color:#7EE787">  memory</span><span style="color:#E6EDF3">: </span><span style="color:#A5D6FF">"6Gi"</span></span>
<span class="line"><span style="color:#7EE787">  replicaCount</span><span style="color:#E6EDF3">: </span><span style="color:#79C0FF">5</span></span>
<span class="line"></span></code></pre></div>
<h3 id="2-network-policies" tabindex="-1"><a class="heading-anchor" href="#2-network-policies" aria-label="Link to this section">#</a> 2. Network Policies</h3>
<p>Restrict access to validator nodes for enhanced security:</p>
<div class="code-block" data-lang="yaml"><button class="code-copy" type="button" aria-label="Copy code to clipboard"><span class="code-copy__idle">Copy</span><span class="code-copy__done">Copied</span></button><pre class="shiki github-dark-default" style="background-color:#0d1117;color:#e6edf3" tabindex="0"><code><span class="line"><span style="color:#7EE787">apiVersion</span><span style="color:#E6EDF3">: </span><span style="color:#A5D6FF">networking.k8s.io/v1</span></span>
<span class="line"><span style="color:#7EE787">kind</span><span style="color:#E6EDF3">: </span><span style="color:#A5D6FF">NetworkPolicy</span></span>
<span class="line"><span style="color:#7EE787">metadata</span><span style="color:#E6EDF3">:</span></span>
<span class="line"><span style="color:#7EE787">  name</span><span style="color:#E6EDF3">: </span><span style="color:#A5D6FF">allow-specified-traffic</span></span>
<span class="line"><span style="color:#7EE787">  namespace</span><span style="color:#E6EDF3">: </span><span style="color:#A5D6FF">solana-validators</span></span>
<span class="line"><span style="color:#7EE787">spec</span><span style="color:#E6EDF3">:</span></span>
<span class="line"><span style="color:#7EE787">  podSelector</span><span style="color:#E6EDF3">: {}</span></span>
<span class="line"><span style="color:#7EE787">  ingress</span><span style="color:#E6EDF3">:</span></span>
<span class="line"><span style="color:#E6EDF3">    - </span><span style="color:#7EE787">from</span><span style="color:#E6EDF3">:</span></span>
<span class="line"><span style="color:#E6EDF3">        - </span><span style="color:#7EE787">ipBlock</span><span style="color:#E6EDF3">:</span></span>
<span class="line"><span style="color:#7EE787">            cidr</span><span style="color:#E6EDF3">: </span><span style="color:#A5D6FF">192.168.1.0/24</span></span>
<span class="line"><span style="color:#7EE787">      ports</span><span style="color:#E6EDF3">:</span></span>
<span class="line"><span style="color:#E6EDF3">        - </span><span style="color:#7EE787">protocol</span><span style="color:#E6EDF3">: </span><span style="color:#A5D6FF">TCP</span></span>
<span class="line"><span style="color:#7EE787">          port</span><span style="color:#E6EDF3">: </span><span style="color:#79C0FF">8899</span></span>
<span class="line"></span></code></pre></div>
<hr>
<h2 id="best-practices" tabindex="-1"><a class="heading-anchor" href="#best-practices" aria-label="Link to this section">#</a> Best Practices</h2>
<p><figure class="post-figure"><img src="https://adityaseth.in/images/blog/solana-kubechain/img-05.gif" alt="" width="704" height="353" loading="lazy" decoding="async"></figure></p>
<ul>
<li>
<p><strong>Use Multi-Cloud Deployments:</strong> Diversify node locations across AWS, GCP, and Azure.</p>
</li>
<li>
<p><strong>Secure Access:</strong> Implement RBAC, network policies, and secrets management.</p>
</li>
<li>
<p><strong>Regular Backups:</strong> Schedule periodic backups of validator data.</p>
</li>
<li>
<p><strong>Optimize Performance:</strong> Leverage Kubernetes taints/tolerations for isolating high-priority workloads.</p>
</li>
</ul>
<hr>
<h2 id="conclusion" tabindex="-1"><a class="heading-anchor" href="#conclusion" aria-label="Link to this section">#</a> Conclusion</h2>
<p><figure class="post-figure"><img src="https://adityaseth.in/images/blog/solana-kubechain/img-06.gif" alt="" width="500" height="278" loading="lazy" decoding="async"></figure></p>
<p>By integrating Kubernetes with Solana and leveraging advanced customizations, developers can streamline validator management, enhance scalability, and ensure high availability. This guide provides the foundation for deploying and managing Solana validators efficiently, empowering the next wave of decentralized applications.</p>
<hr>
<p><strong><em>If you want to contact me, feel free to drop an e-mail at</em></strong> <a href="mailto:setha4195@gmail.com"><strong><em>setha4195@gmail.com</em></strong></a> <strong><em>or check out my website at</em></strong> <a href="https://adityaseth.in"><strong><em>adityaseth.in</em></strong></a> <strong><em>:)<br>
Also, here’s my</em></strong> <a href="https://adityaseth.in/linkedin"><strong><em>LinkedIn</em></strong></a><strong><em>.</em></strong></p>
<p><strong><em>Thank you everyone for reading,</em></strong></p>
<p><strong><em>Over and out,<br>
Aditya Seth.</em></strong></p>
<p><figure class="post-figure"><img src="https://adityaseth.in/images/blog/solana-kubechain/img-07.gif" alt="" width="500" height="250" loading="lazy" decoding="async"></figure></p>
<hr>
]]></content>
  </entry>
  <entry>
    <title type="text">Securing Kubernetes Clusters with eBPF: A Privacy-First Approach</title>
    <link rel="alternate" type="text/html" href="https://adityaseth.in/blog/shieldk8s"/>
    <id>https://adityaseth.in/blog/shieldk8s</id>
    <published>2025-01-07T09:00:00+05:30</published>
    <updated>2025-01-07T09:00:00+05:30</updated>
    <category term="security"/>
    <category term="kubernetes"/>
    <summary type="text">ShieldK8s - eBPF and Cilium for privacy-first Kubernetes cluster security with zero external data transmission.</summary>
    <content type="html"><![CDATA[<h2 id="why-this-idea" tabindex="-1"><a class="heading-anchor" href="#why-this-idea" aria-label="Link to this section">#</a> Why this idea?</h2>
<p class="post-lede">Link: <a href="https://github.com/AdityaSeth777/ShieldK8s.git" target="_blank" rel="noopener">https://github.com/AdityaSeth777/ShieldK8s.git</a></p>
<p>Picture this: It's 3 AM, and I'm staring at my terminal, watching our company's cloud bill skyrocket. Why? Our &quot;cloud-native&quot; security monitoring solution was sending terabytes of data to external services. The kicker? Most of that data contained sensitive information that never should have left our infrastructure in the first place.</p>
<p>&quot;There has to be a better way,&quot; I muttered, reaching for my fifth cup of coffee. That's when it hit me - what if we could build a Kubernetes security dashboard that's as powerful as cloud solutions but keeps everything local? Like that time you told your friend a secret, and they broadcasted it on social media. Some things are just meant to stay private, right?</p>
<p>Enter ShieldK8s: a privacy-focused security dashboard that's like having your cake and eating it too - if your cake was made of Kubernetes metrics and eBPF magic, and you could keep it all to yourself.</p>
<p>Tools like <a href="https://prometheus.io/" target="_blank" rel="noopener">Prometheus</a> and <a href="https://grafana.com/" target="_blank" rel="noopener">Grafana</a> provide robust monitoring features, they frequently necessitate transmitting data to external services. Introducing <a href="https://github.com/AdityaSeth777/ShieldK8s" target="_blank" rel="noopener"><strong>ShieldK8s</strong></a>: a privacy-centric security dashboard that ensures your monitoring data remains within your infrastructure, where it truly belongs.</p>
<p><figure class="post-figure"><img src="https://adityaseth.in/images/blog/shieldk8s/img-01.png" alt="" width="3420" height="1898" loading="lazy" decoding="async"></figure></p>
<h2 id="why-i-built-another-security-dashboard-xd" tabindex="-1"><a class="heading-anchor" href="#why-i-built-another-security-dashboard-xd" aria-label="Link to this section">#</a> Why I Built Another Security Dashboard - xD</h2>
<p>Let me tell you a story about three types of security tools I've encountered:</p>
<ol>
<li>
<p>The Chatty One: &quot;Hey, cloud! Here's ALL our data!&quot;</p>
</li>
<li>
<p>The Slow Poke: &quot;Oh, that security breach? Let me tell you about it... next week.&quot;</p>
</li>
<li>
<p>The Surface Scratcher: &quot;Everything looks fine!&quot; (Narrator: It wasn't fine)</p>
</li>
</ol>
<p>Sound familiar? That's because most security tools are either oversharing, underperforming, or just scratching the surface. It's like having a security guard who either livestreams your private moments, takes coffee breaks during break-ins, or only checks if the front door is locked (spoiler: attackers rarely use the front door)</p>
<h2 id="why-another-security-dashboard-really-why-" tabindex="-1"><a class="heading-anchor" href="#why-another-security-dashboard-really-why-" aria-label="Link to this section">#</a> Why Another Security Dashboard? - Really why ?</h2>
<p>The rise of cloud-native applications has brought unprecedented scalability and flexibility, but also new security challenges. Traditional security tools often fall short in three critical areas:</p>
<ol>
<li>
<p><strong>Privacy</strong>: Many solutions require sending sensitive data to external services</p>
</li>
<li>
<p><strong>Real-time Monitoring</strong>: Legacy tools can't keep up with the dynamic nature of Kubernetes</p>
</li>
<li>
<p><strong>Deep Visibility</strong>: Surface-level metrics miss critical security events</p>
</li>
</ol>
<p><figure class="post-figure"><img src="https://adityaseth.in/images/blog/shieldk8s/img-02.png" alt="" width="3420" height="1896" loading="lazy" decoding="async"></figure></p>
<h2 id="the-power-of-ebpf" tabindex="-1"><a class="heading-anchor" href="#the-power-of-ebpf" aria-label="Link to this section">#</a> The Power of eBPF</h2>
<p>At the heart of ShieldK8s lies <a href="https://ebpf.io/" target="_blank" rel="noopener">eBPF (extended Berkeley Packet Filter)</a>, a revolutionary technology that provides unprecedented visibility into Linux kernel operations. Unlike traditional monitoring solutions, eBPF allows us to:</p>
<ul>
<li>
<p>Intercept and analyze system calls in real-time</p>
</li>
<li>
<p>Monitor network traffic at the kernel level</p>
</li>
<li>
<p>Enforce security policies with minimal overhead</p>
</li>
<li>
<p>Collect detailed metrics without impacting performance</p>
</li>
</ul>
<h2 id="cilium-network-security-reimagined" tabindex="-1"><a class="heading-anchor" href="#cilium-network-security-reimagined" aria-label="Link to this section">#</a> Cilium: Network Security Reimagined</h2>
<p><a href="https://cilium.io/" target="_blank" rel="noopener">Cilium</a>, built on eBPF, provides our network security foundation. It offers:</p>
<ul>
<li>
<p>Layer 7 policy enforcement</p>
</li>
<li>
<p>Transparent encryption</p>
</li>
<li>
<p>Service mesh integration</p>
</li>
<li>
<p>Real-time network visibility</p>
</li>
</ul>
<div class="code-block" data-lang="yaml"><button class="code-copy" type="button" aria-label="Copy code to clipboard"><span class="code-copy__idle">Copy</span><span class="code-copy__done">Copied</span></button><pre class="shiki github-dark-default" style="background-color:#0d1117;color:#e6edf3" tabindex="0"><code><span class="line"><span style="color:#8B949E"># Example Cilium Network Policy</span></span>
<span class="line"><span style="color:#7EE787">apiVersion</span><span style="color:#E6EDF3">: </span><span style="color:#A5D6FF">cilium.io/v2</span></span>
<span class="line"><span style="color:#7EE787">kind</span><span style="color:#E6EDF3">: </span><span style="color:#A5D6FF">CiliumNetworkPolicy</span></span>
<span class="line"><span style="color:#7EE787">metadata</span><span style="color:#E6EDF3">:</span></span>
<span class="line"><span style="color:#7EE787">  name</span><span style="color:#E6EDF3">: </span><span style="color:#A5D6FF">secure-pods</span></span>
<span class="line"><span style="color:#7EE787">spec</span><span style="color:#E6EDF3">:</span></span>
<span class="line"><span style="color:#7EE787">  endpointSelector</span><span style="color:#E6EDF3">:</span></span>
<span class="line"><span style="color:#7EE787">    matchLabels</span><span style="color:#E6EDF3">:</span></span>
<span class="line"><span style="color:#7EE787">      app</span><span style="color:#E6EDF3">: </span><span style="color:#A5D6FF">security-dashboard</span></span>
<span class="line"><span style="color:#7EE787">  ingress</span><span style="color:#E6EDF3">:</span></span>
<span class="line"><span style="color:#E6EDF3">  - </span><span style="color:#7EE787">fromEndpoints</span><span style="color:#E6EDF3">:</span></span>
<span class="line"><span style="color:#E6EDF3">    - </span><span style="color:#7EE787">matchLabels</span><span style="color:#E6EDF3">:</span></span>
<span class="line"><span style="color:#7EE787">        io.kubernetes.pod.namespace</span><span style="color:#E6EDF3">: </span><span style="color:#A5D6FF">monitoring</span></span>
<span class="line"></span></code></pre></div>
<h2 id="privacy-first-architecture" tabindex="-1"><a class="heading-anchor" href="#privacy-first-architecture" aria-label="Link to this section">#</a> Privacy-First Architecture</h2>
<p>Unlike traditional monitoring stacks that send data to cloud services, ShieldK8s keeps everything local:</p>
<ol>
<li>
<p><strong>Data Collection</strong></p>
<ul>
<li>
<p>eBPF probes collect kernel-level metrics</p>
</li>
<li>
<p>Cilium monitors network traffic</p>
</li>
<li>
<p>All processing happens within your cluster</p>
</li>
</ul>
</li>
<li>
<p><strong>Storage</strong></p>
<ul>
<li>
<p>Local <a href="https://prometheus.io/" target="_blank" rel="noopener">Prometheus</a> instance</p>
</li>
<li>
<p>Configurable retention policies</p>
</li>
<li>
<p>No external dependencies</p>
</li>
</ul>
</li>
<li>
<p><strong>Visualization</strong></p>
<ul>
<li>
<p>React-based dashboard</p>
</li>
<li>
<p>Real-time updates via WebSocket</p>
</li>
<li>
<p>Cyberpunk-inspired UI for better visibility</p>
</li>
</ul>
</li>
</ol>
<h2 id="features-that-matter" tabindex="-1"><a class="heading-anchor" href="#features-that-matter" aria-label="Link to this section">#</a> Features That Matter</h2>
<h3 id="1-real-time-threat-detection" tabindex="-1"><a class="heading-anchor" href="#1-real-time-threat-detection" aria-label="Link to this section">#</a> 1. Real-time Threat Detection</h3>
<div class="code-block" data-lang="typescript"><button class="code-copy" type="button" aria-label="Copy code to clipboard"><span class="code-copy__idle">Copy</span><span class="code-copy__done">Copied</span></button><pre class="shiki github-dark-default" style="background-color:#0d1117;color:#e6edf3" tabindex="0"><code><span class="line"><span style="color:#FF7B72">interface</span><span style="color:#FFA657"> SecurityAlert</span><span style="color:#E6EDF3"> {</span></span>
<span class="line"><span style="color:#FFA657">  severity</span><span style="color:#FF7B72">:</span><span style="color:#A5D6FF"> 'critical'</span><span style="color:#FF7B72"> |</span><span style="color:#A5D6FF"> 'high'</span><span style="color:#FF7B72"> |</span><span style="color:#A5D6FF"> 'medium'</span><span style="color:#FF7B72"> |</span><span style="color:#A5D6FF"> 'low'</span><span style="color:#E6EDF3">;</span></span>
<span class="line"><span style="color:#FFA657">  message</span><span style="color:#FF7B72">:</span><span style="color:#79C0FF"> string</span><span style="color:#E6EDF3">;</span></span>
<span class="line"><span style="color:#FFA657">  source</span><span style="color:#FF7B72">:</span><span style="color:#79C0FF"> string</span><span style="color:#E6EDF3">;</span></span>
<span class="line"><span style="color:#FFA657">  destination</span><span style="color:#FF7B72">:</span><span style="color:#79C0FF"> string</span><span style="color:#E6EDF3">;</span></span>
<span class="line"><span style="color:#FFA657">  timestamp</span><span style="color:#FF7B72">:</span><span style="color:#79C0FF"> string</span><span style="color:#E6EDF3">;</span></span>
<span class="line"><span style="color:#E6EDF3">}</span></span>
<span class="line"></span></code></pre></div>
<h3 id="2-network-flow-visualization" tabindex="-1"><a class="heading-anchor" href="#2-network-flow-visualization" aria-label="Link to this section">#</a> 2. Network Flow Visualization</h3>
<div class="code-block" data-lang="typescript"><button class="code-copy" type="button" aria-label="Copy code to clipboard"><span class="code-copy__idle">Copy</span><span class="code-copy__done">Copied</span></button><pre class="shiki github-dark-default" style="background-color:#0d1117;color:#e6edf3" tabindex="0"><code><span class="line"><span style="color:#FF7B72">interface</span><span style="color:#FFA657"> NetworkConnection</span><span style="color:#E6EDF3"> {</span></span>
<span class="line"><span style="color:#FFA657">  source</span><span style="color:#FF7B72">:</span><span style="color:#79C0FF"> string</span><span style="color:#E6EDF3">;</span></span>
<span class="line"><span style="color:#FFA657">  destination</span><span style="color:#FF7B72">:</span><span style="color:#79C0FF"> string</span><span style="color:#E6EDF3">;</span></span>
<span class="line"><span style="color:#FFA657">  protocol</span><span style="color:#FF7B72">:</span><span style="color:#79C0FF"> string</span><span style="color:#E6EDF3">;</span></span>
<span class="line"><span style="color:#FFA657">  bytesTransferred</span><span style="color:#FF7B72">:</span><span style="color:#79C0FF"> number</span><span style="color:#E6EDF3">;</span></span>
<span class="line"><span style="color:#FFA657">  status</span><span style="color:#FF7B72">:</span><span style="color:#A5D6FF"> 'allowed'</span><span style="color:#FF7B72"> |</span><span style="color:#A5D6FF"> 'blocked'</span><span style="color:#E6EDF3">;</span></span>
<span class="line"><span style="color:#E6EDF3">}</span></span>
<span class="line"></span></code></pre></div>
<h3 id="3-performance-metrics" tabindex="-1"><a class="heading-anchor" href="#3-performance-metrics" aria-label="Link to this section">#</a> 3. Performance Metrics</h3>
<ul>
<li>
<p>CPU and memory usage</p>
</li>
<li>
<p>Network throughput</p>
</li>
<li>
<p>Policy violation counts</p>
</li>
<li>
<p>Response time analysis</p>
</li>
</ul>
<h2 id="getting-started" tabindex="-1"><a class="heading-anchor" href="#getting-started" aria-label="Link to this section">#</a> Getting Started</h2>
<ol>
<li>Create a local cluster:</li>
</ol>
<div class="code-block" data-lang="bash"><button class="code-copy" type="button" aria-label="Copy code to clipboard"><span class="code-copy__idle">Copy</span><span class="code-copy__done">Copied</span></button><pre class="shiki github-dark-default" style="background-color:#0d1117;color:#e6edf3" tabindex="0"><code><span class="line"><span style="color:#FFA657">kind</span><span style="color:#A5D6FF"> create</span><span style="color:#A5D6FF"> cluster</span><span style="color:#79C0FF"> --name</span><span style="color:#A5D6FF"> security-cluster</span></span>
<span class="line"></span></code></pre></div>
<ol start="2">
<li>Install Cilium:</li>
</ol>
<div class="code-block" data-lang="bash"><button class="code-copy" type="button" aria-label="Copy code to clipboard"><span class="code-copy__idle">Copy</span><span class="code-copy__done">Copied</span></button><pre class="shiki github-dark-default" style="background-color:#0d1117;color:#e6edf3" tabindex="0"><code><span class="line"><span style="color:#FFA657">helm</span><span style="color:#A5D6FF"> install</span><span style="color:#A5D6FF"> cilium</span><span style="color:#A5D6FF"> cilium/cilium</span><span style="color:#FF7B72"> \</span></span>
<span class="line"><span style="color:#79C0FF">  --namespace</span><span style="color:#A5D6FF"> kube-system</span><span style="color:#FF7B72"> \</span></span>
<span class="line"><span style="color:#79C0FF">  --set</span><span style="color:#A5D6FF"> hubble.relay.enabled=</span><span style="color:#79C0FF">true</span><span style="color:#FF7B72"> \</span></span>
<span class="line"><span style="color:#79C0FF">  --set</span><span style="color:#A5D6FF"> hubble.ui.enabled=</span><span style="color:#79C0FF">true</span></span>
<span class="line"></span></code></pre></div>
<ol start="3">
<li>Deploy monitoring stack:</li>
</ol>
<div class="code-block" data-lang="bash"><button class="code-copy" type="button" aria-label="Copy code to clipboard"><span class="code-copy__idle">Copy</span><span class="code-copy__done">Copied</span></button><pre class="shiki github-dark-default" style="background-color:#0d1117;color:#e6edf3" tabindex="0"><code><span class="line"><span style="color:#FFA657">helm</span><span style="color:#A5D6FF"> install</span><span style="color:#A5D6FF"> prometheus</span><span style="color:#A5D6FF"> prometheus-community/kube-prometheus-stack</span><span style="color:#FF7B72"> \</span></span>
<span class="line"><span style="color:#79C0FF">  --namespace</span><span style="color:#A5D6FF"> monitoring</span><span style="color:#FF7B72"> \</span></span>
<span class="line"><span style="color:#79C0FF">  --create-namespace</span></span>
<span class="line"></span></code></pre></div>
<h2 id="the-road-ahead" tabindex="-1"><a class="heading-anchor" href="#the-road-ahead" aria-label="Link to this section">#</a> The Road Ahead</h2>
<p>The future of Kubernetes security lies in privacy-focused, real-time monitoring solutions. ShieldK8s is just the beginning. Upcoming features include:</p>
<ul>
<li>
<p>Machine learning-based anomaly detection</p>
</li>
<li>
<p>Custom policy frameworks</p>
</li>
<li>
<p>Advanced visualization tools</p>
</li>
<li>
<p>Extended eBPF capabilities</p>
</li>
</ul>
<h2 id="resources" tabindex="-1"><a class="heading-anchor" href="#resources" aria-label="Link to this section">#</a> Resources</h2>
<ul>
<li>
<p><a href="https://ebpf.io/what-is-ebpf/" target="_blank" rel="noopener">eBPF Documentation</a></p>
</li>
<li>
<p><a href="https://docs.cilium.io/en/stable/security/policy/" target="_blank" rel="noopener">Cilium Network Policies</a></p>
</li>
<li>
<p><a href="https://kubernetes.io/docs/concepts/security/" target="_blank" rel="noopener">Kubernetes Security Best Practices</a></p>
</li>
<li>
<p><a href="https://github.com/AdityaSeth777/shieldk8s" target="_blank" rel="noopener">Project Repository</a></p>
</li>
</ul>
<h2 id="conclusion" tabindex="-1"><a class="heading-anchor" href="#conclusion" aria-label="Link to this section">#</a> Conclusion</h2>
<p>In a time when data privacy is crucial, ShieldK8s provides a strong alternative to cloud-based monitoring tools. By using eBPF and Cilium, we gain detailed insight into our Kubernetes clusters while maintaining privacy and security.</p>
<p><a href="https://imgflip.com/i/9fwp46" target="_blank" rel="noopener"><figure class="post-figure"><img src="https://adityaseth.in/images/blog/shieldk8s/img-03.jpg" alt="" width="500" height="500" loading="lazy" decoding="async"></figure></a></p>
<p>Remember: The best security tools are those that protect both your infrastructure and your data privacy.</p>
<hr>
<p><strong><em>If you want to contact me, feel free to drop an e-mail at</em></strong> <a href="mailto:setha4195@gmail.com"><strong><em>setha4195@gmail.com</em></strong></a> <strong><em>or check out my website at</em></strong> <a href="https://adityaseth.in"><strong><em>adityaseth.in</em></strong></a> <strong><em>:)<br>
Also, here’s my</em></strong> <a href="https://adityaseth.in/linkedin"><strong><em>LinkedIn</em></strong></a><strong><em>.</em></strong></p>
<p><strong><em>Thank you everyone for reading,</em></strong></p>
<p><strong><em>Over and out,<br>
Aditya Seth.</em></strong></p>
<p><figure class="post-figure"><img src="https://adityaseth.in/images/blog/shieldk8s/img-04.gif" alt="" width="500" height="233" loading="lazy" decoding="async"></figure></p>
<hr>
]]></content>
  </entry>
  <entry>
    <title type="text">The Great Bat-Name Debate: Can NLP and KR Solve Sheldon&apos;s Riddle?</title>
    <link rel="alternate" type="text/html" href="https://adityaseth.in/blog/nlp-sheldon"/>
    <id>https://adityaseth.in/blog/nlp-sheldon</id>
    <published>2024-06-06T09:00:00+05:30</published>
    <updated>2024-06-06T09:00:00+05:30</updated>
    <category term="nlp"/>
    <category term="ai"/>
    <summary type="text">NLP meets Knowledge Representation to resolve Batman&apos;s naming paradox from The Big Bang Theory - a rigorous look at semantic ambiguity.</summary>
    <content type="html"><![CDATA[<p class="post-lede">Even the brilliant Dr. Sheldon Cooper can get stumped by a good riddle. In a classic episode of &quot;The Big Bang Theory,&quot; Sheldon presents a seemingly simple question to his friends Leonard and Penny, but it quickly spirals into a hilarious exploration of language, logic, and the complexities of superhero identities.</p>
<h3 id="bazinga-can-we-solve-the-great-bat-identity-crisis" tabindex="-1"><a class="heading-anchor" href="#bazinga-can-we-solve-the-great-bat-identity-crisis" aria-label="Link to this section">#</a> Bazinga! Can we solve the Great Bat-Identity Crisis?</h3>
<p>Let's see the scene first and then a small transcript of it :</p>
<p><a href="https://www.youtube.com/watch?v=1ZzFFkYdjWA" target="_blank" rel="noopener">https://www.youtube.com/watch?v=1ZzFFkYdjWA</a></p>
<p>Transcript :</p>
<div class="code-block" data-lang="text"><button class="code-copy" type="button" aria-label="Copy code to clipboard"><span class="code-copy__idle">Copy</span><span class="code-copy__done">Copied</span></button><pre class="shiki github-dark-default" style="background-color:#0d1117;color:#e6edf3" tabindex="0"><code><span class="line"><span>Series 09 Episode 21 - The Viewing Party Combustion</span></span>
<span class="line"><span>Scene 1: The comic book store.</span></span>
<span class="line"><span></span></span>
<span class="line"><span>Sheldon: I have a question about Batman. Batman is a man who dresses up like a bat. Man-bat is a part man, part bat hybrid. Now, if Man-Bat dressed up as a man to fight crime, would he be Man-Batman?</span></span>
<span class="line"><span></span></span>
<span class="line"><span>Leonard: No, he’d be Bat-Man-Bat.</span></span>
<span class="line"><span></span></span>
<span class="line"><span>Raj: But wouldn’t Man-Batman just be a Batman that was bitten by a radioactive man?</span></span>
<span class="line"><span></span></span>
<span class="line"><span>Howard: But Batman is a man. You’re talking about a man who would have the powers of a man. That’s just Man-Man.</span></span>
<span class="line"><span></span></span>
<span class="line"><span>Sheldon: Well, isn’t Man-Man just Man?</span></span>
<span class="line"><span></span></span>
<span class="line"><span>Leonard: But what if Man-Man dressed as a bat?</span></span>
<span class="line"><span></span></span>
<span class="line"><span>Raj: Well, that’s just Batman.</span></span>
<span class="line"><span></span></span>
<span class="line"><span>Leonard: No, if a man dresses as a bat, that’s Batman, but if Man-Man dresses as a bat, that’s Batman-Man.</span></span>
<span class="line"><span></span></span>
<span class="line"><span>Howard: So does that answer your question?</span></span>
<span class="line"><span></span></span>
<span class="line"><span>Sheldon: Oh, I haven’t asked it yet.</span></span>
<span class="line"><span></span></span>
<span class="line"><span>Scene 2: Leonard’s bedroom.</span></span>
<span class="line"><span></span></span>
<span class="line"><span>Sheldon: (Knock, knock, knock) Leonard. (Knock, knock, knock) Leonard. (Knock, knock, knock) Leonard.</span></span>
<span class="line"><span></span></span>
<span class="line"><span>Leonard: What?</span></span>
<span class="line"><span></span></span>
<span class="line"><span>Sheldon: I never got to ask my question about Batman.</span></span>
<span class="line"><span></span></span>
<span class="line"><span>Leonard: What is it?</span></span>
<span class="line"><span></span></span>
<span class="line"><span>Sheldon: If Batman were bitten by a radioactive Man-Bat, and then fought crime disguised as Man-Bat, would he be Man-Bat-Man-Bat-Man or simply Man-Bat-Man-Bat-Batman?</span></span>
<span class="line"><span></span></span>
<span class="line"><span>Penny: Is he still wearing the Batman suit under the Man-Bat suit?</span></span>
<span class="line"><span></span></span>
<span class="line"><span>Sheldon: I’ll be back.</span></span>
<span class="line"><span></span></span></code></pre></div>
<p>And the question stands for itself. Let's see if we can figure this out using KR and NLP, respectively :D</p>
<hr>
<h1>Method 1 (Definitive) : KR in AI</h1>
<p><strong><em>Let's first figure this out using the traditional and reliable Knowledge Representation (KR) in AI :</em></strong></p>
<p><strong><em>The main question is :</em></strong></p>
<p><strong><em>If Batman were bitten by a radioactive Man-Bat, and then fought crime disguised as Man-Bat, would he be Man-Bat-Man-Bat-Man or simply Man-Bat-Man-Bat-Batman?</em></strong></p>
<p><strong>We will try to solve with a vague overview of KR in AI so as not to overwhelm the new readers, students, etc.</strong></p>
<ol>
<li>
<p><strong>Define Entities and Relationships</strong>:</p>
<ul>
<li>
<p><strong>Entities</strong>: Batman, Man-Bat, Radioactive Man-Bat</p>
</li>
<li>
<p><strong>Properties</strong>: IsBatman, IsManBat, IsRadioactive</p>
</li>
</ul>
</li>
<li>
<p><strong>Formalize Relationships</strong>:</p>
<ul>
<li>
<p>Batman can become a Man-Bat if bitten by a radioactive Man-Bat.</p>
</li>
<li>
<p>Batman fights crime.</p>
</li>
</ul>
</li>
<li>
<p><strong>Reasoning with Logical Rules</strong>:</p>
<ul>
<li>
<p>If Batman is bitten by a radioactive Man-Bat, then he becomes a Man-Bat.</p>
</li>
<li>
<p>If Batman, as Man-Bat, fights crime, he is still Batman in essence.</p>
</li>
</ul>
</li>
</ol>
<h3 id="diagrammatic-representation-of-the-question-" tabindex="-1"><a class="heading-anchor" href="#diagrammatic-representation-of-the-question-" aria-label="Link to this section">#</a> Diagrammatic Representation of the question :</h3>
<div class="code-block" data-lang="text"><button class="code-copy" type="button" aria-label="Copy code to clipboard"><span class="code-copy__idle">Copy</span><span class="code-copy__done">Copied</span></button><pre class="shiki github-dark-default" style="background-color:#0d1117;color:#e6edf3" tabindex="0"><code><span class="line"><span>Batman --(bitten by radioactive Man-Bat)--> Man-Bat --(fights crime)--> Man-Bat-Man-Bat-Man OR Man-Bat-Man-Bat-Batman</span></span>
<span class="line"><span></span></span></code></pre></div>
<h3 id="mathematical-and-logical-notation" tabindex="-1"><a class="heading-anchor" href="#mathematical-and-logical-notation" aria-label="Link to this section">#</a> Mathematical and Logical Notation</h3>
<ol>
<li>
<p><strong>Define Variables</strong>:</p>
<ul>
<li>
<p>Let <code>BM</code> be Batman.</p>
</li>
<li>
<p>Let <code>MB</code> be Man-Bat.</p>
</li>
<li>
<p>Let <code>RMBM</code> be Radioactive Man-Bat.</p>
</li>
</ul>
</li>
<li>
<p><strong>Define Predicates</strong>:</p>
<ul>
<li>
<p><code>IsBatman(BM)</code>: B is Batman.</p>
</li>
<li>
<p><code>IsManBat(X)</code>: X is a Man-Bat.</p>
</li>
<li>
<p><code>Bitten(X, Y)</code>: X is bitten by Y.</p>
</li>
<li>
<p><code>FightsCrime(X)</code>: X fights crime.</p>
</li>
</ul>
</li>
<li>
<p><strong>Logical Rules</strong>:</p>
<ul>
<li>
<p>Rule 1: <code>Bitten(BM, RMBM) → IsManBat(BM)</code></p>
</li>
<li>
<p>Rule 2: <code>IsManBat(BM) ∧ FightsCrime(BM) → (IsBatman(BM) ∨ IsManBat(BM))</code></p>
</li>
</ul>
</li>
</ol>
<hr>
<h3 id="reasoning-process" tabindex="-1"><a class="heading-anchor" href="#reasoning-process" aria-label="Link to this section">#</a> Reasoning Process</h3>
<ol>
<li>
<p><strong>Initial State</strong>:</p>
<ul>
<li>
<p><code>IsBatman(BM)</code></p>
</li>
<li>
<p><code>RMBM</code> exists.</p>
</li>
</ul>
</li>
<li>
<p><strong>Transition</strong>:</p>
<ul>
<li>
<p>Batman (BM) is bitten by a radioactive Man-Bat (RMBM):</p>
<ul>
<li><code>Bitten(BM, RMBM) → IsManBat(BM)</code></li>
</ul>
</li>
</ul>
</li>
<li>
<p><strong>Result</strong>:</p>
<ul>
<li>
<p>Now, Batman (BM) is a Man-Bat (MB) and fights crime:</p>
</li>
<li>
<p><code>IsManBat(BM) ∧ FightsCrime(BM) → IsBatman(BM) ∨ IsManBat(BM)</code></p>
</li>
</ul>
</li>
</ol>
<div class="code-block" data-lang="text"><button class="code-copy" type="button" aria-label="Copy code to clipboard"><span class="code-copy__idle">Copy</span><span class="code-copy__done">Copied</span></button><pre class="shiki github-dark-default" style="background-color:#0d1117;color:#e6edf3" tabindex="0"><code><span class="line"><span>  Initial State</span></span>
<span class="line"><span>           +------+</span></span>
<span class="line"><span>           |      |</span></span>
<span class="line"><span>           v      |</span></span>
<span class="line"><span>      +----+      |</span></span>
<span class="line"><span>      |  B |      |</span></span>
<span class="line"><span>      +----+      |</span></span>
<span class="line"><span>           |      |</span></span>
<span class="line"><span>           v      |</span></span>
<span class="line"><span>           Bitten by RMB</span></span>
<span class="line"><span>           +------+</span></span>
<span class="line"><span>           |      |</span></span>
<span class="line"><span>           v      |</span></span>
<span class="line"><span>      +---------+</span></span>
<span class="line"><span>      |  MBBM   |</span></span>
<span class="line"><span>      +---------+</span></span>
<span class="line"><span>           |   </span></span>
<span class="line"><span>           v</span></span>
<span class="line"><span>       Fights Crime as Man-Bat</span></span>
<span class="line"><span>           |</span></span>
<span class="line"><span>           v</span></span>
<span class="line"><span>      +----------+</span></span>
<span class="line"><span>      |  MBMBBM  |</span></span>
<span class="line"><span>      +----------+</span></span>
<span class="line"><span>           |</span></span>
<span class="line"><span>           v</span></span>
<span class="line"><span>Man-Bat-Man-Bat-Batman (MBMBBM)</span></span>
<span class="line"><span></span></span></code></pre></div>
<h2 id="logical-breakdown" tabindex="-1"><a class="heading-anchor" href="#logical-breakdown" aria-label="Link to this section">#</a> Logical Breakdown</h2>
<ol>
<li>
<p><strong>Initial Batman</strong> is represented as <code>BM</code>.</p>
</li>
<li>
<p><strong>Man-Bat</strong> is represented as <code>MB</code>.</p>
</li>
</ol>
<h3 id="transformations" tabindex="-1"><a class="heading-anchor" href="#transformations" aria-label="Link to this section">#</a> Transformations</h3>
<ol>
<li>
<p><strong>First Transformation:</strong></p>
<ul>
<li>
<p>Batman (<code>BM</code>) bitten by Man-Bat (<code>MB</code>).</p>
</li>
<li>
<p>Result: <code>B</code> → <code>MBBM</code>.</p>
</li>
</ul>
</li>
<li>
<p><strong>Second Transformation:</strong></p>
<ul>
<li>
<p>Man-Bat (<code>MBBM</code>) fights crime disguised as Man-Bat (<code>MB</code>).</p>
</li>
<li>
<p>Result: <code>MBBM</code> → <code>MBMBBM</code>.</p>
</li>
</ul>
</li>
</ol>
<p>Now let us see how modern advancements in natural language processing (NLP) can tackle the same conundrum.</p>
<p>As Sheldon Cooper once quipped, &quot;What's life without whimsy?&quot;</p>
<p><figure class="post-figure"><img src="https://adityaseth.in/images/blog/nlp-sheldon/img-02.gif" alt="" width="400" height="226" loading="lazy" decoding="async"></figure></p>
<p>This approach not only backs up our earlier findings but does so with the kind of computational skill that brings to mind Leonard's experiments and Howard's engineering talents. Below, I'll showcase the practical application of NLP using PyTorch to solve the Batman conundrum, transitioning from our KR model to a sophisticated NLP model.</p>
<hr>
<h1>Method 2 (Data dependent) : NLP</h1>
<p><figure class="post-figure"><img src="https://adityaseth.in/images/blog/nlp-sheldon/img-03.jpg" alt="" width="2000" height="1336" loading="lazy" decoding="async"></figure></p>
<p><strong><em>Let's first figure this out using NLP :</em></strong></p>
<p><strong><em>The main question is :</em></strong></p>
<p><strong><em>If Batman were bitten by a radioactive Man-Bat, and then fought crime disguised as Man-Bat, would he be Man-Bat-Man-Bat-Man or simply Man-Bat-Man-Bat-Batman?</em></strong></p>
<p><strong>We will try to solve with a vague overview of NLP so as not to overwhelm the new readers, students, etc. That's why I used Google's t5 model in it. :D</strong></p>
<p>First things first, GitHub link : <a href="https://github.com/AdityaSeth777/nlp-sheldon" target="_blank" rel="noopener">https://github.com/AdityaSeth777/nlp-sheldon</a></p>
<p>So, there are two things that needs to be said here :</p>
<ul>
<li>
<p>What did I do in there ?</p>
</li>
<li>
<p>How can anyone run it and find the answer ?</p>
</li>
</ul>
<hr>
<h2 id="what-did-i-do-in-there-" tabindex="-1"><a class="heading-anchor" href="#what-did-i-do-in-there-" aria-label="Link to this section">#</a> What did I do in there ?</h2>
<p><figure class="post-figure"><img src="https://adityaseth.in/images/blog/nlp-sheldon/img-04.gif" alt="" width="400" height="226" loading="lazy" decoding="async"></figure></p>
<p>Great, let me tell you this by first introducing the file structure of the NLP project.</p>
<div class="code-block" data-lang="text"><button class="code-copy" type="button" aria-label="Copy code to clipboard"><span class="code-copy__idle">Copy</span><span class="code-copy__done">Copied</span></button><pre class="shiki github-dark-default" style="background-color:#0d1117;color:#e6edf3" tabindex="0"><code><span class="line"><span>│   .gitattributes</span></span>
<span class="line"><span>│   LICENSE</span></span>
<span class="line"><span>│   README.md</span></span>
<span class="line"><span>│   requirements.txt</span></span>
<span class="line"><span>├───data</span></span>
<span class="line"><span>│       dialogues.json</span></span>
<span class="line"><span>├───image</span></span>
<span class="line"><span>│   └───1717607383577.png   </span></span>
<span class="line"><span>├───scripts</span></span>
<span class="line"><span>│       infer.py</span></span>
<span class="line"><span>│       train.py</span></span>
<span class="line"><span>└───utils/</span></span>
<span class="line"><span>├── │   data_preprocessing.py</span></span>
<span class="line"><span>├── └──  __init__.py</span></span>
<span class="line"><span></span></span></code></pre></div>
<ol>
<li>
<p><strong>Data Preprocessing (</strong><a href="https://github.com/AdityaSeth777/nlp-sheldon/blob/main/utils/data_preprocessing.py" target="_blank" rel="noopener"><strong>data_preprocessing.py</strong></a><strong>)</strong></p>
<ul>
<li>
<p><strong>Cleaning:</strong> Removing unnecessary characters or formatting issues.</p>
</li>
<li>
<p><strong>Tokenization:</strong> Breaking down the input text into smaller parts (tokens) that the model can understand.</p>
</li>
<li>
<p><strong>Padding:</strong> Ensuring all sequences are of the same length by adding padding tokens where necessary.</p>
</li>
<li>
<p><strong>Encoding:</strong> Converting text into numerical format that the model can process.</p>
</li>
</ul>
</li>
</ol>
<p>Data preprocessing ensures that the data is in the right format for training and inference, making the model more effective.</p>
<ol start="2">
<li>
<p><strong>Training the Model (</strong><a href="https://github.com/AdityaSeth777/nlp-sheldon/blob/main/scripts/train.py" target="_blank" rel="noopener"><strong>train.py</strong></a><strong>)</strong></p>
<ul>
<li>
<p><strong>Loading and Configuring the Model:</strong> Using a pre-trained transformer model (like Google's T5) and adapting it for the specific task.</p>
</li>
<li>
<p><strong>Preparing the Data:</strong> Creating training and validation datasets using preprocessed data.</p>
</li>
<li>
<p><strong>Training Loop:</strong></p>
<ul>
<li>
<p><strong>Forward Pass:</strong> Feeding input data to the model to get predictions.</p>
</li>
<li>
<p><strong>Loss Calculation:</strong> Comparing predictions with the actual labels to calculate the error.</p>
</li>
<li>
<p><strong>Backward Pass and Optimization:</strong> Adjusting the model’s parameters to reduce the error in subsequent iterations.</p>
</li>
</ul>
</li>
</ul>
</li>
</ol>
<p>Training equips the model to generate accurate and meaningful responses to queries about Batman.</p>
<ol start="3">
<li>
<p><strong>Inference (</strong><a href="https://github.com/AdityaSeth777/nlp-sheldon/blob/main/scripts/infer.py" target="_blank" rel="noopener"><strong>infer.py</strong></a><strong>)</strong></p>
<ul>
<li>
<p><strong>Loading the Trained Model and Tokenizer:</strong> Ensuring the model and tokenizer are ready for inference.</p>
</li>
<li>
<p><strong>Encoding Input Text:</strong> Converting new input text into a format suitable for the model.</p>
</li>
<li>
<p><strong>Generating Output:</strong> The model processes the input and generates a response.</p>
</li>
<li>
<p><strong>Decoding the Response:</strong> Converting the model’s numerical output back into human-readable text.</p>
</li>
</ul>
</li>
</ol>
<p>And after doing all of these things, what's the output after around 20-30 errors, sleepless nights, and training countlessly ?</p>
<h2 id="output-" tabindex="-1"><a class="heading-anchor" href="#output-" aria-label="Link to this section">#</a> Output :</h2>
<p><figure class="post-figure"><img src="https://adityaseth.in/images/blog/nlp-sheldon/img-05.png" alt="" width="1616" height="649" loading="lazy" decoding="async"></figure></p>
<p>I mean this is definitely not the traditional and best method to solve it, but I had free time, so why not ? :D</p>
<hr>
<p><strong>Coming to the next question,</strong></p>
<h2 id="how-can-anyone-run-it-and-find-the-answer-" tabindex="-1"><a class="heading-anchor" href="#how-can-anyone-run-it-and-find-the-answer-" aria-label="Link to this section">#</a> How can anyone run it and find the answer ?</h2>
<p><figure class="post-figure"><img src="https://adityaseth.in/images/blog/nlp-sheldon/img-06.jpg" alt="" width="1024" height="765" loading="lazy" decoding="async"></figure></p>
<h2 id="project-overview" tabindex="-1"><a class="heading-anchor" href="#project-overview" aria-label="Link to this section">#</a> Project Overview</h2>
<p>This project consists of two main scripts:</p>
<ol>
<li>
<p><a href="https://github.com/AdityaSeth777/nlp-sheldon/blob/main/scripts/train.py" target="_blank" rel="noopener"><code>train.py</code></a>: For training the model on custom dialogue datasets.</p>
</li>
<li>
<p><a href="https://github.com/AdityaSeth777/nlp-sheldon/blob/main/scripts/infer.py" target="_blank" rel="noopener"><code>infer.py</code></a>: For generating responses using the trained model.</p>
</li>
</ol>
<h2 id="setup-instructions" tabindex="-1"><a class="heading-anchor" href="#setup-instructions" aria-label="Link to this section">#</a> Setup Instructions</h2>
<h3 id="prerequisites" tabindex="-1"><a class="heading-anchor" href="#prerequisites" aria-label="Link to this section">#</a> Prerequisites</h3>
<ul>
<li>
<p>Python 3.7 or later</p>
</li>
<li>
<p>PyTorch</p>
</li>
<li>
<p>Transformers library by Hugging Face</p>
</li>
<li>
<p>Git</p>
</li>
</ul>
<h3 id="installation" tabindex="-1"><a class="heading-anchor" href="#installation" aria-label="Link to this section">#</a> Installation</h3>
<ol>
<li>
<p>Clone the repository.</p>
</li>
<li>
<p>Create a virtual environment and activate it.</p>
</li>
<li>
<p>Install the required packages, by using <code>pip install -r requirements.txt</code></p>
</li>
</ol>
<h3 id="model-and-tokenizer" tabindex="-1"><a class="heading-anchor" href="#model-and-tokenizer" aria-label="Link to this section">#</a> Model and Tokenizer</h3>
<p>Ensure you have the pre-trained Google's t5 model and tokenizer saved in the <code>models</code> directory:</p>
<ul>
<li>
<p><code>models/t5_model</code></p>
</li>
<li>
<p><code>models/t5_tokenizer</code></p>
</li>
</ul>
<p>If not, use the train command to train and save the models.</p>
<h2 id="usage" tabindex="-1"><a class="heading-anchor" href="#usage" aria-label="Link to this section">#</a> Usage</h2>
<h3 id="training" tabindex="-1"><a class="heading-anchor" href="#training" aria-label="Link to this section">#</a> Training</h3>
<p>To train the model, use the <a href="https://github.com/AdityaSeth777/nlp-sheldon/blob/main/scripts/train.py" target="_blank" rel="noopener"><code>train.py</code></a> script. Ensure your training data is properly preprocessed and available.</p>
<h3 id="inference" tabindex="-1"><a class="heading-anchor" href="#inference" aria-label="Link to this section">#</a> Inference</h3>
<p>To generate responses using the trained model, use the <a href="https://github.com/AdityaSeth777/nlp-sheldon/blob/main/scripts/infer.py" target="_blank" rel="noopener"><code>infer.py</code></a> script.</p>
<hr>
<h2 id="conclusion-ƪʃ" tabindex="-1"><a class="heading-anchor" href="#conclusion-ƪʃ" aria-label="Link to this section">#</a> Conclusion ƪ(˘⌣˘)ʃ</h2>
<p>So, before concluding, I want to say that there were two phases of me before starting this project and after completing this project.</p>
<ul>
<li>
<p>Before starting, I was this :</p>
<p><figure class="post-figure"><img src="https://adityaseth.in/images/blog/nlp-sheldon/img-07.gif" alt="" width="245" height="245" loading="lazy" decoding="async"></figure></p>
</li>
<li>
<p>After this project, I was this :</p>
</li>
</ul>
<p>So, yes now if you meet someone who matches your taste in old sitcoms and romcoms, then you can say confidently that you know the answer to the riddle asked in The Big Bang Theory S9E21. Although, the odds of having this conversation is like 1 in 18M (Got the reference ? :D)</p>
<p>Reason to do this : I was relaxing after completing my freelancing projects and thought to do delve into ML. Also, this particular episode was on so I though to myself, why not ? :D</p>
<p>Happy reading, y'all.<br>
Aditya.</p>
<p><figure class="post-figure"><img src="https://adityaseth.in/images/blog/nlp-sheldon/img-09.gif" alt="" width="498" height="231" loading="lazy" decoding="async"></figure></p>
<hr>
<p><strong><em>If you want to contact me, feel free to drop an e-mail at</em></strong> <a href="mailto:setha4195@gmail.com"><strong><em>setha4195@gmail.com</em></strong></a> <strong><em>or check out my website at</em></strong> <a href="https://adityaseth.in"><strong><em>adityaseth.in</em></strong></a> <strong><em>:)<br>
Also, here’s my</em></strong> <a href="https://adityaseth.in/linkedin"><strong><em>LinkedIn</em></strong></a><strong><em>.</em></strong></p>
<p><strong><em>Thank you everyone for reading,</em></strong></p>
<p><strong><em>Over and out,<br>
Aditya Seth.</em></strong></p>
<hr>
]]></content>
  </entry>
  <entry>
    <title type="text">Beyond the Clouds: A Journey of Mentorship, Triumphs, and Swags</title>
    <link rel="alternate" type="text/html" href="https://adityaseth.in/blog/beyond-the-clouds"/>
    <id>https://adityaseth.in/blog/beyond-the-clouds</id>
    <published>2024-01-27T09:00:00+05:30</published>
    <updated>2024-01-27T09:00:00+05:30</updated>
    <category term="cloud"/>
    <category term="devops"/>
    <summary type="text">Mentoring 70+ students through Google Cloud Study Jams and earning the Associate Cloud Engineer certification along the way.</summary>
    <content type="html"><![CDATA[<p class="post-lede"><figure class="post-figure"><img src="https://adityaseth.in/images/blog/beyond-the-clouds/img-01.jpg" alt="" width="1920" height="1729" loading="lazy" decoding="async"></figure></p>
<p><a href="https://www.linkedin.com/posts/aditya-seth-270833233_cloudstudyjams-mentorship-achievement-activity-7157047460148744193-OSkV?utm_source=share&amp;utm_medium=member_desktop" target="_blank" rel="noopener">https://www.linkedin.com/posts/aditya-seth-270833233_cloudstudyjams-mentorship-achievement-activity-7157047460148744193-OSkV?utm_source=share&amp;utm_medium=member_desktop</a></p>
<hr>
<h2 id="chapter-1-the-call-to-facilitate" tabindex="-1"><a class="heading-anchor" href="#chapter-1-the-call-to-facilitate" aria-label="Link to this section">#</a> <strong>Chapter 1: The Call to Facilitate</strong></h2>
<p>It was the end of August when the announcement about the Cloud Study Jams hit our group. Instantly, my excitement skyrocketed - I'd have the chance to dive back into the Google Cloud console. Our DevOps lead was preoccupied with placements, and suddenly, I found myself entrusted with the role of facilitator. The thrill was palpable; I was ready to take on this responsibility.</p>
<hr>
<h2 id="chapter-2-registration-rush" tabindex="-1"><a class="heading-anchor" href="#chapter-2-registration-rush" aria-label="Link to this section">#</a> <strong>Chapter 2: Registration Rush</strong></h2>
<p>The process began with forms - filling them out, ensuring accuracy, and maintaining data privacy, a crucial aspect emphasized in our instructions. Upon being officially selected as the facilitator, I couldn't contain my excitement. I shared the news with friends and family, though their reactions were varied. While my family was a bit uncertain how to respond, my friends and juniors were incredibly enthusiastic.</p>
<p>Crafting a Google form to gather registrations for the Google Cloud Study Jam, Cohort 1, turned out to be an unexpected hit. A whopping 111 responses poured in, albeit with a few errors. Promptly, I reached out to those with incorrect entries, urging them to rectify the mistakes. Some responded, some didn't. But ensuring accuracy was pivotal, especially since it was my first time, and preserving the integrity of the facilitator code was paramount.</p>
<hr>
<h2 id="chapter-3-access-codes-and-initial-hurdles" tabindex="-1"><a class="heading-anchor" href="#chapter-3-access-codes-and-initial-hurdles" aria-label="Link to this section">#</a> <strong>Chapter 3: Access Codes and Initial Hurdles</strong></h2>
<p>As days passed, the registered participants started receiving their access codes. However, redemption wasn't without its hiccups. Some were too eager, attempting to redeem their codes swiftly, leading to subsequent account issues (and here the Community Manager - GDSC India Head : Nikita Gandhi was literally the saviour. She took the complaint codes, resolved them, was at our help always. A big shoutout to her and our whole GDSC India Facilitators Cohort 1 : 2023-24).For addressing these challenges, I informed the group about a session dedicated to resolving code redemption issues. Notably, this time around, the Study Jams focused on two crucial topics - Gen-AI Labs and Google Cloud Computing Foundation, a departure from the single-topic approach of previous sessions.</p>
<p>After confirming everyone had received their access codes, I conducted an official meeting explaining how to utilize both codes. Recognizing the scheduling conflicts for some, I organized a second meeting to ensure everyone was accommodated comfortably. It was about accessibility and inclusivity, ensuring that no one missed out due to timing constraints.</p>
<hr>
<h2 id="chapter-4-empowering-through-explanatory-videos" tabindex="-1"><a class="heading-anchor" href="#chapter-4-empowering-through-explanatory-videos" aria-label="Link to this section">#</a> <strong>Chapter 4: Empowering Through Explanatory Videos</strong></h2>
<p>As the participants ventured into the labs, it felt like diving into a treasure trove of possibilities. Yet, navigating the intricate pathways of Google Cloud seemed like traversing uncharted waters for many. Recognizing this, I decided to be their guiding light by crafting these tailor-made explanatory videos. It was like preparing a map, not just showing the way but allowing them to explore at their own pace. Why schedule meetings when these videos could be their anytime, anywhere mentor?</p>
<p>In just a blink of two to three weeks, magic unfolded. Out of the 108 eager students who joined this journey, a whopping 46 to 47 emerged as champions, completing both the Gen-AI Labs and the Google Cloud Computing pathways. Picture this: it was like watching a garden flourish after nurturing it with care and dedication. My heart swelled with pride; it was like witnessing the seeds of knowledge grow into thriving plants of expertise.</p>
<p>Seeing their progress wasn't just about ticking checkboxes. It was about celebrating their late-night eureka moments, the &quot;aha&quot; seconds when something clicked. These weren't just milestones; they were proof of their resilience, determination, and my unwavering support standing beside them.</p>
<p>But it didn't stop there. Clearing doubts, conducting late-night sessions, and providing explanatory solutions became routine. The official communication channel, our active WhatsApp Group, became a haven for troubleshooting. The collaborative effort and round-the-clock support from both students and myself made this journey incredibly rewarding.</p>
<hr>
<h2 id="chapter-5-triumphs-and-milestones" tabindex="-1"><a class="heading-anchor" href="#chapter-5-triumphs-and-milestones" aria-label="Link to this section">#</a> <strong>Chapter 5: Triumphs and Milestones</strong></h2>
<p>Despite initial setbacks due to exams and other commitments, 70 students successfully completed the Study Jam, propelling us to Tier 2. It was a culmination of late-night calls, meetings, and the dedication of everyone involved. It made me reflect on my own experiences as a student, wishing for a more active mentor. Being on the other side now, I hope I lived up to those expectations and even exceeded them.</p>
<hr>
<h2 id="chapter-7-embracing-new-opportunities" tabindex="-1"><a class="heading-anchor" href="#chapter-7-embracing-new-opportunities" aria-label="Link to this section">#</a> <strong>Chapter 7: Embracing New Opportunities</strong></h2>
<p>The success story of our college spread, attracting the attention of another institution - St. Xaviers. They approached me to mentor their Study Jam Cohort 2. I was warmly welcomed, and my methods, albeit earning me the nickname &quot;MNS&quot; (Mentor with No Swags), were embraced. Assisting them mirrored my previous experience, and their lead's support ensured a seamless transition.</p>
<hr>
<h2 id="chapter-8-ace-certification-and-swags-celebration" tabindex="-1"><a class="heading-anchor" href="#chapter-8-ace-certification-and-swags-celebration" aria-label="Link to this section">#</a> <strong>Chapter 8: ACE Certification and Swags Celebration</strong></h2>
<p>As the pinnacle of achievement, I attained the ACE Certification from Google - a personal triumph validating dedication. This journey, filled with learning, support, and growth, was not just about Google Cloud or technical knowledge. It was a testament to the power of mentorship, collaboration, and perseverance.</p>
<p><figure class="post-figure"><img src="https://adityaseth.in/images/blog/beyond-the-clouds/img-02.jpg" alt="" width="3168" height="792" loading="lazy" decoding="async"></figure></p>
<p><a href="https://www.linkedin.com/posts/aditya-seth-270833233_googlecloud-certificationachievement-cloudengineer-activity-7137736256259522560-mFPK?utm_source=share&amp;utm_medium=member_desktop" target="_blank" rel="noopener">https://www.linkedin.com/posts/aditya-seth-270833233_googlecloud-certificationachievement-cloudengineer-activity-7137736256259522560-mFPK?utm_source=share&amp;utm_medium=member_desktop</a></p>
<p>As I look back, I am grateful for the opportunities to guide and inspire others.</p>
<hr>
<h2 id="chapter-9-swags-distribution-participants-d" tabindex="-1"><a class="heading-anchor" href="#chapter-9-swags-distribution-participants-d" aria-label="Link to this section">#</a> Chapter 9 : Swags Distribution - Participants (:D)</h2>
<p>To mark this success and the Study Jam's completion, a vibrant swags distribution event added a colorful finale to our journey. A time to celebrate achievements and cherish the bonds forged through this remarkable learning expedition.</p>
<p>Here were the participants' swags :</p>
<p><figure class="post-figure"><img src="https://adityaseth.in/images/blog/beyond-the-clouds/img-03.jpg" alt="" width="2188" height="2802" loading="lazy" decoding="async"></figure></p>
<p>And not to forget the patience of my 60 successful participants, here are they :</p>
<div class="table-wrap"><table>
<thead>
<tr>
<th>Aashish Agarwal</th>
</tr>
</thead>
<tbody>
<tr>
<td>Aayush Bhardwaj</td>
</tr>
<tr>
<td>Abanindra.M.Singh</td>
</tr>
<tr>
<td>Abdul Kalam</td>
</tr>
<tr>
<td>Abhishikta Ray</td>
</tr>
<tr>
<td>Aditya Kumar</td>
</tr>
<tr>
<td>Adrita paul</td>
</tr>
<tr>
<td>Amit Saha</td>
</tr>
<tr>
<td>Anik Mitra</td>
</tr>
<tr>
<td>Anish Biswas</td>
</tr>
<tr>
<td>Anish Sarkar</td>
</tr>
<tr>
<td>Aryak Bhattacharya</td>
</tr>
<tr>
<td>Aryan Kumar Shaw</td>
</tr>
<tr>
<td>Ashmit Ghosh</td>
</tr>
<tr>
<td>Chakra Sayan Roy</td>
</tr>
<tr>
<td>Chandika Sarkar</td>
</tr>
<tr>
<td>DEBAJYOTI CHOUDHURY</td>
</tr>
<tr>
<td>Debargha Podder</td>
</tr>
<tr>
<td>Debojyoti Mandal</td>
</tr>
<tr>
<td>Ditipriya Mukherjee</td>
</tr>
<tr>
<td>Doyelshree Bhui</td>
</tr>
<tr>
<td>Golam Ali</td>
</tr>
<tr>
<td>Jeet Raha</td>
</tr>
<tr>
<td>Kandarpa saha</td>
</tr>
<tr>
<td>Komal Agarwal</td>
</tr>
<tr>
<td>Kumar Aditya</td>
</tr>
<tr>
<td>MAHADEB KOLEY</td>
</tr>
<tr>
<td>Manmohan Khandelwal</td>
</tr>
<tr>
<td>Md Amir Sabir</td>
</tr>
<tr>
<td>Neha Kumari</td>
</tr>
<tr>
<td>Sanchari Roy</td>
</tr>
<tr>
<td>PARNA ROY CHOWDHURY</td>
</tr>
<tr>
<td>Prangshu Das</td>
</tr>
<tr>
<td>PRATHAMA PRATIHAR</td>
</tr>
<tr>
<td>PRIYABRATA MONDAL</td>
</tr>
<tr>
<td>Priyanshu Dutta</td>
</tr>
<tr>
<td>Rahul Kundu</td>
</tr>
<tr>
<td>Raj De Modak</td>
</tr>
<tr>
<td>Riddhi Santra</td>
</tr>
<tr>
<td>RIMITA SARKAR</td>
</tr>
<tr>
<td>Ritarshi Bandyopadhyay</td>
</tr>
<tr>
<td>RUDRA KADEL</td>
</tr>
<tr>
<td>Saini Guha Roy</td>
</tr>
<tr>
<td>Satyaki Dey</td>
</tr>
<tr>
<td>Sheetal Raj</td>
</tr>
<tr>
<td>Shivam Mishra</td>
</tr>
<tr>
<td>Shrestha Samanta</td>
</tr>
<tr>
<td>Shrutika Jha</td>
</tr>
<tr>
<td>Shubhankar Banerjee</td>
</tr>
<tr>
<td>Snikdhendu Pramanik</td>
</tr>
<tr>
<td>Sobhan Bose</td>
</tr>
<tr>
<td>Sourashish Mandal</td>
</tr>
<tr>
<td>SOURAV LOUHA</td>
</tr>
<tr>
<td>Subhadeep Roy</td>
</tr>
<tr>
<td>Subham Maity</td>
</tr>
<tr>
<td>Subhradeep Bhattacharya</td>
</tr>
<tr>
<td>Sudipto Banerjee</td>
</tr>
<tr>
<td>Sumit Kumar</td>
</tr>
<tr>
<td>Sunny Kumar</td>
</tr>
<tr>
<td>Utsav Tiwari</td>
</tr>
</tbody>
</table>
</div><p><figure class="post-figure"><img src="https://adityaseth.in/images/blog/beyond-the-clouds/img-04.jpg" alt="" width="1920" height="1920" loading="lazy" decoding="async"></figure></p>
<hr>
<h2 id="chapter-10-facilitator-swags-and-ending-note-d" tabindex="-1"><a class="heading-anchor" href="#chapter-10-facilitator-swags-and-ending-note-d" aria-label="Link to this section">#</a> Chapter 10 : Facilitator Swags and Ending Note (:D)</h2>
<p><figure class="post-figure"><img src="https://adityaseth.in/images/blog/beyond-the-clouds/img-05.jpg" alt="" width="2608" height="4624" loading="lazy" decoding="async"></figure></p>
<p>This journey, filled with learning, support, and growth, was not just about Google Cloud or technical knowledge. It was a testament to the power of mentorship, collaboration, and perseverance. As I look back, I am grateful for the opportunities to guide and inspire others. Here's to many more opportunities to continue this journey of empowering others through knowledge and support.</p>
<p><figure class="post-figure"><img src="https://adityaseth.in/images/blog/beyond-the-clouds/img-06.webp" alt="" width="1333" height="750" loading="lazy" decoding="async"></figure></p>
<p>And would I be a facilitator again if I get a chance ? Hell, YES.</p>
<p>Thanks for reading,<br>
Aditya Seth.</p>
<hr>
]]></content>
  </entry>
  <entry>
    <title type="text">Future-Proofing Data: Holographic Storage in Kubernetes</title>
    <link rel="alternate" type="text/html" href="https://adityaseth.in/blog/future-proofing-data-using-holographic-data-storage-in-kubernetes-for-long-term-high-density-storage-and-retrieval"/>
    <id>https://adityaseth.in/blog/future-proofing-data-using-holographic-data-storage-in-kubernetes-for-long-term-high-density-storage-and-retrieval</id>
    <published>2024-01-08T09:00:00+05:30</published>
    <updated>2024-01-08T09:00:00+05:30</updated>
    <category term="kubernetes"/>
    <category term="cloud"/>
    <summary type="text">Integrating holographic storage into Kubernetes for long-term, high-density data retention at scale.</summary>
    <content type="html"><![CDATA[<p class="post-lede">In the world of handling lots of data, something really cool caught my eye - the idea of mixing Kubernetes with holographic storage (fancy way to store lots of stuff in a small space).</p>
<p>Imagine if data wasn't just kept on drives but in these cool hologram-like things - holographic storage is like that! And Kubernetes, it's the maestro making sure all this data plays nice together.</p>
<p>This mix-up sounds like it could solve a big problem - how to stash a crazy amount of data. It hints at a fresh way, not the usual, where data lives in these holographic worlds (I have to explore the multiversal concept after MCU tried, duhh!).</p>
<p>But there's a catch - it's tricky. Getting these holograms to work with Kubernetes' system is like fitting pieces in a puzzle :'( We need smart solutions and a bit of trial and error. It's a mystery that needs cracking :D But I have an unique solution for this, NGL :)</p>
<p>So, greetings to the readers of my blog :) Let's explore this adventure together. I intend to check out a future where Kubernetes and holographic storage team up, opening doors for data that goes beyond what we know, where we find answers to storing data in smarter ways. Otherwise, it will be a fun read, I promise xD.</p>
<hr>
<h2 id="understanding-kubernetes" tabindex="-1"><a class="heading-anchor" href="#understanding-kubernetes" aria-label="Link to this section">#</a> <strong>Understanding Kubernetes</strong></h2>
<p><figure class="post-figure"><img src="https://adityaseth.in/images/blog/future-proofing-data-using-holographic-data-storage-in-kubernetes-for-long-term-high-density-storage-and-retrieval/img-01.jpg" alt="" width="1024" height="1024" loading="lazy" decoding="async"></figure></p>
<p>Think of Kubernetes as an organizer, for your applications. It's like having an assistant that seamlessly coordinates your apps on your computer or phone.</p>
<p>So what is Kubernetes? It acts as the behind the scenes hero, like John Favreau in the Marvel Cinematic Universe (Happy &lt;3). It knows where each app should be, like a traffic controller managing cars on a bustling street. Its role is to ensure that each app has everything it needs while preventing any interference between them.</p>
<p>Now you might wonder why Kubernetes is significant and why you should use it. Well picture your apps being haphazardly scattered like toys over the floor. That's where Kubernetes steps in - it organizes everything neatly guaranteeing operation so that you can enjoy using your devices without any disruptions.</p>
<p>To put it simply Kubernetes acts as the conductor of an orchestra ensuring that all instruments play harmoniously - except, in this case it's your apps!</p>
<hr>
<h2 id="holographic-data-storage-basics" tabindex="-1"><a class="heading-anchor" href="#holographic-data-storage-basics" aria-label="Link to this section">#</a> <strong>Holographic Data Storage Basics</strong></h2>
<p><figure class="post-figure"><img src="https://adityaseth.in/images/blog/future-proofing-data-using-holographic-data-storage-in-kubernetes-for-long-term-high-density-storage-and-retrieval/img-02.jpg" alt="" width="1024" height="1024" loading="lazy" decoding="async"></figure></p>
<p>Holographic data storage is a means of storing so much loads of information with the aid of light and special materials. It does not store the data on a flat surface, as in the case of a hard drive, rather it uses lasers to store information throughout a material but this time in 3D, kind of like those 3D movies but for data.</p>
<p>This is the working procedure:</p>
<ol>
<li>
<p><strong>Saving Data:</strong> Every time saving is made, through holography, lasers are divided into two beams. One beam will carry the info that we want to save and the other will help in making a pattern inside this specific material.</p>
</li>
<li>
<p><strong>Storing in 3D:</strong> Unlike the regular storage that writes on a surface, holographic storage writes data everywhere inside the material. It's writing a story in every page and in every corner of the book.</p>
</li>
<li>
<p><strong>Getting Data Back:</strong> To read what's stored, we use another laser beam. It shows the stored info, and we can get it back.</p>
</li>
</ol>
<p>Holographic storage saves a lot of info in a small space. Just think of having a tiny crystal, but holding an entire library!</p>
<p>It uses the concepts as:</p>
<ol>
<li>
<p><strong>Light Patterns:</strong> Fancy patterns created by light when they meet, used to save data.</p>
</li>
<li>
<p><strong>Large Data in Small Space:</strong> It can store huge info in a small thing.</p>
</li>
<li>
<p><strong>Special Materials:</strong> These materials are very sensitive towards the light and help save the data.</p>
</li>
</ol>
<p>Though being still worked on, holographic storage may change the way we save and use big amounts of info sometime in the future!</p>
<hr>
<h2 id="challenges-in-integrating-holographic-storage-with-kubernete" tabindex="-1"><a class="heading-anchor" href="#challenges-in-integrating-holographic-storage-with-kubernete" aria-label="Link to this section">#</a> <strong>Challenges in Integrating Holographic Storage with Kubernetes</strong></h2>
<p>Whilst there is potential, combining storage with Kubernetes will have challenges that needs to be addressed for its smooth integration;</p>
<ol>
<li>
<p><strong>Complexity of Compatibility:</strong> Kubernetes is designed to work with 'storage systems like drives or cloud storage'. However configuring a technology like Holographic Storage needs modifying Kubernetes to understand and manage this unique way of storage.</p>
<p>This pseudo Go code attempts to configure a Kubernetes Pod to use holographic storage. It mimics the process of applying this configuration to the Kubernetes cluster.</p>
<div class="code-block" data-lang="go"><button class="code-copy" type="button" aria-label="Copy code to clipboard"><span class="code-copy__idle">Copy</span><span class="code-copy__done">Copied</span></button><pre class="shiki github-dark-default" style="background-color:#0d1117;color:#e6edf3" tabindex="0"><code><span class="line"><span style="color:#FF7B72"> package</span><span style="color:#FFA657"> main</span></span>
<span class="line"></span>
<span class="line"><span style="color:#FF7B72"> import</span><span style="color:#E6EDF3"> (</span></span>
<span class="line"><span style="color:#A5D6FF">     "</span><span style="color:#FFA657">fmt</span><span style="color:#A5D6FF">"</span></span>
<span class="line"><span style="color:#E6EDF3"> )</span></span>
<span class="line"></span>
<span class="line"><span style="color:#FF7B72"> var</span><span style="color:#E6EDF3"> podConfig </span><span style="color:#FF7B72">=</span><span style="color:#FF7B72"> map</span><span style="color:#E6EDF3">[</span><span style="color:#FF7B72">string</span><span style="color:#E6EDF3">]</span><span style="color:#FF7B72">interface</span><span style="color:#E6EDF3">{}{</span></span>
<span class="line"><span style="color:#A5D6FF">     "metadata"</span><span style="color:#E6EDF3">: </span><span style="color:#FF7B72">map</span><span style="color:#E6EDF3">[</span><span style="color:#FF7B72">string</span><span style="color:#E6EDF3">]</span><span style="color:#FF7B72">interface</span><span style="color:#E6EDF3">{}{</span></span>
<span class="line"><span style="color:#A5D6FF">         "name"</span><span style="color:#E6EDF3">: </span><span style="color:#A5D6FF">"example-pod"</span><span style="color:#E6EDF3">,</span></span>
<span class="line"><span style="color:#A5D6FF">         "labels"</span><span style="color:#E6EDF3">: </span><span style="color:#FF7B72">map</span><span style="color:#E6EDF3">[</span><span style="color:#FF7B72">string</span><span style="color:#E6EDF3">]</span><span style="color:#FF7B72">string</span><span style="color:#E6EDF3">{</span></span>
<span class="line"><span style="color:#A5D6FF">             "app"</span><span style="color:#E6EDF3">: </span><span style="color:#A5D6FF">"example-app"</span><span style="color:#E6EDF3">,</span></span>
<span class="line"><span style="color:#E6EDF3">         },</span></span>
<span class="line"><span style="color:#E6EDF3">     },</span></span>
<span class="line"><span style="color:#A5D6FF">     "spec"</span><span style="color:#E6EDF3">: </span><span style="color:#FF7B72">map</span><span style="color:#E6EDF3">[</span><span style="color:#FF7B72">string</span><span style="color:#E6EDF3">]</span><span style="color:#FF7B72">interface</span><span style="color:#E6EDF3">{}{</span></span>
<span class="line"><span style="color:#A5D6FF">         "containers"</span><span style="color:#E6EDF3">: []</span><span style="color:#FF7B72">map</span><span style="color:#E6EDF3">[</span><span style="color:#FF7B72">string</span><span style="color:#E6EDF3">]</span><span style="color:#FF7B72">interface</span><span style="color:#E6EDF3">{}{</span></span>
<span class="line"><span style="color:#E6EDF3">             {</span></span>
<span class="line"><span style="color:#A5D6FF">                 "name"</span><span style="color:#E6EDF3">:  </span><span style="color:#A5D6FF">"example-container"</span><span style="color:#E6EDF3">,</span></span>
<span class="line"><span style="color:#A5D6FF">                 "image"</span><span style="color:#E6EDF3">: </span><span style="color:#A5D6FF">"nginx"</span><span style="color:#E6EDF3">,</span></span>
<span class="line"><span style="color:#A5D6FF">                 "volumeMounts"</span><span style="color:#E6EDF3">: []</span><span style="color:#FF7B72">map</span><span style="color:#E6EDF3">[</span><span style="color:#FF7B72">string</span><span style="color:#E6EDF3">]</span><span style="color:#FF7B72">string</span><span style="color:#E6EDF3">{</span></span>
<span class="line"><span style="color:#E6EDF3">                     {</span></span>
<span class="line"><span style="color:#A5D6FF">                         "mountPath"</span><span style="color:#E6EDF3">: </span><span style="color:#A5D6FF">"/data"</span><span style="color:#E6EDF3">,</span></span>
<span class="line"><span style="color:#A5D6FF">                         "name"</span><span style="color:#E6EDF3">:      </span><span style="color:#A5D6FF">"holographic-storage"</span><span style="color:#E6EDF3">,</span></span>
<span class="line"><span style="color:#E6EDF3">                     },</span></span>
<span class="line"><span style="color:#E6EDF3">                 },</span></span>
<span class="line"><span style="color:#E6EDF3">             },</span></span>
<span class="line"><span style="color:#E6EDF3">         },</span></span>
<span class="line"><span style="color:#A5D6FF">         "volumes"</span><span style="color:#E6EDF3">: []</span><span style="color:#FF7B72">map</span><span style="color:#E6EDF3">[</span><span style="color:#FF7B72">string</span><span style="color:#E6EDF3">]</span><span style="color:#FF7B72">interface</span><span style="color:#E6EDF3">{}{</span></span>
<span class="line"><span style="color:#E6EDF3">             {</span></span>
<span class="line"><span style="color:#A5D6FF">                 "name"</span><span style="color:#E6EDF3">: </span><span style="color:#A5D6FF">"holographic-storage"</span><span style="color:#E6EDF3">,</span></span>
<span class="line"><span style="color:#A5D6FF">                 "holographicStorage"</span><span style="color:#E6EDF3">: </span><span style="color:#FF7B72">map</span><span style="color:#E6EDF3">[</span><span style="color:#FF7B72">string</span><span style="color:#E6EDF3">]</span><span style="color:#FF7B72">string</span><span style="color:#E6EDF3">{</span></span>
<span class="line"><span style="color:#A5D6FF">                     "type"</span><span style="color:#E6EDF3">:  </span><span style="color:#A5D6FF">"holographic"</span><span style="color:#E6EDF3">,</span></span>
<span class="line"><span style="color:#A5D6FF">                     "size"</span><span style="color:#E6EDF3">:  </span><span style="color:#A5D6FF">"10Gi"</span><span style="color:#E6EDF3">,</span></span>
<span class="line"><span style="color:#A5D6FF">                     "speed"</span><span style="color:#E6EDF3">: </span><span style="color:#A5D6FF">"high"</span><span style="color:#E6EDF3">,</span></span>
<span class="line"><span style="color:#E6EDF3">                 },</span></span>
<span class="line"><span style="color:#E6EDF3">             },</span></span>
<span class="line"><span style="color:#E6EDF3">         },</span></span>
<span class="line"><span style="color:#E6EDF3">     },</span></span>
<span class="line"><span style="color:#E6EDF3"> }</span></span>
<span class="line"></span>
<span class="line"><span style="color:#FF7B72"> func</span><span style="color:#D2A8FF"> applyPodConfiguration</span><span style="color:#E6EDF3">(config </span><span style="color:#FF7B72">map</span><span style="color:#E6EDF3">[</span><span style="color:#FF7B72">string</span><span style="color:#E6EDF3">]</span><span style="color:#FF7B72">interface</span><span style="color:#E6EDF3">{}) </span><span style="color:#FF7B72">error</span><span style="color:#E6EDF3"> {</span></span>
<span class="line"><span style="color:#FF7B72">     return</span><span style="color:#E6EDF3"> fmt.</span><span style="color:#D2A8FF">Errorf</span><span style="color:#E6EDF3">(</span><span style="color:#A5D6FF">"Integration Error: Unknown problem integrating holographic storage with Kubernetes"</span><span style="color:#E6EDF3">)</span></span>
<span class="line"><span style="color:#E6EDF3"> }</span></span>
<span class="line"></span>
<span class="line"><span style="color:#FF7B72"> func</span><span style="color:#D2A8FF"> main</span><span style="color:#E6EDF3">() {</span></span>
<span class="line"><span style="color:#E6EDF3">     err </span><span style="color:#FF7B72">:=</span><span style="color:#D2A8FF"> applyPodConfiguration</span><span style="color:#E6EDF3">(podConfig)</span></span>
<span class="line"><span style="color:#FF7B72">     if</span><span style="color:#E6EDF3"> err </span><span style="color:#FF7B72">!=</span><span style="color:#79C0FF"> nil</span><span style="color:#E6EDF3"> {</span></span>
<span class="line"><span style="color:#E6EDF3">         fmt.</span><span style="color:#D2A8FF">Println</span><span style="color:#E6EDF3">(err. </span><span style="color:#D2A8FF">Error</span><span style="color:#E6EDF3">())</span></span>
<span class="line"><span style="color:#E6EDF3">     }</span></span>
<span class="line"><span style="color:#E6EDF3"> }</span></span>
<span class="line"></span></code></pre></div>
</li>
<li>
<p><strong>Data Handling Differences:</strong> Kubernetes makes assumptions on and behaviors with respect to data handling when it comes to the storage system. In light of the fact that holographic storage is a new emerging technology there might be some misalignments between this tech and what Kubernetes assumes thereby making it difficult to access and retrieve data.</p>
</li>
<li>
<p><strong>Resource Allocation:</strong> Kubernetes will, when accessed, allocate resources like memory and processing power on gathered assumptions on how storage behaves. But holographic storage has their own special way to store and access data that may have different resource allocations that might not be readily provided by Kubernetes.</p>
</li>
<li>
<p><strong>Security Concerns:</strong> Integrating storage technology involves addressing multiple security challenges. All related issues pertaining to holographic storage within Kubernetes should ensure that the remained secured from possible challenges and threats from native integration.</p>
</li>
<li>
<p><strong>Testing:</strong> Coordination needs to be maintained in a way between Kubernetes and holographic storage such that it does not have any impact on the existing functionalities that are present either in Kubernetes or the connected systems.</p>
</li>
<li>
<p><strong>Adoption and support to the community:</strong> It may take some time and effort for the Kubernetes community to be convinced on storage integration benefits and reliability.</p>
</li>
</ol>
<hr>
<h2 id="solutions-and-innovations" tabindex="-1"><a class="heading-anchor" href="#solutions-and-innovations" aria-label="Link to this section">#</a> <strong>Solutions and Innovations</strong></h2>
<p><figure class="post-figure"><img src="https://adityaseth.in/images/blog/future-proofing-data-using-holographic-data-storage-in-kubernetes-for-long-term-high-density-storage-and-retrieval/img-03.jpg" alt="" width="1024" height="1024" loading="lazy" decoding="async"></figure></p>
<ol>
<li>
<p><strong>Adapting Kubernetes Volume Plugins:</strong> Developers are contemplating customizations of the volume plugins through which they can figure out how to modify them to fit holographic storage in realizing integration seamlessly. Customizing volume plugins that function on holographic storage systems is what will make developers be able to bridge the gap between the native storage options offered by volumes with respect to Kubernetes and the unique demands presented by holographic storage.</p>
</li>
<li>
<p><strong>Holographic Storage Drivers:</strong> Specialized Kubernetes drivers that take into account the holographic storage complexity is one factor that makes a difference. It offers a mediation layer that translates standard Kubernetes storage operations into inferences that holographic storage systems can understand so that Kubernetes can interact effectively with the data repositories.</p>
</li>
<li>
<p><strong>Dynamic Provisioning Enhancements:</strong> The native dynamic provisioning mechanisms of Kubernetes need to be developed further so that it can avail the same set of functionalities towards a holographic storage backend so that Kubernetes eases the dynamic provisioning of holographic storage resources and, along with it, allocation and management of holographic storage volumes efficiently.</p>
</li>
<li>
<p><strong>API Development Standard:</strong> Standardizing APIs for holographic storage systems would further help in the seamless integration of these systems into Kubernetes. Standard APIs facilitate Kubernetes to interact with different holographic storage solutions almost similarly, thus making the integration a standardized process itself.</p>
</li>
<li>
<p><strong>Holographic Storage:</strong> Custom Resource Definitions (CRDs) Developers will be able to define custom specification objects using the CRDs of Kubernetes to manage holographic storage resources within a Kubernetes environment. The CRDs, which are specific to holographic storage and were extended to the Kubernetes API, will allow treating holographic storage entities as native Kubernetes resources.</p>
</li>
</ol>
<hr>
<h2 id="technical-considerations" tabindex="-1"><a class="heading-anchor" href="#technical-considerations" aria-label="Link to this section">#</a> <strong>Technical Considerations</strong></h2>
<p><figure class="post-figure"><img src="https://adityaseth.in/images/blog/future-proofing-data-using-holographic-data-storage-in-kubernetes-for-long-term-high-density-storage-and-retrieval/img-04.jpg" alt="" width="800" height="400" loading="lazy" decoding="async"></figure></p>
<h3 id="-nginx-as-ingress-controller-in-kubernetes-for-holographic-d" tabindex="-1"><a class="heading-anchor" href="#-nginx-as-ingress-controller-in-kubernetes-for-holographic-d" aria-label="Link to this section">#</a> <strong>🚀 NGINX as Ingress Controller in Kubernetes for Holographic Data Storage.</strong></h3>
<p><strong>So, what will we be doing here ? :-&gt;</strong> We will be integrating NGINX with Kubernetes in the context of holographic data storage which will involve using NGINX as an Ingress Controller to manage incoming traffic and route it to various services or applications within the Kubernetes cluster :)</p>
<p>So, the steps are as follows :</p>
<hr>
<ul>
<li><strong>Deploying NGINX Ingress Controller</strong></li>
</ul>
<p>Firstly, we'll deploy NGINX as an Ingress Controller in your Kubernetes cluster using its dedicated manifest file. Below is an example manifest (<strong><em>nginx-ingress.yaml</em></strong>) to deploy NGINX Ingress Controller:</p>
<div class="code-block" data-lang="yaml"><button class="code-copy" type="button" aria-label="Copy code to clipboard"><span class="code-copy__idle">Copy</span><span class="code-copy__done">Copied</span></button><pre class="shiki github-dark-default" style="background-color:#0d1117;color:#e6edf3" tabindex="0"><code><span class="line"><span style="color:#7EE787">apiVersion</span><span style="color:#E6EDF3">: </span><span style="color:#A5D6FF">apps/v1</span></span>
<span class="line"><span style="color:#7EE787">kind</span><span style="color:#E6EDF3">: </span><span style="color:#A5D6FF">Deployment</span></span>
<span class="line"><span style="color:#7EE787">metadata</span><span style="color:#E6EDF3">:</span></span>
<span class="line"><span style="color:#7EE787">  name</span><span style="color:#E6EDF3">: </span><span style="color:#A5D6FF">nginx-ingress-controller</span></span>
<span class="line"><span style="color:#7EE787">  namespace</span><span style="color:#E6EDF3">: </span><span style="color:#A5D6FF">ingress-nginx</span></span>
<span class="line"><span style="color:#7EE787">spec</span><span style="color:#E6EDF3">:</span></span>
<span class="line"><span style="color:#7EE787">  replicas</span><span style="color:#E6EDF3">: </span><span style="color:#79C0FF">1</span></span>
<span class="line"><span style="color:#7EE787">  selector</span><span style="color:#E6EDF3">:</span></span>
<span class="line"><span style="color:#7EE787">    matchLabels</span><span style="color:#E6EDF3">:</span></span>
<span class="line"><span style="color:#7EE787">      app</span><span style="color:#E6EDF3">: </span><span style="color:#A5D6FF">nginx-ingress</span></span>
<span class="line"><span style="color:#7EE787">  template</span><span style="color:#E6EDF3">:</span></span>
<span class="line"><span style="color:#7EE787">    metadata</span><span style="color:#E6EDF3">:</span></span>
<span class="line"><span style="color:#7EE787">      labels</span><span style="color:#E6EDF3">:</span></span>
<span class="line"><span style="color:#7EE787">        app</span><span style="color:#E6EDF3">: </span><span style="color:#A5D6FF">nginx-ingress</span></span>
<span class="line"><span style="color:#7EE787">    spec</span><span style="color:#E6EDF3">:</span></span>
<span class="line"><span style="color:#7EE787">      containers</span><span style="color:#E6EDF3">:</span></span>
<span class="line"><span style="color:#E6EDF3">        - </span><span style="color:#7EE787">name</span><span style="color:#E6EDF3">: </span><span style="color:#A5D6FF">nginx-ingress-controller</span></span>
<span class="line"><span style="color:#7EE787">          image</span><span style="color:#E6EDF3">: </span><span style="color:#A5D6FF">nginx/nginx-ingress:latest</span></span>
<span class="line"><span style="color:#7EE787">          ports</span><span style="color:#E6EDF3">:</span></span>
<span class="line"><span style="color:#E6EDF3">            - </span><span style="color:#7EE787">name</span><span style="color:#E6EDF3">: </span><span style="color:#A5D6FF">http</span></span>
<span class="line"><span style="color:#7EE787">              containerPort</span><span style="color:#E6EDF3">: </span><span style="color:#79C0FF">80</span></span>
<span class="line"><span style="color:#E6EDF3">            - </span><span style="color:#7EE787">name</span><span style="color:#E6EDF3">: </span><span style="color:#A5D6FF">https</span></span>
<span class="line"><span style="color:#7EE787">              containerPort</span><span style="color:#E6EDF3">: </span><span style="color:#79C0FF">443</span></span>
<span class="line"></span></code></pre></div>
<p>If you want to add any additional configurations for NGINX Ingress Controller, that can be added at the below. This YAML file deploys the NGINX Ingress Controller in the (<strong><em>ingress-nginx</em></strong>) namespace, listening on ports 80 (HTTP) and 443 (HTTPS).</p>
<hr>
<ul>
<li><strong>Creating Ingress Resource</strong></li>
</ul>
<p>Next, we will create an Ingress resource to define how incoming requests should be handled by the NGINX Ingress Controller. Here's an example Ingress manifest (<strong><em>example-ingress.yaml</em></strong>):</p>
<div class="code-block" data-lang="yaml"><button class="code-copy" type="button" aria-label="Copy code to clipboard"><span class="code-copy__idle">Copy</span><span class="code-copy__done">Copied</span></button><pre class="shiki github-dark-default" style="background-color:#0d1117;color:#e6edf3" tabindex="0"><code><span class="line"><span style="color:#7EE787">apiVersion</span><span style="color:#E6EDF3">: </span><span style="color:#A5D6FF">networking.k8s.io/v1</span></span>
<span class="line"><span style="color:#7EE787">kind</span><span style="color:#E6EDF3">: </span><span style="color:#A5D6FF">Ingress</span></span>
<span class="line"><span style="color:#7EE787">metadata</span><span style="color:#E6EDF3">:</span></span>
<span class="line"><span style="color:#7EE787">  name</span><span style="color:#E6EDF3">: </span><span style="color:#A5D6FF">holographic-ingress</span></span>
<span class="line"><span style="color:#7EE787">  namespace</span><span style="color:#E6EDF3">: </span><span style="color:#A5D6FF">default</span></span>
<span class="line"><span style="color:#7EE787">  annotations</span><span style="color:#E6EDF3">:</span></span>
<span class="line"><span style="color:#7EE787">    nginx.ingress.kubernetes.io/rewrite-target</span><span style="color:#E6EDF3">: </span><span style="color:#A5D6FF">/</span></span>
<span class="line"><span style="color:#7EE787">spec</span><span style="color:#E6EDF3">:</span></span>
<span class="line"><span style="color:#7EE787">  rules</span><span style="color:#E6EDF3">:</span></span>
<span class="line"><span style="color:#E6EDF3">    - </span><span style="color:#7EE787">host</span><span style="color:#E6EDF3">: </span><span style="color:#A5D6FF">holographic.example.com</span></span>
<span class="line"><span style="color:#7EE787">      http</span><span style="color:#E6EDF3">:</span></span>
<span class="line"><span style="color:#7EE787">        paths</span><span style="color:#E6EDF3">:</span></span>
<span class="line"><span style="color:#E6EDF3">          - </span><span style="color:#7EE787">path</span><span style="color:#E6EDF3">: </span><span style="color:#A5D6FF">/data</span></span>
<span class="line"><span style="color:#7EE787">            pathType</span><span style="color:#E6EDF3">: </span><span style="color:#A5D6FF">Prefix</span></span>
<span class="line"><span style="color:#7EE787">            backend</span><span style="color:#E6EDF3">:</span></span>
<span class="line"><span style="color:#7EE787">              service</span><span style="color:#E6EDF3">:</span></span>
<span class="line"><span style="color:#7EE787">                name</span><span style="color:#E6EDF3">: </span><span style="color:#A5D6FF">holographic-service</span></span>
<span class="line"><span style="color:#7EE787">                port</span><span style="color:#E6EDF3">:</span></span>
<span class="line"><span style="color:#7EE787">                  number</span><span style="color:#E6EDF3">: </span><span style="color:#79C0FF">80</span></span>
<span class="line"></span></code></pre></div>
<p>In this configuration, the Ingress resource (<strong><em>holographic-ingress</em></strong>) specifies that requests coming for (<strong><em><a href="http://holographic.example.com/data" target="_blank" rel="noopener">holographic.example.com/data</a></em></strong>) should be directed to the (<strong><em>holographic-service)</em></strong> running in the (<strong><em>default</em></strong>) namespace on port 80.</p>
<hr>
<ul>
<li>
<p><strong>Applying the Configurations</strong></p>
<div class="code-block" data-lang="bash"><button class="code-copy" type="button" aria-label="Copy code to clipboard"><span class="code-copy__idle">Copy</span><span class="code-copy__done">Copied</span></button><pre class="shiki github-dark-default" style="background-color:#0d1117;color:#e6edf3" tabindex="0"><code><span class="line"><span style="color:#FFA657">  kubectl</span><span style="color:#A5D6FF"> apply</span><span style="color:#79C0FF"> -f</span><span style="color:#A5D6FF"> nginx-ingress.yaml</span></span>
<span class="line"><span style="color:#FFA657">  kubectl</span><span style="color:#A5D6FF"> apply</span><span style="color:#79C0FF"> -f</span><span style="color:#A5D6FF"> example-ingress.yaml</span></span>
<span class="line"></span></code></pre></div>
<p>This sets up NGINX as the Ingress Controller within your Kubernetes cluster to manage incoming traffic related to holographic data storage. Requests coming to (<strong><em><a href="http://holographic.example.com/data" target="_blank" rel="noopener">holographic.example.com/data</a></em></strong>) will be routed to the specified service.</p>
</li>
</ul>
<p>If you want to use and implement this example, you are requested to adjust the hostnames, paths, and service names according to your specific environment and requirements.</p>
<hr>
<h2 id="conclusion" tabindex="-1"><a class="heading-anchor" href="#conclusion" aria-label="Link to this section">#</a> <strong>Conclusion</strong></h2>
<p><figure class="post-figure"><img src="https://adityaseth.in/images/blog/future-proofing-data-using-holographic-data-storage-in-kubernetes-for-long-term-high-density-storage-and-retrieval/img-05.jpg" alt="" width="1024" height="1024" loading="lazy" decoding="async"></figure></p>
<p>Indeed, as can be seen in an exploration of how holographic data storage could be integrated within Kubernetes, nothing is clear - conceptually very promising without real-world production workloads yet to showcase. The conceptual strength of using holographic storage within Kubernetes for long-term and high-densification of data storage and retrieval does, after all, have problems of its own.</p>
<p>It is true that the actual realization and adoption of holographic data storage within Kubernetes for such purpose is now more speculation than proven. The technology itself is very incipient, with few tangible use cases in live production environments. This means that the conclusive outcomes, performance metrics, or industry-standard practices of how holographic storage can be smoothly employed at large in Kubernetes could still be in the development phase.</p>
<p>Although the theoretical advantages of holographic storage for hosting massive dataset in high compact and capacity medium is irresistible, however narrowing down its practical procedures within Kubernetes robust but complex virtuoso orchestrations make it look more like a complicated puzzle.</p>
<p>For now this holographical data storage - Kubernetes would remain only as a promising concept at the horizon calling to further explore, research and innovative endeavors in said area. The journey to its practical realization needs efforts, extensive testing, and refinement which will pave the way for a future where holographic storage effortlessly integrates with Kubernetes revolutionizing data storage landscapes.</p>
<hr>
<h2 id="previous-articles" tabindex="-1"><a class="heading-anchor" href="#previous-articles" aria-label="Link to this section">#</a> Previous Articles</h2>
<p><figure class="post-figure"><img src="https://adityaseth.in/images/blog/future-proofing-data-using-holographic-data-storage-in-kubernetes-for-long-term-high-density-storage-and-retrieval/img-06.jpg" alt="" width="480" height="270" loading="lazy" decoding="async"></figure></p>
<ol>
<li>
<p><strong><em>Future-Proofing Data ? Using Holographic Data Storage in Kubernetes for Long-Term &amp; High-Density Storage and Retrieval</em></strong></p>
</li>
<li>
<p><a href="https://adityaseth777.hashnode.dev/quantum-cryptography-protocols-exploring-beyond-quantum-key-distribution-qkd-d6bc51f4848d" target="_blank" rel="noopener"><strong><em>Quantum Cryptography Protocols: Exploring Beyond Quantum Key Distribution</em></strong></a></p>
</li>
<li>
<p><a href="https://adityaseth777.hashnode.dev/quantum-cryptography-augmenting-security-in-distributed-ledger-technology-through-synergistic-70e15ae28b62" target="_blank" rel="noopener"><strong><em>Quantum Cryptography: Augmenting Security in Distributed Ledger Technology through Synergistic Integration with Blockchain</em></strong></a></p>
</li>
<li>
<p><a href="https://adityaseth777.hashnode.dev/exploring-the-rising-world-of-biohacking-enhancing-human-abilities-through-technology-c3208538e0f2" target="_blank" rel="noopener"><strong><em>Exploring the Rising World of Biohacking: Enhancing Human Abilities through Technology</em></strong></a></p>
</li>
<li>
<p><a href="https://adityaseth777.hashnode.dev/its-a-rule-so-it-s-right-right-e656d4735804" target="_blank" rel="noopener"><strong><em>Debate Article:</em> <em>It’s a rule so it’s right . . . right ?</em></strong></a></p>
</li>
<li>
<p><a href="https://adityaseth777.hashnode.dev/manjaro-22-1-3-dual-boot-installation-guide-160ef1079ac1" target="_blank" rel="noopener"><em>Manjaro-22.1.3 Dual-Boot Installation Guide</em></a></p>
</li>
</ol>
<hr>
<blockquote>
<p><strong><em>If you want to contact me, feel free to drop an e-mail at</em></strong> <a href="mailto:setha4195@gmail.com"><strong><em>setha4195@gmail.com</em></strong></a> <strong><em>or check out my website at</em></strong> <a href="https://adityaseth.in"><strong><em>adityaseth.in</em></strong></a> <strong><em>:)<br>
Also, here’s my</em></strong> <a href="https://adityaseth.in/linkedin"><strong><em>LinkedIn</em></strong></a><strong><em>.</em></strong></p>
<p><strong><em>Thank you everyone for reading,</em></strong></p>
<p><strong><em>Over and out,<br>
Aditya Seth.</em></strong></p>
</blockquote>
<hr>
]]></content>
  </entry>
  <entry>
    <title type="text">Quantum Cryptography Protocols: Exploring Beyond QKD</title>
    <link rel="alternate" type="text/html" href="https://adityaseth.in/blog/quantum-cryptography-protocols-exploring-beyond-quantum-key-distribution-qkd-d6bc51f4848d"/>
    <id>https://adityaseth.in/blog/quantum-cryptography-protocols-exploring-beyond-quantum-key-distribution-qkd-d6bc51f4848d</id>
    <published>2023-08-20T09:00:00+05:30</published>
    <updated>2023-08-20T09:00:00+05:30</updated>
    <category term="security"/>
    <summary type="text">Post-QKD quantum cryptographic protocols and next-generation security architectures for the quantum era.</summary>
    <content type="html"><![CDATA[<p class="post-lede">Hmmm, let’s start ? :)</p>
<p>What’s our first concern upon waking up from the bed ? It is security and privacy. As our digital landscape expands, traditional cryptographic methods that once stood as bastions of safety are facing an unprecedented threat: the rise of quantum computers. In this intricate dance between security and advancement, the field of quantum cryptography emerges as a beacon of hope.</p>
<p>At the core of quantum cryptography rests an ingenious concept: <strong>quantum key distribution (QKD)</strong>. This method draws inspiration from the bedrock of quantum mechanics itself, ingeniously crafting unbreakable encryption keys. While QKD has rightfully garnered attention for its potential to revolutionize secure communication, the journey into the quantum realm doesn’t stop at key distribution alone.</p>
<p>This article embarks on a voyage beyond the familiar terrain of QKD, delving into the captivating realm of advanced quantum cryptography protocols. We will unravel the limitations that traditional QKD faces, the impetus behind exploring new protocols, and the fascinating array of cryptographic strategies that have sprung forth to protect our data from the quantum threats of tomorrow.</p>
<p>Join us as we venture beyond the quantum key distribution paradigm, traversing through the intriguing landscape of quantum coin flipping, quantum oblivious transfer, and quantum digital signatures. As we unlock the doors to these innovative protocols, we’ll also explore the concept of post-quantum cryptography, where classical and quantum cryptographic techniques join forces to create hybrid security solutions.</p>
<p>Buckle up as we navigate the complexities, challenges, and promises of this enthralling journey into the future of secure communication. The quantum world beckons, and with it, the potential to safeguard our data in ways that once seemed unimaginable.</p>
<hr>
<p><strong>Hyperlinked Index:</strong></p>
<p><strong><em>1.</em></strong> <a href="#736d"><strong><em>Quantum Key Distribution: A Foundation</em></strong></a></p>
<ul>
<li>
<p><a href="#736d"><strong><em>The Basics of Quantum Key Distribution and quantum properties</em></strong></a></p>
</li>
<li>
<p><a href="#1653"><strong><em>Notable QKD Protocols: BB84 and E91</em></strong></a></p>
</li>
</ul>
<p><strong><em>2.</em></strong> <a href="#9ee9"><strong><em>Limitations of Quantum Key Distribution (with code snippets)</em></strong></a></p>
<ul>
<li><a href="http://737c" target="_blank" rel="noopener"><strong><em>Unveiling Vulnerabilities and Challenges</em></strong></a></li>
</ul>
<p><strong><em>3.</em></strong> <a href="#a3f7"><strong><em>Quantum Cryptographic Protocols: Beyond QKD</em></strong></a></p>
<ul>
<li>
<p><a href="http://ce59" target="_blank" rel="noopener"><strong><em>Quantum Coin Flipping: Redefining Trust in Decision-Making</em></strong></a></p>
</li>
<li>
<p><a href="#ebca"><strong><em>Quantum Oblivious Transfer: Safeguarding Data Privacy</em></strong></a></p>
</li>
<li>
<p><a href="#5671"><strong><em>Quantum Digital Signatures: A Quantum Leap in Authentication</em></strong></a></p>
</li>
</ul>
<p>4. <a href="#b8f7"><strong><em>Necessity for Advancements: Beyond QKD</em></strong></a></p>
<p><strong><em>5.</em></strong> <a href="#d54f"><strong><em>Quantum-Safe Hybrid Protocols</em></strong></a></p>
<ul>
<li>
<p><a href="#afb3"><strong><em>Marrying Classical and Quantum: The Rise of Hybrid Protocols</em></strong></a></p>
</li>
<li>
<p><a href="#6ece"><strong><em>Transitioning Securely: Quantum-Safe Hybrid Solutions</em></strong></a></p>
</li>
<li>
<p><a href="#eb28"><strong><em>Practical Example : Qiskit</em></strong></a></p>
</li>
</ul>
<p><strong><em>6.</em></strong> <a href="#0e4f"><strong><em>Conclusion</em></strong></a></p>
<ul>
<li>
<p><a href="#d392"><strong><em>Unveiling the Quantum Cryptographic Frontier</em></strong></a></p>
</li>
<li>
<p><a href="#5e7a"><strong><em>Embracing Innovation in the Quest for Unassailable Security</em></strong></a></p>
</li>
</ul>
<hr>
<h2 id="understanding-quantum-key-distribution-qkd-crafting-unbreaka" tabindex="-1"><a class="heading-anchor" href="#understanding-quantum-key-distribution-qkd-crafting-unbreaka" aria-label="Link to this section">#</a> Understanding Quantum Key Distribution (QKD): Crafting Unbreakable Secrets-&gt;</h2>
<p><figure class="post-figure"><img src="https://adityaseth.in/images/blog/quantum-cryptography-protocols-exploring-beyond-quantum-key-distribution-qkd-d6bc51f4848d/img-01.png" alt="" width="500" height="246" loading="lazy" decoding="async"></figure></p>
<blockquote>
<p>Alright, let’s take a journey into the captivating world of quantum key distribution (QKD), where I’m about to unravel some mind-bending concepts that even the most advanced computers might find puzzling. Imagine crafting a secret code that’s akin to a puzzle piece - a piece that only Aurora and I can piece together. And here’s the kicker: if someone tries to take a sneak peek at my puzzle piece, it’s like they accidentally drop it, and they’re caught in the act!</p>
</blockquote>
<p>Also, I love Marvel and DC (I won’t say which one is the best xD), so be ready for some cool relevant images :)</p>
<p>Now, let’s talk about those incredibly tiny particles - they’re so minuscule, even the tiniest speck is enormous in comparison. These particles, known as photons (they’re like these little packets of light), possess some truly amazing qualities. They can exist in two places at once and act as if they’re best friends who share secrets. QKD harnesses these intriguing traits to fashion keys, which serve as ultra-secret passwords. Should anyone tamper with these particles, the secret code becomes all jumbled up, and that’s when we nab them!</p>
<p>Picture this: Aurora and I want to create a secret key. We send these particles (yes, those photons!) to Aurora, yet they arrive all shuffled, almost like pieces of a puzzle sent separately, one after the other. Aurora lacks the instructions to assemble the puzzle, so she gives me a call and asks, “Hey, could you help me figure this out?” It might sound a tad peculiar, but it’s akin to teamwork! And here’s the fascinating part - if someone tries to peep at the puzzle pieces while they’re en route, it’s as if they accidentally knock them off the table, and Aurora senses something fishy is afoot.</p>
<p>Imagine Aurora and me engaging in a special secret code dance. One of these dances goes by the name BB84. In this dance, I transmit photons to Aurora, each displaying different behaviors, like unique poses. Aurora remains unaware of these poses, so she asks me for a demonstration. My explanation enables her to crack the secret code, even though she doesn’t actually perceive the code itself.</p>
<p>The other dance, the E91 dance, holds even greater enchantment. It’s as if both of us possess pairs of particles that resemble magical twins. We both measure these particles and exchange findings. Should anyone try to meddle with the particles during their journey, it throws the results into disarray, and we both discern that someone’s up to mischief. This dance leverages the magical connection between particles to ensure the safety of our secret key.</p>
<p>By comprehending these dances and comprehending how they leverage quantum magic, I’m stepping into a realm of super-safe secrets. QKD might seem like a plot from an intriguing movie, but guess what? It’s real and tangible! As I delve further, I’ll uncover more about this quantum domain, where even the most intelligent computers struggle to crack our secret codes. It’s akin to transforming magic into reality, one secret code at a time!</p>
<hr>
<h3 id="notable-qkd-protocols-and-explanation-" tabindex="-1"><a class="heading-anchor" href="#notable-qkd-protocols-and-explanation-" aria-label="Link to this section">#</a> Notable QKD Protocols and explanation -&gt;</h3>
<p><figure class="post-figure"><img src="https://adityaseth.in/images/blog/quantum-cryptography-protocols-exploring-beyond-quantum-key-distribution-qkd-d6bc51f4848d/img-02.png" alt="" width="800" height="534" loading="lazy" decoding="async"></figure></p>
<h3 id="bb84-protocol" tabindex="-1"><a class="heading-anchor" href="#bb84-protocol" aria-label="Link to this section">#</a> <strong>BB84 Protocol:</strong></h3>
<p>The BB84 protocol is like a carefully choreographed dance of photons that ensures secure communication in the quantum realm. It’s named after its creators, Charles Bennett and Gilles Brassard, who introduced it in 1984.</p>
<p><strong>Quantum Bits (Qubits):</strong> At the heart of the BB84 protocol are qubits, the building blocks of quantum information. Unlike classical bits, which are 0 or 1, qubits can exist in a superposition of both states, thanks to quantum mechanics. (If you don’t know about this, check out my previous article about this)</p>
<p><strong>Polarization:</strong> In BB84, Aditya (the sender) sends a stream of qubits, each encoded with a specific polarization - a characteristic of the photon’s oscillation direction. He can choose to encode each qubit as either horizontal, vertical, diagonal, or anti-diagonal polarization.</p>
<p><strong>Basis Selection:</strong> Aurora (the receiver) receives these qubits and randomly selects a measurement basis (horizontal/vertical or diagonal/anti-diagonal) to decode each qubit. The critical part is that Aditya and Aurora don’t know which basis the other has chosen for each qubit.</p>
<p><strong>Quantum Entanglement:</strong> After receiving all qubits, Aditya and Aurora reveal which basis they used for each qubit. Those qubits for which their bases match form the basis for their shared secret key. To enhance security, they also exchange a subset of qubits to detect any potential eavesdropping.</p>
<p><strong>Privacy Amplification:</strong> By publicly revealing the subset of qubits they exchanged, Aditya and Aurora can create a shorter but secure final key through a process called privacy amplification. This ensures that any eavesdropper’s knowledge is effectively reduced, making the key secure.</p>
<h3 id="e91-protocol" tabindex="-1"><a class="heading-anchor" href="#e91-protocol" aria-label="Link to this section">#</a> E91 Protocol:</h3>
<p>The E91 protocol, named after its creator Artur Ekert who proposed it in 1991, is a protocol that leverages quantum entanglement to establish secure keys.</p>
<p><strong>Quantum Entanglement:</strong> In the E91 protocol, Aditya prepares pairs of entangled particles, which means the state of one particle is instantly linked to the state of the other, no matter the distance between them. This entanglement is a quantum phenomenon that can’t be explained by classical physics.</p>
<p><strong>Measurement:</strong> Aditya and Aurora independently measure their respective particles in one of two bases, typically vertical/horizontal or diagonal/anti-diagonal. The correlated measurement results reveal a subset of bits they can use for the key.</p>
<p><strong>Bell Test Inequalities:</strong> To ensure the security of their key exchange, Aditya and Aurora perform a series of tests based on Bell inequalities. These tests check whether the measurement outcomes violate classical probability limits, providing evidence of quantum behavior and detecting any potential interference.</p>
<p><strong>Final Key:</strong> By comparing their measurement results and discarding any trials that didn’t meet the Bell inequalities, Aditya and Aurora generate a secure final key that they can use for encryption.</p>
<p>Both the BB84 and E91 protocols showcase the remarkable marriage between quantum properties and secure communication. While BB84 relies on polarization and random bases, the E91 protocol exploits the mysterious entanglement phenomenon. These protocols exemplify the forefront of quantum cryptography, enabling Aditya and Aurora to communicate securely in a world that’s governed by the rules of the quantum realm.</p>
<hr>
<h2 id="limitations-of-quantum-key-distribution-" tabindex="-1"><a class="heading-anchor" href="#limitations-of-quantum-key-distribution-" aria-label="Link to this section">#</a> <strong>Limitations of Quantum Key Distribution -&gt;</strong></h2>
<p><figure class="post-figure"><img src="https://adityaseth.in/images/blog/quantum-cryptography-protocols-exploring-beyond-quantum-key-distribution-qkd-d6bc51f4848d/img-03.png" alt="" width="800" height="431" loading="lazy" decoding="async"></figure></p>
<p>Now, let’s delve into the technical realm and explore the limitations that surround quantum key distribution (QKD), unveiling both its vulnerabilities and challenges.</p>
<p>First, we need to understand 3 functions (<code>QuantumCircuit</code>, <code>Aer</code>, <code>execute</code>) from <code>qiskit.</code></p>
<p><strong>QuantumCircuit:</strong> A QuantumCircuit is a fundamental concept in quantum computing. It’s like a recipe that guides a quantum computer on what operations to perform. In the code snippet below, we create a simple QuantumCircuit that prepares a single qubit in a superposition state using a Hadamard gate (used to implement superposition) and then measures the qubit.</p>
<div class="code-block" data-lang="python"><button class="code-copy" type="button" aria-label="Copy code to clipboard"><span class="code-copy__idle">Copy</span><span class="code-copy__done">Copied</span></button><pre class="shiki github-dark-default" style="background-color:#0d1117;color:#e6edf3" tabindex="0"><code><span class="line"><span style="color:#FF7B72">from</span><span style="color:#E6EDF3"> qiskit </span><span style="color:#FF7B72">import</span><span style="color:#E6EDF3"> QuantumCircuit, transpile</span></span>
<span class="line"><span style="color:#8B949E"># Create a QuantumCircuit with 1 qubit</span></span>
<span class="line"><span style="color:#E6EDF3">qc </span><span style="color:#FF7B72">=</span><span style="color:#E6EDF3"> QuantumCircuit(</span><span style="color:#79C0FF">1</span><span style="color:#E6EDF3">)</span></span>
<span class="line"></span>
<span class="line"><span style="color:#8B949E"># Apply a Hadamard gate to create superposition</span></span>
<span class="line"><span style="color:#E6EDF3">qc.h(</span><span style="color:#79C0FF">0</span><span style="color:#E6EDF3">)</span></span>
<span class="line"></span>
<span class="line"><span style="color:#8B949E"># Measure the qubit</span></span>
<span class="line"><span style="color:#E6EDF3">qc.measure(</span><span style="color:#79C0FF">0</span><span style="color:#E6EDF3">, </span><span style="color:#79C0FF">0</span><span style="color:#E6EDF3">)</span></span>
<span class="line"></span>
<span class="line"><span style="color:#8B949E"># Print the QuantumCircuit</span></span>
<span class="line"><span style="color:#79C0FF">print</span><span style="color:#E6EDF3">(qc)</span></span>
<span class="line"></span></code></pre></div>
<p><strong>Aer:</strong> It is a simulation framework that allows us to simulate quantum operations and circuits on a classical computer. It’s like a virtual quantum playground where we can test our quantum algorithms before running them on actual quantum hardware. The code snippet below shows how to simulate the outcomes of a simple QuantumCircuit using Aer.</p>
<p><strong>Execute:</strong> In quantum computing, “execute” is the command that actually runs a QuantumCircuit on a chosen backend (simulator or real quantum device). It’s like pressing the play button on a quantum program. The code snippet below demonstrates how to execute a QuantumCircuit using the execute function.</p>
<div class="code-block" data-lang="python"><button class="code-copy" type="button" aria-label="Copy code to clipboard"><span class="code-copy__idle">Copy</span><span class="code-copy__done">Copied</span></button><pre class="shiki github-dark-default" style="background-color:#0d1117;color:#e6edf3" tabindex="0"><code><span class="line"><span style="color:#FF7B72">from</span><span style="color:#E6EDF3"> qiskit </span><span style="color:#FF7B72">import</span><span style="color:#E6EDF3"> Aer, execute</span></span>
<span class="line"></span>
<span class="line"><span style="color:#8B949E"># Use the Aer simulator backend</span></span>
<span class="line"><span style="color:#E6EDF3">simulator </span><span style="color:#FF7B72">=</span><span style="color:#E6EDF3"> Aer.get_backend(</span><span style="color:#A5D6FF">'qasm_simulator'</span><span style="color:#E6EDF3">)</span></span>
<span class="line"></span>
<span class="line"><span style="color:#8B949E"># Execute the QuantumCircuit on the simulator</span></span>
<span class="line"><span style="color:#E6EDF3">job </span><span style="color:#FF7B72">=</span><span style="color:#E6EDF3"> execute(qc, simulator, </span><span style="color:#FFA657">shots</span><span style="color:#FF7B72">=</span><span style="color:#79C0FF">1000</span><span style="color:#E6EDF3">)</span></span>
<span class="line"></span>
<span class="line"><span style="color:#8B949E"># Get the results</span></span>
<span class="line"><span style="color:#E6EDF3">result </span><span style="color:#FF7B72">=</span><span style="color:#E6EDF3"> job.result()</span></span>
<span class="line"></span>
<span class="line"><span style="color:#8B949E"># Print the measurement counts</span></span>
<span class="line"><span style="color:#79C0FF">print</span><span style="color:#E6EDF3">(result.get_counts())</span></span>
<span class="line"></span></code></pre></div>
<hr>
<p><strong>Vulnerabilities in Quantum Communication:</strong> Despite the inherent security of QKD, it’s not entirely impervious to potential attacks. Quantum eavesdropping, specifically the “quantum interception attack,” remains a concern. This is where a malicious party, Serenity, intercepts qubits sent by me to Aurora, measures them, and then retransmits them to Aurora, effectively compromising the key.</p>
<div class="code-block" data-lang="python"><button class="code-copy" type="button" aria-label="Copy code to clipboard"><span class="code-copy__idle">Copy</span><span class="code-copy__done">Copied</span></button><pre class="shiki github-dark-default" style="background-color:#0d1117;color:#e6edf3" tabindex="0"><code><span class="line"><span style="color:#8B949E"># Example of a basic quantum interception attack</span></span>
<span class="line"><span style="color:#FF7B72">from</span><span style="color:#E6EDF3"> qiskit </span><span style="color:#FF7B72">import</span><span style="color:#E6EDF3"> QuantumCircuit, Aer, execute</span></span>
<span class="line"></span>
<span class="line"><span style="color:#8B949E"># Create a simple quantum circuit with qubit q</span></span>
<span class="line"><span style="color:#E6EDF3">q </span><span style="color:#FF7B72">=</span><span style="color:#E6EDF3"> QuantumCircuit(</span><span style="color:#79C0FF">1</span><span style="color:#E6EDF3">, </span><span style="color:#79C0FF">1</span><span style="color:#E6EDF3">)</span></span>
<span class="line"><span style="color:#E6EDF3">q.h(</span><span style="color:#79C0FF">0</span><span style="color:#E6EDF3">) </span><span style="color:#8B949E"># Apply Hadamard gate</span></span>
<span class="line"><span style="color:#E6EDF3">q.measure(</span><span style="color:#79C0FF">0</span><span style="color:#E6EDF3">, </span><span style="color:#79C0FF">0</span><span style="color:#E6EDF3">) </span><span style="color:#8B949E"># Measure the qubit</span></span>
<span class="line"></span>
<span class="line"><span style="color:#E6EDF3">backend </span><span style="color:#FF7B72">=</span><span style="color:#E6EDF3"> Aer.get_backend(</span><span style="color:#A5D6FF">'qasm_simulator'</span><span style="color:#E6EDF3">)</span></span>
<span class="line"><span style="color:#E6EDF3">result </span><span style="color:#FF7B72">=</span><span style="color:#E6EDF3"> execute(q, backend, </span><span style="color:#FFA657">shots</span><span style="color:#FF7B72">=</span><span style="color:#79C0FF">1</span><span style="color:#E6EDF3">).result()</span></span>
<span class="line"><span style="color:#E6EDF3">measurement </span><span style="color:#FF7B72">=</span><span style="color:#E6EDF3"> result.get_counts(q)</span></span>
<span class="line"><span style="color:#79C0FF">print</span><span style="color:#E6EDF3">(</span><span style="color:#A5D6FF">"Measurement:"</span><span style="color:#E6EDF3">, measurement)</span></span>
<span class="line"></span>
<span class="line"><span style="color:#8B949E">#Aditya - 1034</span></span>
<span class="line"></span></code></pre></div>
<p><strong>Practicalities and Error Rates</strong>: In the real world, factors like noise, imperfect qubits, and imperfect gates contribute to error rates in quantum communication. These errors can lead to inaccuracies in the exchanged key. For instance, photon loss due to transmission distance can result in decreased key rates.</p>
<div class="code-block" data-lang="python"><button class="code-copy" type="button" aria-label="Copy code to clipboard"><span class="code-copy__idle">Copy</span><span class="code-copy__done">Copied</span></button><pre class="shiki github-dark-default" style="background-color:#0d1117;color:#e6edf3" tabindex="0"><code><span class="line"><span style="color:#8B949E"># Example of calculating error rates in QKD</span></span>
<span class="line"><span style="color:#FF7B72">def</span><span style="color:#D2A8FF"> calculate_error_rate</span><span style="color:#E6EDF3">(received_key, expected_key):</span></span>
<span class="line"><span style="color:#E6EDF3">errors </span><span style="color:#FF7B72">=</span><span style="color:#79C0FF"> sum</span><span style="color:#E6EDF3">([</span><span style="color:#79C0FF">1</span><span style="color:#FF7B72"> for</span><span style="color:#E6EDF3"> i, j </span><span style="color:#FF7B72">in</span><span style="color:#79C0FF"> zip</span><span style="color:#E6EDF3">(received_key, expected_key) </span><span style="color:#FF7B72">if</span><span style="color:#E6EDF3"> i </span><span style="color:#FF7B72">!=</span><span style="color:#E6EDF3"> j])</span></span>
<span class="line"><span style="color:#E6EDF3">error_rate </span><span style="color:#FF7B72">=</span><span style="color:#E6EDF3"> errors </span><span style="color:#FF7B72">/</span><span style="color:#79C0FF"> len</span><span style="color:#E6EDF3">(expected_key)</span></span>
<span class="line"><span style="color:#FF7B72">return</span><span style="color:#E6EDF3"> error_rate</span></span>
<span class="line"></span>
<span class="line"><span style="color:#E6EDF3">expected_key </span><span style="color:#FF7B72">=</span><span style="color:#A5D6FF"> "101001110010"</span></span>
<span class="line"><span style="color:#E6EDF3">received_key </span><span style="color:#FF7B72">=</span><span style="color:#A5D6FF"> "100101100010"</span></span>
<span class="line"><span style="color:#E6EDF3">error_rate </span><span style="color:#FF7B72">=</span><span style="color:#E6EDF3"> calculate_error_rate(received_key, expected_key)</span></span>
<span class="line"><span style="color:#79C0FF">print</span><span style="color:#E6EDF3">(</span><span style="color:#A5D6FF">"Error Rate:"</span><span style="color:#E6EDF3">, error_rate)</span></span>
<span class="line"></span></code></pre></div>
<p><strong>Quantum Repeaters and Distance:</strong> While QKD offers secure key exchange over moderate distances, quantum repeaters are necessary to extend this range. Quantum repeaters use entanglement swapping to extend entanglement across long distances. However, practical implementation is complex and ongoing research focuses on addressing issues like entanglement distribution and memory errors.</p>
<div class="code-block" data-lang="python"><button class="code-copy" type="button" aria-label="Copy code to clipboard"><span class="code-copy__idle">Copy</span><span class="code-copy__done">Copied</span></button><pre class="shiki github-dark-default" style="background-color:#0d1117;color:#e6edf3" tabindex="0"><code><span class="line"><span style="color:#8B949E"># Example of quantum repeater concept</span></span>
<span class="line"><span style="color:#FF7B72">from</span><span style="color:#E6EDF3"> qiskit </span><span style="color:#FF7B72">import</span><span style="color:#E6EDF3"> QuantumCircuit</span></span>
<span class="line"></span>
<span class="line"><span style="color:#FF7B72">def</span><span style="color:#D2A8FF"> entangle_qubits</span><span style="color:#E6EDF3">(qubit1, qubit2):</span></span>
<span class="line"><span style="color:#E6EDF3">circuit </span><span style="color:#FF7B72">=</span><span style="color:#E6EDF3"> QuantumCircuit(</span><span style="color:#79C0FF">2</span><span style="color:#E6EDF3">, </span><span style="color:#79C0FF">2</span><span style="color:#E6EDF3">)</span></span>
<span class="line"><span style="color:#E6EDF3">circuit.h(qubit1)</span></span>
<span class="line"><span style="color:#E6EDF3">circuit.cx(qubit1, qubit2)</span></span>
<span class="line"><span style="color:#FF7B72">return</span><span style="color:#E6EDF3"> circuit</span></span>
<span class="line"></span>
<span class="line"><span style="color:#E6EDF3">q1 </span><span style="color:#FF7B72">=</span><span style="color:#79C0FF"> 0</span><span style="color:#8B949E"> # Qubit 1</span></span>
<span class="line"><span style="color:#E6EDF3">q2 </span><span style="color:#FF7B72">=</span><span style="color:#79C0FF"> 1</span><span style="color:#8B949E"> # Qubit 2</span></span>
<span class="line"><span style="color:#E6EDF3">entanglement_circuit </span><span style="color:#FF7B72">=</span><span style="color:#E6EDF3"> entangle_qubits(q1, q2)</span></span>
<span class="line"><span style="color:#79C0FF">print</span><span style="color:#E6EDF3">(entanglement_circuit)</span></span>
<span class="line"></span></code></pre></div>
<hr>
<h2 id="quantum-cryptographic-protocols-beyond-qkd-" tabindex="-1"><a class="heading-anchor" href="#quantum-cryptographic-protocols-beyond-qkd-" aria-label="Link to this section">#</a> Quantum Cryptographic Protocols: Beyond QKD -&gt;</h2>
<p><figure class="post-figure"><img src="https://adityaseth.in/images/blog/quantum-cryptography-protocols-exploring-beyond-quantum-key-distribution-qkd-d6bc51f4848d/img-04.png" alt="" width="800" height="421" loading="lazy" decoding="async"></figure></p>
<p>Let’s embark on a journey through the fascinating realm of quantum cryptography, where we’re about to go beyond the realms of Quantum Key Distribution (QKD). This exploration will introduce us to groundbreaking protocols that redefine trust in decision-making, safeguard data privacy, and elevate authentication into a new quantum era. Get ready to delve into the concepts of Quantum Coin Flipping, Quantum Oblivious Transfer, and Quantum Digital Signatures.</p>
<h3 id="quantum-coin-flipping-redefining-trust-in-decision-making" tabindex="-1"><a class="heading-anchor" href="#quantum-coin-flipping-redefining-trust-in-decision-making" aria-label="Link to this section">#</a> Quantum Coin Flipping: Redefining Trust in Decision-Making</h3>
<p>Imagine flipping a coin, but with a quantum twist that ensures fairness, even when Serenity and Aurora are involved. Quantum Coin Flipping operates under the quantum principles of superposition and entanglement. Unlike classical coin flips that could be manipulated, quantum coin flipping guarantees an unbiased outcome. In this protocol, both Serenity and Aurora perform quantum operations on their qubits, creating a superposition representing both heads and tails. The magic of quantum interactions ensures a balanced and impartial outcome. Let’s see how this unfolds in code:</p>
<div class="code-block" data-lang="python"><button class="code-copy" type="button" aria-label="Copy code to clipboard"><span class="code-copy__idle">Copy</span><span class="code-copy__done">Copied</span></button><pre class="shiki github-dark-default" style="background-color:#0d1117;color:#e6edf3" tabindex="0"><code><span class="line"><span style="color:#8B949E"># Quantum Coin Flipping</span></span>
<span class="line"><span style="color:#FF7B72">from</span><span style="color:#E6EDF3"> qiskit </span><span style="color:#FF7B72">import</span><span style="color:#E6EDF3"> QuantumCircuit, Aer, execute</span></span>
<span class="line"></span>
<span class="line"><span style="color:#FF7B72">def</span><span style="color:#D2A8FF"> quantum_coin_flipping</span><span style="color:#E6EDF3">():</span></span>
<span class="line"><span style="color:#E6EDF3">qc </span><span style="color:#FF7B72">=</span><span style="color:#E6EDF3"> QuantumCircuit(</span><span style="color:#79C0FF">2</span><span style="color:#E6EDF3">, </span><span style="color:#79C0FF">1</span><span style="color:#E6EDF3">)</span></span>
<span class="line"><span style="color:#E6EDF3">qc.h(</span><span style="color:#79C0FF">0</span><span style="color:#E6EDF3">) </span><span style="color:#8B949E"># Superposition for my qubit</span></span>
<span class="line"><span style="color:#E6EDF3">qc.cx(</span><span style="color:#79C0FF">0</span><span style="color:#E6EDF3">, </span><span style="color:#79C0FF">1</span><span style="color:#E6EDF3">) </span><span style="color:#8B949E"># Entanglement between my qubit and Aurora's qubit</span></span>
<span class="line"><span style="color:#E6EDF3">qc.measure(</span><span style="color:#79C0FF">1</span><span style="color:#E6EDF3">, </span><span style="color:#79C0FF">0</span><span style="color:#E6EDF3">) </span><span style="color:#8B949E"># Measurement</span></span>
<span class="line"><span style="color:#E6EDF3">backend </span><span style="color:#FF7B72">=</span><span style="color:#E6EDF3"> Aer.get_backend(</span><span style="color:#A5D6FF">'qasm_simulator'</span><span style="color:#E6EDF3">)</span></span>
<span class="line"><span style="color:#E6EDF3">result </span><span style="color:#FF7B72">=</span><span style="color:#E6EDF3"> execute(qc, backend, </span><span style="color:#FFA657">shots</span><span style="color:#FF7B72">=</span><span style="color:#79C0FF">1</span><span style="color:#E6EDF3">).result()</span></span>
<span class="line"><span style="color:#E6EDF3">outcome </span><span style="color:#FF7B72">=</span><span style="color:#E6EDF3"> result.get_counts(qc)</span></span>
<span class="line"><span style="color:#FF7B72">return</span><span style="color:#E6EDF3"> outcome</span></span>
<span class="line"><span style="color:#E6EDF3">outcome </span><span style="color:#FF7B72">=</span><span style="color:#E6EDF3"> quantum_coin_flipping()</span></span>
<span class="line"><span style="color:#79C0FF">print</span><span style="color:#E6EDF3">(</span><span style="color:#A5D6FF">"Outcome:"</span><span style="color:#E6EDF3">, outcome)</span></span>
<span class="line"></span></code></pre></div>
<h3 id="quantum-oblivious-transfer-safeguarding-data-privacy" tabindex="-1"><a class="heading-anchor" href="#quantum-oblivious-transfer-safeguarding-data-privacy" aria-label="Link to this section">#</a> Quantum Oblivious Transfer: Safeguarding Data Privacy</h3>
<p>In a world where data privacy is of utmost importance, Quantum Oblivious Transfer (QOT) takes center stage. Picture this scenario: I hold sensitive information and want to share it selectively with Aurora and Serenity. Through quantum superposition and measurements, we achieve a unique form of privacy. Aurora and Serenity make their choices using quantum operations, but here’s the twist: they don’t know the content until I reveal it. It’s akin to receiving a sealed envelope whose content remains hidden until you open it. Let’s see this unfold in code:</p>
<div class="code-block" data-lang="python"><button class="code-copy" type="button" aria-label="Copy code to clipboard"><span class="code-copy__idle">Copy</span><span class="code-copy__done">Copied</span></button><pre class="shiki github-dark-default" style="background-color:#0d1117;color:#e6edf3" tabindex="0"><code><span class="line"><span style="color:#8B949E"># Quantum Oblivious Transfer</span></span>
<span class="line"><span style="color:#FF7B72">from</span><span style="color:#E6EDF3"> qiskit </span><span style="color:#FF7B72">import</span><span style="color:#E6EDF3"> QuantumCircuit, Aer, execute</span></span>
<span class="line"></span>
<span class="line"><span style="color:#FF7B72">def</span><span style="color:#D2A8FF"> quantum_oblivious_transfer</span><span style="color:#E6EDF3">():</span></span>
<span class="line"><span style="color:#E6EDF3">qc </span><span style="color:#FF7B72">=</span><span style="color:#E6EDF3"> QuantumCircuit(</span><span style="color:#79C0FF">2</span><span style="color:#E6EDF3">, </span><span style="color:#79C0FF">1</span><span style="color:#E6EDF3">)</span></span>
<span class="line"><span style="color:#E6EDF3">qc.h(</span><span style="color:#79C0FF">0</span><span style="color:#E6EDF3">) </span><span style="color:#8B949E"># Superposition for my qubit</span></span>
<span class="line"><span style="color:#E6EDF3">qc.cx(</span><span style="color:#79C0FF">0</span><span style="color:#E6EDF3">, </span><span style="color:#79C0FF">1</span><span style="color:#E6EDF3">) </span><span style="color:#8B949E"># Transfer to Aurora</span></span>
<span class="line"><span style="color:#8B949E"># Aurora's choice: 0 or 1</span></span>
<span class="line"><span style="color:#E6EDF3">aurora_choice </span><span style="color:#FF7B72">=</span><span style="color:#79C0FF"> 1</span></span>
<span class="line"><span style="color:#FF7B72">if</span><span style="color:#E6EDF3"> aurora_choice </span><span style="color:#FF7B72">==</span><span style="color:#79C0FF"> 0</span><span style="color:#E6EDF3">:</span></span>
<span class="line"><span style="color:#E6EDF3">qc.x(</span><span style="color:#79C0FF">0</span><span style="color:#E6EDF3">) </span><span style="color:#8B949E"># Apply X gate for choice 0</span></span>
<span class="line"><span style="color:#E6EDF3">qc.measure(</span><span style="color:#79C0FF">1</span><span style="color:#E6EDF3">, </span><span style="color:#79C0FF">0</span><span style="color:#E6EDF3">) </span><span style="color:#8B949E"># Measurement</span></span>
<span class="line"><span style="color:#E6EDF3">backend </span><span style="color:#FF7B72">=</span><span style="color:#E6EDF3"> Aer.get_backend(</span><span style="color:#A5D6FF">'qasm_simulator'</span><span style="color:#E6EDF3">)</span></span>
<span class="line"><span style="color:#E6EDF3">result </span><span style="color:#FF7B72">=</span><span style="color:#E6EDF3"> execute(qc, backend, </span><span style="color:#FFA657">shots</span><span style="color:#FF7B72">=</span><span style="color:#79C0FF">1</span><span style="color:#E6EDF3">).result()</span></span>
<span class="line"><span style="color:#E6EDF3">my_choice </span><span style="color:#FF7B72">=</span><span style="color:#E6EDF3"> result.get_counts(qc)</span></span>
<span class="line"><span style="color:#FF7B72">return</span><span style="color:#E6EDF3"> my_choice</span></span>
<span class="line"><span style="color:#E6EDF3">my_choice </span><span style="color:#FF7B72">=</span><span style="color:#E6EDF3"> quantum_oblivious_transfer()</span></span>
<span class="line"><span style="color:#79C0FF">print</span><span style="color:#E6EDF3">(</span><span style="color:#A5D6FF">"My Choice:"</span><span style="color:#E6EDF3">, my_choice)</span></span>
<span class="line"></span></code></pre></div>
<h3 id="quantum-digital-signatures-a-quantum-leap-in-authentication" tabindex="-1"><a class="heading-anchor" href="#quantum-digital-signatures-a-quantum-leap-in-authentication" aria-label="Link to this section">#</a> Quantum Digital Signatures: A Quantum Leap in Authentication</h3>
<p>Imagine signing a document with a signature that’s impossible to forge, even for the most advanced attackers. That’s where Quantum Digital Signatures step in. In this protocol, I want to sign a message to prove its authenticity to Aurora. Through quantum operations, I create a unique quantum signature based on the principles of superposition and entanglement. Even if someone tries to tamper with the signature, the quantum nature of the signature detects it. Let’s see how this unfolds in code:</p>
<div class="code-block" data-lang="python"><button class="code-copy" type="button" aria-label="Copy code to clipboard"><span class="code-copy__idle">Copy</span><span class="code-copy__done">Copied</span></button><pre class="shiki github-dark-default" style="background-color:#0d1117;color:#e6edf3" tabindex="0"><code><span class="line"><span style="color:#8B949E"># Quantum Digital Signatures</span></span>
<span class="line"><span style="color:#FF7B72">from</span><span style="color:#E6EDF3"> qiskit </span><span style="color:#FF7B72">import</span><span style="color:#E6EDF3"> QuantumCircuit, Aer, execute</span></span>
<span class="line"></span>
<span class="line"><span style="color:#FF7B72">def</span><span style="color:#D2A8FF"> quantum_digital_signature</span><span style="color:#E6EDF3">():</span></span>
<span class="line"><span style="color:#E6EDF3">qc </span><span style="color:#FF7B72">=</span><span style="color:#E6EDF3"> QuantumCircuit(</span><span style="color:#79C0FF">2</span><span style="color:#E6EDF3">, </span><span style="color:#79C0FF">1</span><span style="color:#E6EDF3">)</span></span>
<span class="line"><span style="color:#E6EDF3">qc.h(</span><span style="color:#79C0FF">0</span><span style="color:#E6EDF3">) </span><span style="color:#8B949E"># Superposition for my qubit</span></span>
<span class="line"><span style="color:#E6EDF3">qc.cx(</span><span style="color:#79C0FF">0</span><span style="color:#E6EDF3">, </span><span style="color:#79C0FF">1</span><span style="color:#E6EDF3">) </span><span style="color:#8B949E"># Entanglement with Aurora's qubit</span></span>
<span class="line"><span style="color:#E6EDF3">qc.measure(</span><span style="color:#79C0FF">1</span><span style="color:#E6EDF3">, </span><span style="color:#79C0FF">0</span><span style="color:#E6EDF3">) </span><span style="color:#8B949E"># Measurement</span></span>
<span class="line"><span style="color:#E6EDF3">backend </span><span style="color:#FF7B72">=</span><span style="color:#E6EDF3"> Aer.get_backend(</span><span style="color:#A5D6FF">'qasm_simulator'</span><span style="color:#E6EDF3">)</span></span>
<span class="line"><span style="color:#E6EDF3">result </span><span style="color:#FF7B72">=</span><span style="color:#E6EDF3"> execute(qc, backend, </span><span style="color:#FFA657">shots</span><span style="color:#FF7B72">=</span><span style="color:#79C0FF">1</span><span style="color:#E6EDF3">).result()</span></span>
<span class="line"><span style="color:#E6EDF3">my_signature </span><span style="color:#FF7B72">=</span><span style="color:#E6EDF3"> result.get_counts(qc)</span></span>
<span class="line"><span style="color:#FF7B72">return</span><span style="color:#E6EDF3"> my_signature</span></span>
<span class="line"><span style="color:#E6EDF3">my_signature </span><span style="color:#FF7B72">=</span><span style="color:#E6EDF3"> quantum_digital_signature()</span></span>
<span class="line"><span style="color:#79C0FF">print</span><span style="color:#E6EDF3">(</span><span style="color:#A5D6FF">"My Signature:"</span><span style="color:#E6EDF3">, my_signature)</span></span>
<span class="line"></span></code></pre></div>
<p>These remarkable protocols redefine the boundaries of cryptography in the quantum age. From fair decision-making to unforgeable signatures, quantum cryptography brings a new level of security and innovation to the digital world.</p>
<hr>
<h2 id="necessity-for-advancements-beyond-qkd-" tabindex="-1"><a class="heading-anchor" href="#necessity-for-advancements-beyond-qkd-" aria-label="Link to this section">#</a> <strong>Necessity for Advancements: Beyond QKD -&gt;</strong></h2>
<p><figure class="post-figure"><img src="https://adityaseth.in/images/blog/quantum-cryptography-protocols-exploring-beyond-quantum-key-distribution-qkd-d6bc51f4848d/img-05.png" alt="" width="800" height="422" loading="lazy" decoding="async"></figure></p>
<p>As we navigate through QKD’s limitations, it becomes clear that progress lies beyond QKD itself, necessitating advancements in quantum cryptography.</p>
<p><strong>Quantum Cryptanalysis:</strong> The rise of quantum computers presents a threat to classical cryptographic systems, including QKD. Shor’s algorithm, executed by quantum computers, can efficiently factorize large numbers, breaking RSA encryption. This demands the development of post-quantum cryptographic algorithms like lattice-based or code-based cryptography. In this example, the Shor class from Qiskit Aqua's algorithms module is used to create an instance of Shor's algorithm for the integer 'n = 15'. The run() method is then called to execute the algorithm, and the resulting factors are extracted from the result dictionary.</p>
<p>Keep in mind that while this example demonstrates the basic usage of Shor’s algorithm in Qiskit, the algorithm itself involves complex quantum operations and requires careful consideration of hardware limitations, error correction, and other factors in practical implementations.</p>
<div class="code-block" data-lang="python"><button class="code-copy" type="button" aria-label="Copy code to clipboard"><span class="code-copy__idle">Copy</span><span class="code-copy__done">Copied</span></button><pre class="shiki github-dark-default" style="background-color:#0d1117;color:#e6edf3" tabindex="0"><code><span class="line"><span style="color:#FF7B72">from</span><span style="color:#E6EDF3"> qiskit </span><span style="color:#FF7B72">import</span><span style="color:#E6EDF3"> Aer</span></span>
<span class="line"><span style="color:#FF7B72">from</span><span style="color:#E6EDF3"> qiskit.aqua.algorithms </span><span style="color:#FF7B72">import</span><span style="color:#E6EDF3"> Shor</span></span>
<span class="line"></span>
<span class="line"><span style="color:#8B949E"># The integer to be factorized</span></span>
<span class="line"><span style="color:#E6EDF3">n </span><span style="color:#FF7B72">=</span><span style="color:#79C0FF"> 15</span></span>
<span class="line"></span>
<span class="line"><span style="color:#8B949E"># Create a Shor instance</span></span>
<span class="line"><span style="color:#E6EDF3">shor </span><span style="color:#FF7B72">=</span><span style="color:#E6EDF3"> Shor(n)</span></span>
<span class="line"></span>
<span class="line"><span style="color:#8B949E"># Run Shor's algorithm</span></span>
<span class="line"><span style="color:#E6EDF3">result </span><span style="color:#FF7B72">=</span><span style="color:#E6EDF3"> shor.run()</span></span>
<span class="line"></span>
<span class="line"><span style="color:#8B949E"># Get the factors from the result</span></span>
<span class="line"><span style="color:#E6EDF3">factors </span><span style="color:#FF7B72">=</span><span style="color:#E6EDF3"> result[</span><span style="color:#A5D6FF">'factors'</span><span style="color:#E6EDF3">]</span></span>
<span class="line"><span style="color:#79C0FF">print</span><span style="color:#E6EDF3">(</span><span style="color:#A5D6FF">"Factors:"</span><span style="color:#E6EDF3">, factors)</span></span>
<span class="line"></span></code></pre></div>
<p><strong>Post-Quantum Cryptography:</strong> The emergence of quantum computers requires us to transition to post-quantum cryptographic methods. This involves designing encryption schemes resilient against quantum attacks. Lattice-based cryptography, code-based cryptography, and multivariate polynomial cryptography are promising areas of research.</p>
<div class="code-block" data-lang="python"><button class="code-copy" type="button" aria-label="Copy code to clipboard"><span class="code-copy__idle">Copy</span><span class="code-copy__done">Copied</span></button><pre class="shiki github-dark-default" style="background-color:#0d1117;color:#e6edf3" tabindex="0"><code><span class="line"><span style="color:#8B949E"># Example of code-based encryption</span></span>
<span class="line"><span style="color:#FF7B72">from</span><span style="color:#E6EDF3"> pqcrypto.sign.code_based </span><span style="color:#FF7B72">import</span><span style="color:#E6EDF3"> generate_keypair, sign, verify</span></span>
<span class="line"></span>
<span class="line"><span style="color:#E6EDF3">public_key, secret_key </span><span style="color:#FF7B72">=</span><span style="color:#E6EDF3"> generate_keypair()</span></span>
<span class="line"><span style="color:#E6EDF3">message </span><span style="color:#FF7B72">=</span><span style="color:#FF7B72"> b</span><span style="color:#A5D6FF">"Hello, world!"</span></span>
<span class="line"><span style="color:#E6EDF3">signature </span><span style="color:#FF7B72">=</span><span style="color:#E6EDF3"> sign(message, secret_key)</span></span>
<span class="line"><span style="color:#E6EDF3">is_valid </span><span style="color:#FF7B72">=</span><span style="color:#E6EDF3"> verify(message, signature, public_key)</span></span>
<span class="line"><span style="color:#79C0FF">print</span><span style="color:#E6EDF3">(</span><span style="color:#A5D6FF">"Signature is valid:"</span><span style="color:#E6EDF3">, is_valid)</span></span>
<span class="line"></span></code></pre></div>
<p><strong>Quantum Key Distribution Advancements:</strong> Continuous innovation in QKD is vital. Researchers focus on improving system efficiency, enhancing practicality, and enabling integration into existing communication infrastructures. Efforts encompass error correction codes, efficient qubit transmission, and tackling eavesdropping techniques like Trojan-horse attacks.</p>
<div class="code-block" data-lang="python"><button class="code-copy" type="button" aria-label="Copy code to clipboard"><span class="code-copy__idle">Copy</span><span class="code-copy__done">Copied</span></button><pre class="shiki github-dark-default" style="background-color:#0d1117;color:#e6edf3" tabindex="0"><code><span class="line"><span style="color:#8B949E"># Example of QKD system improvement: Quantum Error Correction</span></span>
<span class="line"><span style="color:#FF7B72">from</span><span style="color:#E6EDF3"> qiskit.ignis.verification.quantum_volume </span><span style="color:#FF7B72">import</span><span style="color:#E6EDF3"> QuantumVolume</span></span>
<span class="line"><span style="color:#FF7B72">from</span><span style="color:#E6EDF3"> qiskit.providers.aer </span><span style="color:#FF7B72">import</span><span style="color:#E6EDF3"> AerSimulator</span></span>
<span class="line"></span>
<span class="line"><span style="color:#E6EDF3">backend </span><span style="color:#FF7B72">=</span><span style="color:#E6EDF3"> AerSimulator()</span></span>
<span class="line"><span style="color:#E6EDF3">qubits </span><span style="color:#FF7B72">=</span><span style="color:#79C0FF"> 5</span></span>
<span class="line"><span style="color:#E6EDF3">depth </span><span style="color:#FF7B72">=</span><span style="color:#79C0FF"> 3</span></span>
<span class="line"><span style="color:#E6EDF3">qvolume </span><span style="color:#FF7B72">=</span><span style="color:#E6EDF3"> QuantumVolume(qubits, depth)</span></span>
<span class="line"><span style="color:#E6EDF3">result </span><span style="color:#FF7B72">=</span><span style="color:#E6EDF3"> qvolume.run(</span><span style="color:#FFA657">backend</span><span style="color:#FF7B72">=</span><span style="color:#E6EDF3">backend)</span></span>
<span class="line"><span style="color:#79C0FF">print</span><span style="color:#E6EDF3">(</span><span style="color:#A5D6FF">"Quantum Volume:"</span><span style="color:#E6EDF3">, result[</span><span style="color:#A5D6FF">'quantum_volume'</span><span style="color:#E6EDF3">])</span></span>
<span class="line"></span></code></pre></div>
<blockquote>
<p><strong>As we confront the limitations of QKD and the emerging quantum landscape, the path ahead involves a combination of innovative cryptographic techniques and the practical implementation of advanced quantum technologies. It’s a journey of constant evolution in the quest for secure communication in the quantum era.</strong></p>
</blockquote>
<hr>
<h2 id="quantum-safe-hybrid-protocols-" tabindex="-1"><a class="heading-anchor" href="#quantum-safe-hybrid-protocols-" aria-label="Link to this section">#</a> <strong>Quantum-Safe Hybrid Protocols -&gt;</strong></h2>
<p><figure class="post-figure"><img src="https://adityaseth.in/images/blog/quantum-cryptography-protocols-exploring-beyond-quantum-key-distribution-qkd-d6bc51f4848d/img-06.jpg" alt="" width="702" height="426" loading="lazy" decoding="async"></figure></p>
<h3 id="marrying-classical-and-quantum-the-rise-of-hybrid-protocols-" tabindex="-1"><a class="heading-anchor" href="#marrying-classical-and-quantum-the-rise-of-hybrid-protocols-" aria-label="Link to this section">#</a> <strong>Marrying Classical and Quantum: The Rise of Hybrid Protocols :)</strong></h3>
<p>Imagine a world where classical and quantum computers team up to solve complex problems. This is the realm of hybrid protocols, a collaboration that combines the strengths of both technologies. These protocols are revolutionizing computing, as evidenced by the Qiskit Runtime project developed by IBM.</p>
<p>In the world of classical computing, bits are 0s or 1s, while quantum computing involves qubits that can be both 0 and 1 simultaneously. Hybrid protocols merge these worlds, utilizing classical computers for their everyday processing speed and quantum computers for tackling intricate challenges.</p>
<p>Qiskit Runtime, for instance, showcases the power of hybrid protocols. It combines classical pre-processing and post-processing steps with quantum computing execution. This synergy optimizes computations by harnessing the unique capabilities of both systems.</p>
<h3 id="transitioning-securely-quantum-safe-hybrid-solutions" tabindex="-1"><a class="heading-anchor" href="#transitioning-securely-quantum-safe-hybrid-solutions" aria-label="Link to this section">#</a> <strong>Transitioning Securely: Quantum-Safe Hybrid Solutions</strong></h3>
<p>In the ever-evolving landscape of data security, quantum computers pose a challenge to classical cryptographic methods. The need for quantum-safe solutions is evident, and quantum-safe hybrid solutions offer a path forward.</p>
<p>Quantum-safe hybrid solutions integrate classical encryption with quantum-resistant techniques. This dual-layer approach is like fortifying a castle with modern technology and ancient wisdom. It ensures that even the most advanced quantum computer cannot easily breach our defenses.</p>
<p>Let’s consider a practical example. In secure communication channels, classical encryption safeguards most data, while quantum encryption adds an extra layer of protection for highly sensitive information. This strategy ensures comprehensive data security in the quantum era.</p>
<h3 id="practical-example-qiskit-runtime" tabindex="-1"><a class="heading-anchor" href="#practical-example-qiskit-runtime" aria-label="Link to this section">#</a> Practical Example: Qiskit Runtime</h3>
<p>The Qiskit Runtime project, with its hybrid approach, demonstrates the feasibility and impact of these protocols. By employing classical computations to prepare quantum circuits, then leveraging quantum computing for execution, and finally using classical processing for analysis, Qiskit Runtime achieves efficient problem-solving.</p>
<p>Analytical data reveals that Qiskit Runtime significantly enhances quantum computation efficiency. On average, this project reduces the number of transpilation passes, leading to a 25% improvement in execution times. This achievement underscores the tangible benefits of hybrid protocols in real-world scenarios.</p>
<hr>
<h2 id="conclusion-" tabindex="-1"><a class="heading-anchor" href="#conclusion-" aria-label="Link to this section">#</a> <strong>Conclusion -&gt;</strong></h2>
<p><figure class="post-figure"><img src="https://adityaseth.in/images/blog/quantum-cryptography-protocols-exploring-beyond-quantum-key-distribution-qkd-d6bc51f4848d/img-07.jpg" alt="" width="612" height="300" loading="lazy" decoding="async"></figure></p>
<p>In this quantum cryptography journey, we’ve delved into the fascinating world where the seemingly bizarre laws of quantum mechanics meet the realm of secure communication. Quantum cryptography isn’t just science fiction; it’s an evolving field that’s redefining the way we think about encryption and data protection. As we wrap up our exploration, let’s take a moment to reflect on the quantum cryptographic frontier we’ve unveiled.</p>
<h3 id="unveiling-the-quantum-cryptographic-frontier" tabindex="-1"><a class="heading-anchor" href="#unveiling-the-quantum-cryptographic-frontier" aria-label="Link to this section">#</a> <strong>Unveiling the Quantum Cryptographic Frontier:</strong></h3>
<p>Throughout our journey, we’ve encountered the groundbreaking concept of quantum key distribution (QKD). This ingenious method harnesses the mystical properties of quantum mechanics to create encryption keys that are virtually invulnerable. We’ve learned about qubits, the quantum analogs of classical bits, and how they dance in superposition and entanglement, forming the basis of unbreakable quantum encryption.</p>
<p>We’ve explored notable QKD protocols like BB84 and E91, where Aurora and I engage in a cryptographic dance while the sneaky Serenity attempts to intercept their secrets. We’ve humanized the complex concepts, imagining jigsaw puzzles, secret languages, and magical dances that illustrate how quantum cryptography works.</p>
<h3 id="embracing-innovation-in-the-quest-for-unassailable-security" tabindex="-1"><a class="heading-anchor" href="#embracing-innovation-in-the-quest-for-unassailable-security" aria-label="Link to this section">#</a> <strong>Embracing Innovation in the Quest for Unassailable Security:</strong></h3>
<p>As we move forward, the fusion of classical and quantum technologies through hybrid protocols promises a new era of computing prowess. The Qiskit Runtime project, among others, showcases the practical applications of hybrid computing, where classical and quantum systems cooperate to solve problems more efficiently. This approach ensures that quantum computing’s potential is harnessed while maintaining the security and reliability of classical computing.</p>
<p>In the quest for unassailable security, quantum-safe hybrid solutions emerge as our shields against the impending threat of quantum computers. These solutions fortify classical encryption with quantum-resistant techniques, providing a multi-layered defense that withstands the power of quantum attacks. As quantum computers advance, embracing these innovations becomes imperative to safeguard our data.</p>
<hr>
<h2 id="published-and-upcoming-articles" tabindex="-1"><a class="heading-anchor" href="#published-and-upcoming-articles" aria-label="Link to this section">#</a> Published and Upcoming Articles</h2>
<p><figure class="post-figure"><img src="https://adityaseth.in/images/blog/quantum-cryptography-protocols-exploring-beyond-quantum-key-distribution-qkd-d6bc51f4848d/img-08.jpg" alt="" width="655" height="395" loading="lazy" decoding="async"></figure></p>
<p><strong>Upcoming Articles:</strong></p>
<ol>
<li>
<p><em>The Potential of Quantum Cryptography: Secure Communication in the Quantum Era</em></p>
</li>
<li>
<p><em>Quantum Cryptanalysis: Unraveling the Challenges of Breaking Quantum Codes</em></p>
</li>
</ol>
<p><strong>Published Articles:</strong></p>
<ol>
<li>
<p><a href="https://medium.com/@adityaseth777/exploring-the-rising-world-of-biohacking-enhancing-human-abilities-through-technology-c3208538e0f2" target="_blank" rel="noopener"><em>Exploring the Rising World of Biohacking: Enhancing Human Abilities through Technology</em></a></p>
</li>
<li>
<p><a href="https://medium.com/@adityaseth777/quantum-cryptography-augmenting-security-in-distributed-ledger-technology-through-synergistic-70e15ae28b62" target="_blank" rel="noopener"><em>Quantum Cryptography: Augmenting Security in Distributed Ledger Technology through Synergistic Integration with Blockchain</em></a></p>
</li>
<li>
<p><a href="https://medium.com/@adityaseth777/its-a-rule-so-it-s-right-right-e656d4735804" target="_blank" rel="noopener"><strong><em>Debate Article:</em></strong> <em>It’s a rule so it’s right . . . right ?</em></a></p>
</li>
<li>
<p><a href="https://medium.com/@adityaseth777/quantum-cryptography-protocols-exploring-beyond-quantum-key-distribution-qkd-d6bc51f4848d" target="_blank" rel="noopener"><em>Quantum Cryptography Protocols: Exploring Beyond Quantum Key Distribution</em></a></p>
</li>
</ol>
<p><strong>_______________________________________________________________</strong></p>
<blockquote>
<p><strong><em>If you want to contact me, feel free to drop an e-mail at</em></strong> <a href="mailto:setha4195@gmail.com"><strong><em>setha4195@gmail.com</em></strong></a> <strong><em>or check out my website at</em></strong> <a href="https://adityaseth.in"><strong><em>adityaseth.in</em></strong></a> <strong><em>:)<br>
Also, here’s my</em></strong> <a href="https://adityaseth.in/linkedin"><strong><em>LinkedIn</em></strong></a><strong><em>.</em></strong></p>
<p><strong><em>Thank you everyone for reading,</em></strong></p>
<p><strong><em>Over and out,<br>
Aditya Seth.</em></strong></p>
</blockquote>
<p><strong>_______________________________________________________________</strong></p>
]]></content>
  </entry>
  <entry>
    <title type="text">Manjaro 22.1.3 Dual-Boot Installation Guide</title>
    <link rel="alternate" type="text/html" href="https://adityaseth.in/blog/manjaro-22-1-3-dual-boot-installation-guide-160ef1079ac1"/>
    <id>https://adityaseth.in/blog/manjaro-22-1-3-dual-boot-installation-guide-160ef1079ac1</id>
    <published>2023-07-03T09:00:00+05:30</published>
    <updated>2023-07-03T09:00:00+05:30</updated>
    <category term="linux"/>
    <summary type="text">Step-by-step walkthrough for installing Manjaro Gnome 22.1.3 in a dual-boot setup - partition config, bootloader, and common pitfalls.</summary>
    <content type="html"><![CDATA[<p class="post-lede"><strong>Here are the step by step dual-boot installation guide for Manjaro OS -&gt;</strong></p>
<p><strong>For the record, I will be installing Manjaro Gnome-22.1.3 because I love Gnome :)</strong></p>
<hr>
<h2 id="step-1" tabindex="-1"><a class="heading-anchor" href="#step-1" aria-label="Link to this section">#</a> Step 1</h2>
<p><strong>Go to the download page :</strong> <a href="https://manjaro.org/download/" target="_blank" rel="noopener"><strong>Manjaro OS</strong></a></p>
<p><figure class="post-figure"><img src="https://adityaseth.in/images/blog/manjaro-22-1-3-dual-boot-installation-guide-160ef1079ac1/img-01.png" alt="" width="800" height="450" loading="lazy" decoding="async"></figure></p>
<hr>
<h2 id="step-2" tabindex="-1"><a class="heading-anchor" href="#step-2" aria-label="Link to this section">#</a> Step 2</h2>
<p><strong>Select your preferred Manjaro installation with the desired desktop environment. Click on the <em>“Image”</em> button.</strong></p>
<p><figure class="post-figure"><img src="https://adityaseth.in/images/blog/manjaro-22-1-3-dual-boot-installation-guide-160ef1079ac1/img-02.png" alt="" width="432" height="286" loading="lazy" decoding="async"></figure></p>
<hr>
<h2 id="step-3" tabindex="-1"><a class="heading-anchor" href="#step-3" aria-label="Link to this section">#</a> Step 3</h2>
<p><strong>Whilst it is being downloaded, go to this</strong> <a href="https://rufus.ie/en/" target="_blank" rel="noopener"><strong>website</strong></a> <strong>and download the latest version of Rufus (4.1.exe whilst this article is being written)</strong></p>
<p><figure class="post-figure"><img src="https://adityaseth.in/images/blog/manjaro-22-1-3-dual-boot-installation-guide-160ef1079ac1/img-03.png" alt="" width="800" height="450" loading="lazy" decoding="async"></figure></p>
<hr>
<h2 id="step-4" tabindex="-1"><a class="heading-anchor" href="#step-4" aria-label="Link to this section">#</a> Step 4</h2>
<p><strong>After downloading both the files (Rufus set-up and the Manjaro iso file), insert the USB drive and launch Rufus. Select the ISO file and start flashing the iso file on the USB drive.</strong></p>
<p><figure class="post-figure"><img src="https://adityaseth.in/images/blog/manjaro-22-1-3-dual-boot-installation-guide-160ef1079ac1/img-04.png" alt="" width="473" height="536" loading="lazy" decoding="async"></figure></p>
<hr>
<h2 id="step-5" tabindex="-1"><a class="heading-anchor" href="#step-5" aria-label="Link to this section">#</a> Step 5</h2>
<p><strong>Now, while the USB drive is being bootable with the Manjaro ISO file, let’s adjust our preliminary partitions. Go to <em>“Search”</em> and then open <em>“Create and format hard disk partitions”</em>. Launch that and let us examine the partitions first.</strong></p>
<p><figure class="post-figure"><img src="https://adityaseth.in/images/blog/manjaro-22-1-3-dual-boot-installation-guide-160ef1079ac1/img-05.png" alt="" width="800" height="450" loading="lazy" decoding="async"></figure></p>
<hr>
<h2 id="step-6" tabindex="-1"><a class="heading-anchor" href="#step-6" aria-label="Link to this section">#</a> Step 6</h2>
<p><strong>Shrink the hard disk drive and free at least 120 GB+ space for the Manjaro installation.</strong></p>
<p><figure class="post-figure"><img src="https://adityaseth.in/images/blog/manjaro-22-1-3-dual-boot-installation-guide-160ef1079ac1/img-06.png" alt="" width="411" height="393" loading="lazy" decoding="async"></figure></p>
<p><figure class="post-figure"><img src="https://adityaseth.in/images/blog/manjaro-22-1-3-dual-boot-installation-guide-160ef1079ac1/img-07.png" alt="" width="800" height="450" loading="lazy" decoding="async"></figure></p>
<hr>
<h2 id="step-7" tabindex="-1"><a class="heading-anchor" href="#step-7" aria-label="Link to this section">#</a> Step 7</h2>
<p><strong>After unallocating the space, and after the USB drive has been made bootable, go to <em>“Settings-&gt;Recovery”</em> and click <em>“Advanced Restart”</em> to restart into Recovery mode.</strong></p>
<p><figure class="post-figure"><img src="https://adityaseth.in/images/blog/manjaro-22-1-3-dual-boot-installation-guide-160ef1079ac1/img-08.png" alt="" width="800" height="450" loading="lazy" decoding="async"></figure></p>
<hr>
<h2 id="step-8" tabindex="-1"><a class="heading-anchor" href="#step-8" aria-label="Link to this section">#</a> Step 8</h2>
<p><strong>After launching into Recovery mode, select <em>“Use a device”</em> to boot from the USB drive.</strong></p>
<p><figure class="post-figure"><img src="https://adityaseth.in/images/blog/manjaro-22-1-3-dual-boot-installation-guide-160ef1079ac1/img-09.jpg" alt="" width="800" height="451" loading="lazy" decoding="async"></figure></p>
<hr>
<h2 id="step-9" tabindex="-1"><a class="heading-anchor" href="#step-9" aria-label="Link to this section">#</a> Step 9</h2>
<p><strong>After selecting the USB drive, select the USB drive to boot from there -&gt;</strong></p>
<p><figure class="post-figure"><img src="https://adityaseth.in/images/blog/manjaro-22-1-3-dual-boot-installation-guide-160ef1079ac1/img-10.jpg" alt="" width="800" height="451" loading="lazy" decoding="async"></figure></p>
<hr>
<h2 id="step-10" tabindex="-1"><a class="heading-anchor" href="#step-10" aria-label="Link to this section">#</a> Step 10</h2>
<p><strong>After clicking that, the boot up screen will boot up from the drive and display. The choice of whether to use the free or proprietary drivers actually boils down to how you intend to use the machine. If you’re into gaming or CAD, then you’ll be far better off with the proprietary drivers, but if you don’t have those requirements, then you might as well use the free drivers.</strong></p>
<p><figure class="post-figure"><img src="https://adityaseth.in/images/blog/manjaro-22-1-3-dual-boot-installation-guide-160ef1079ac1/img-11.jpg" alt="" width="800" height="451" loading="lazy" decoding="async"></figure></p>
<hr>
<h2 id="step-11" tabindex="-1"><a class="heading-anchor" href="#step-11" aria-label="Link to this section">#</a> Step 11</h2>
<p><strong>After selecting the option, the installer screen pops up. Click on <em>“Launch Installer”</em></strong></p>
<p><figure class="post-figure"><img src="https://adityaseth.in/images/blog/manjaro-22-1-3-dual-boot-installation-guide-160ef1079ac1/img-12.jpg" alt="" width="800" height="451" loading="lazy" decoding="async"></figure></p>
<hr>
<h2 id="step-12" tabindex="-1"><a class="heading-anchor" href="#step-12" aria-label="Link to this section">#</a> Step 12</h2>
<p><strong>Make sure you are connected to the internet otherwise none will work.</strong></p>
<p><figure class="post-figure"><img src="https://adityaseth.in/images/blog/manjaro-22-1-3-dual-boot-installation-guide-160ef1079ac1/img-13.jpg" alt="" width="800" height="1418" loading="lazy" decoding="async"></figure></p>
<hr>
<h2 id="step-13" tabindex="-1"><a class="heading-anchor" href="#step-13" aria-label="Link to this section">#</a> Step 13</h2>
<p><strong>After clicking on <em>“Launch Installer”</em>, advance to the next steps. You’ll be greeted with the <em>“Manjaro Linux 22.1.3 Talos installer”</em></strong></p>
<p><figure class="post-figure"><img src="https://adityaseth.in/images/blog/manjaro-22-1-3-dual-boot-installation-guide-160ef1079ac1/img-14.jpg" alt="" width="800" height="451" loading="lazy" decoding="async"></figure></p>
<hr>
<h2 id="step-14" tabindex="-1"><a class="heading-anchor" href="#step-14" aria-label="Link to this section">#</a> Step 14</h2>
<p><strong>Next step ensures the location, so make sure to select the proper location, of course. After setting up, click on <em>“Next”</em>.</strong></p>
<p><figure class="post-figure"><img src="https://adityaseth.in/images/blog/manjaro-22-1-3-dual-boot-installation-guide-160ef1079ac1/img-15.jpg" alt="" width="800" height="451" loading="lazy" decoding="async"></figure></p>
<hr>
<h2 id="step-15" tabindex="-1"><a class="heading-anchor" href="#step-15" aria-label="Link to this section">#</a> Step 15</h2>
<p><strong>Now comes the options to set up the partitions which would be used by the Manjaro OS. Select <em>“Manual partitioning”</em>. It actually helps us get a better idea and more control. Click on <em>“Next”</em>. The next steps are gonna be fun XD.</strong></p>
<p><figure class="post-figure"><img src="https://adityaseth.in/images/blog/manjaro-22-1-3-dual-boot-installation-guide-160ef1079ac1/img-16.jpg" alt="" width="800" height="451" loading="lazy" decoding="async"></figure></p>
<hr>
<h2 id="step-16" tabindex="-1"><a class="heading-anchor" href="#step-16" aria-label="Link to this section">#</a> Step 16</h2>
<p><strong>Double click on the free space for creating a new partition or click on the <em>“New Partition Table”</em>.</strong></p>
<p><figure class="post-figure"><img src="https://adityaseth.in/images/blog/manjaro-22-1-3-dual-boot-installation-guide-160ef1079ac1/img-17.jpg" alt="" width="800" height="451" loading="lazy" decoding="async"></figure></p>
<hr>
<h2 id="step-17" tabindex="-1"><a class="heading-anchor" href="#step-17" aria-label="Link to this section">#</a> Step 17</h2>
<p><strong>We have to create three partitions for the OS to operate. The unallocated space from</strong> <a href="#step-6"><strong>Step 6</strong></a> <strong>will be used in this and further steps.</strong></p>
<ul>
<li><strong><em>/boot/efi partition - 512MB</em></strong></li>
<li><strong><em>swap partition - 2048MB</em></strong></li>
<li><strong><em>/root partition - remaining space</em></strong></li>
</ul>
<p><strong>To create the boot partition, click on the <em>“New Partition Table”</em> button and the pop-up window will be displayed as shown. Follow the steps shown. Specify the memory size of your partition, file system type, and mount point and click <em>“Ok”</em>.</strong></p>
<p><figure class="post-figure"><img src="https://adityaseth.in/images/blog/manjaro-22-1-3-dual-boot-installation-guide-160ef1079ac1/img-18.jpg" alt="" width="800" height="1418" loading="lazy" decoding="async"></figure></p>
<hr>
<h2 id="step-18" tabindex="-1"><a class="heading-anchor" href="#step-18" aria-label="Link to this section">#</a> Step 18</h2>
<p><strong>To create swap space, again, click on the <em>“New Partition Table”</em> button and follow the steps shown. Notice that when you select the file system as <em>“linuxswap”</em> the mount point is grayed out and cannot be created.</strong></p>
<p><figure class="post-figure"><img src="https://adityaseth.in/images/blog/manjaro-22-1-3-dual-boot-installation-guide-160ef1079ac1/img-19.jpg" alt="" width="800" height="1418" loading="lazy" decoding="async"></figure></p>
<p><strong>This is because Swap is a virtual memory space that is used when the main memory begins to get used up and not a mount point that can be used for data storage.</strong></p>
<hr>
<h2 id="step-19" tabindex="-1"><a class="heading-anchor" href="#step-19" aria-label="Link to this section">#</a> Step 19</h2>
<p><strong>Use the remaining free space as root partition with mount point as <em>“/”</em> and ext4 format. I will not be going to put a picture to verify. Do it yourself :)<br>
After creating the three partitions successfully, the entire storage disk will look like the following:</strong></p>
<p><figure class="post-figure"><img src="https://adityaseth.in/images/blog/manjaro-22-1-3-dual-boot-installation-guide-160ef1079ac1/img-20.jpg" alt="" width="800" height="451" loading="lazy" decoding="async"></figure></p>
<p><strong>After setting up, click on <em>“Next”</em>.</strong></p>
<hr>
<h2 id="step-20" tabindex="-1"><a class="heading-anchor" href="#step-20" aria-label="Link to this section">#</a> Step 20</h2>
<p><strong>Set up the name of the account, password and everything in the next step.</strong></p>
<p><figure class="post-figure"><img src="https://adityaseth.in/images/blog/manjaro-22-1-3-dual-boot-installation-guide-160ef1079ac1/img-21.jpg" alt="" width="800" height="451" loading="lazy" decoding="async"></figure></p>
<p><strong>After setting up, click on <em>“Next”</em>.</strong></p>
<hr>
<h2 id="step-21" tabindex="-1"><a class="heading-anchor" href="#step-21" aria-label="Link to this section">#</a> Step 21</h2>
<p><strong>Click on your desired office suite if you want. There is also an option of clicking <em>“No Office Suite”</em>.</strong></p>
<p><figure class="post-figure"><img src="https://adityaseth.in/images/blog/manjaro-22-1-3-dual-boot-installation-guide-160ef1079ac1/img-22.jpg" alt="" width="800" height="451" loading="lazy" decoding="async"></figure></p>
<p><strong>After setting up, click on <em>“Next”</em>.</strong></p>
<hr>
<h2 id="step-22" tabindex="-1"><a class="heading-anchor" href="#step-22" aria-label="Link to this section">#</a> Step 22</h2>
<p><strong>Now the next page will provide you an overview of what will happen if you click on <em>“Install”</em>. Basically, if you have followed the above steps properly, everything should be alright. After examining everything, click on <em>“Install”</em>.</strong></p>
<p><figure class="post-figure"><img src="https://adityaseth.in/images/blog/manjaro-22-1-3-dual-boot-installation-guide-160ef1079ac1/img-23.jpg" alt="" width="800" height="451" loading="lazy" decoding="async"></figure></p>
<hr>
<h2 id="step-23" tabindex="-1"><a class="heading-anchor" href="#step-23" aria-label="Link to this section">#</a> Step 23</h2>
<p><strong>The install screen will appear then (without any errors):</strong></p>
<p><figure class="post-figure"><img src="https://adityaseth.in/images/blog/manjaro-22-1-3-dual-boot-installation-guide-160ef1079ac1/img-24.jpg" alt="" width="800" height="451" loading="lazy" decoding="async"></figure></p>
<p><strong>Give it adequate time to install. Don’t switch off your laptop/PC whilst it is being installed.</strong></p>
<hr>
<h2 id="step-24" tabindex="-1"><a class="heading-anchor" href="#step-24" aria-label="Link to this section">#</a> Step 24</h2>
<p><strong>After the installation has been completed, the following screen will appear.</strong></p>
<p><figure class="post-figure"><img src="https://adityaseth.in/images/blog/manjaro-22-1-3-dual-boot-installation-guide-160ef1079ac1/img-25.jpg" alt="" width="800" height="451" loading="lazy" decoding="async"></figure></p>
<p><strong>Select <em>“Restart now”</em> and remove the USB drive. The laptop/PC should restart and the Manjaro Boot Manager should appear.</strong></p>
<hr>
<h2 id="step-25" tabindex="-1"><a class="heading-anchor" href="#step-25" aria-label="Link to this section">#</a> Step 25</h2>
<p><strong>This is the Manjaro Boot Manager. This will appear everytime you switch on your laptop/PC. If you want to log in to Manjaro, click on <em>“Manjaro Linux”</em>. If you want to log in to Windows, click on <em>“Windows Boot Manager”</em>. As simple as that.</strong></p>
<p><figure class="post-figure"><img src="https://adityaseth.in/images/blog/manjaro-22-1-3-dual-boot-installation-guide-160ef1079ac1/img-26.jpg" alt="" width="800" height="451" loading="lazy" decoding="async"></figure></p>
<hr>
<h2 id="step-26" tabindex="-1"><a class="heading-anchor" href="#step-26" aria-label="Link to this section">#</a> Step 26</h2>
<p><strong>For logging in to Manjaro, the screen will appear like this -&gt;</strong></p>
<p><figure class="post-figure"><img src="https://adityaseth.in/images/blog/manjaro-22-1-3-dual-boot-installation-guide-160ef1079ac1/img-27.jpg" alt="" width="800" height="451" loading="lazy" decoding="async"></figure></p>
<hr>
<h2 id="step-27" tabindex="-1"><a class="heading-anchor" href="#step-27" aria-label="Link to this section">#</a> Step 27</h2>
<p><strong>There are a VAST amount of updates remaining (accessible through the upper right corner), so make sure to update them as well.</strong></p>
<p><figure class="post-figure"><img src="https://adityaseth.in/images/blog/manjaro-22-1-3-dual-boot-installation-guide-160ef1079ac1/img-28.jpg" alt="" width="800" height="451" loading="lazy" decoding="async"></figure></p>
<hr>
<h2 id="step-28" tabindex="-1"><a class="heading-anchor" href="#step-28" aria-label="Link to this section">#</a> Step 28</h2>
<p><strong>For the final verification and the last step, open <em>“Terminal”</em> and run the following command -&gt;</strong> <code>**sudo pacman -S sceenfetch**</code> <strong>for screenFetch or</strong> <code>**sudo pacman -S neofetch**</code> <strong>for Neofetch. Press “Y” wherever necessary.</strong></p>
<p><strong>After successful installation, write <em>“screenfetch”</em> or <em>“neofetch</em>” in the terminal and press Enter. The following image, if appears -&gt; means that the Manjaro OS installation is successful.</strong></p>
<hr>
<p><strong>That’ll be all.</strong></p>
<p><strong>Upcoming Articles:</strong></p>
<ol>
<li><em>The Potential of Quantum Cryptography: Secure Communication in the Quantum Era</em></li>
<li><em>Quantum Cryptography Protocols: Exploring Beyond Quantum Key Distribution</em></li>
<li><em>Quantum Cryptanalysis: Unraveling the Challenges of Breaking Quantum Codes</em></li>
</ol>
<p><strong>Published Articles:</strong></p>
<ol>
<li><a href="https://medium.com/@adityaseth777/manjaro-22-1-3-dual-boot-installation-guide-160ef1079ac1" target="_blank" rel="noopener"><em>Manjaro-22.1.3 Dual-Boot Installation Guide</em></a></li>
<li><a href="https://medium.com/@adityaseth777/exploring-the-rising-world-of-biohacking-enhancing-human-abilities-through-technology-c3208538e0f2" target="_blank" rel="noopener"><em>Exploring the Rising World of Biohacking: Enhancing Human Abilities through Technology</em></a></li>
<li><a href="https://medium.com/@adityaseth777/quantum-cryptography-augmenting-security-in-distributed-ledger-technology-through-synergistic-70e15ae28b62" target="_blank" rel="noopener"><em>Quantum Cryptography: Augmenting Security in Distributed Ledger Technology through Synergistic Integration with Blockchain</em></a></li>
<li><a href="https://medium.com/@adityaseth777/its-a-rule-so-it-s-right-right-e656d4735804" target="_blank" rel="noopener"><strong><em>Debate Article:</em></strong> <em>It’s a rule so it’s right . . . right ?</em></a></li>
</ol>
<p><strong>_______________________________________________________________</strong></p>
<blockquote>
<p><strong><em>If you want to contact me, feel free to drop an e-mail at</em></strong> <a href="mailto:setha4195@gmail.com"><strong><em>setha4195@gmail.com</em></strong></a> <strong><em>or check out my website at</em></strong> <a href="https://adityaseth.in"><strong><em>adityaseth.in</em></strong></a> <strong><em>:)<br>
Also, here’s my</em></strong> <a href="https://adityaseth.in/linkedin"><strong><em>LinkedIn</em></strong></a><strong><em>.</em></strong></p>
<p><strong><em>Thank you everyone for reading,</em></strong></p>
<p><strong><em>Over and out,<br>
Aditya Seth.</em></strong></p>
</blockquote>
]]></content>
  </entry>
  <entry>
    <title type="text">Quantum Cryptography: Augmenting Security in Distributed Ledger Technology</title>
    <link rel="alternate" type="text/html" href="https://adityaseth.in/blog/quantum-cryptography-augmenting-security-in-distributed-ledger-technology-through-synergistic-70e15ae28b62"/>
    <id>https://adityaseth.in/blog/quantum-cryptography-augmenting-security-in-distributed-ledger-technology-through-synergistic-70e15ae28b62</id>
    <published>2023-07-01T09:00:00+05:30</published>
    <updated>2023-07-01T09:00:00+05:30</updated>
    <category term="security"/>
    <summary type="text">Integrating quantum cryptography with blockchain and DLT to build distributed systems that withstand quantum-era attacks on today&apos;s cryptographic assumptions.</summary>
    <content type="html"><![CDATA[<p class="post-lede">Now, the main story is gonna start :D</p>
<p>In the ever-evolving landscape of cybersecurity, where threats loom large and data integrity is of paramount importance, the marriage of quantum cryptography and distributed ledger technology holds the promise of revolutionizing security measures within blockchain networks. This article sets out to explore the remarkable potential of quantum cryptography in enhancing the security fabric of distributed ledger technology. By harnessing the extraordinary principles of quantum mechanics, this synergy empowers blockchain systems with unprecedented levels of protection, safeguarding against the impending quantum threats that conventional cryptographic methods may soon succumb to.</p>
<p><strong>Traverse this intellectually exhilarating journey as we delve into the depths of quantum cryptography’s mesmerizing intricacies, unravelling the transformative impact it begets upon the security landscape of distributed ledger technology, and unveiling a brave new era where impregnability and resilience reign supreme.</strong></p>
<h2 id="understanding-quantum-cryptography-" tabindex="-1"><a class="heading-anchor" href="#understanding-quantum-cryptography-" aria-label="Link to this section">#</a> Understanding Quantum Cryptography -&gt;</h2>
<p><figure class="post-figure"><img src="https://adityaseth.in/images/blog/quantum-cryptography-augmenting-security-in-distributed-ledger-technology-through-synergistic-70e15ae28b62/img-01.jpg" alt="" width="800" height="533" loading="lazy" decoding="async"></figure></p>
<blockquote>
<p><strong>To truly grasp the impact of quantum computing on the security of our cryptographic systems, let’s dive into the captivating world of Quantum Cryptography. This field of study harnesses the mind-boggling principles of quantum mechanics to achieve something truly remarkable - secure communication and data protection that can withstand the power of quantum computers.</strong></p>
</blockquote>
<p>Quantum mechanics takes us to the microscopic realm of matter and energy, where things work in extraordinary and often counterintuitive ways. Imagine particles existing in multiple states at the same time (a concept known as superposition) or particles mysteriously connected to each other regardless of distance (a phenomenon called entanglement). It is within this realm that Quantum Cryptography finds its foundation.</p>
<p>In traditional cryptography, we rely on complex mathematical algorithms to encrypt our data and keep it safe from prying eyes. However, the emergence of quantum computers has raised concerns about the vulnerability of these algorithms. Quantum computers possess tremendous computational power that can potentially break the codes we thought were unbreakable. This is where Quantum Cryptography steps in to offer a solution.</p>
<p>Quantum Cryptography introduces novel cryptographic protocols, and one of the shining examples is Quantum Key Distribution (QKD). Imagine two individuals, let’s call them Aditya and Aurora, who want to communicate securely over an insecure channel. QKD allows them to establish a secret key by sending quantum particles (usually particles of light called photons) to each other. These particles carry encoded information in their quantum states. The fascinating part is that any attempt by an eavesdropper, often known as Eve, to intercept or measure these particles will inevitably disturb their delicate quantum states, leaving behind traces of her presence. This remarkable feature enables Aditya and Aurora to detect any unauthorized attempts to access their communication.</p>
<p>Once Aditya and Aurora have successfully established a secure key through QKD, they can use it with conventional encryption algorithms, such as the well-known Advanced Encryption Standard (AES), to encrypt and decrypt their messages. Even if Eve manages to intercept their encrypted communication, she won’t possess the key required to unlock the hidden message, thanks to the principles of Quantum Cryptography.</p>
<p>But Quantum Cryptography goes beyond just secure key distribution. It encompasses other vital concepts such as quantum-resistant algorithms and quantum-resistant digital signatures. These cryptographic techniques are designed to withstand attacks not only from classical computers but also from the formidable power of quantum computers. This forward-thinking approach ensures that our cryptographic systems remain robust and secure even in the face of future technological advancements.</p>
<p>In conclusion, exploring the fascinating realm of Quantum Cryptography opens up new avenues for secure communication and data protection. By leveraging the principles of quantum mechanics, we can establish secure keys, detect eavesdroppers, and employ techniques that are resistant to the computational power of quantum computers. This enables us to embrace the future with confidence, knowing that our data remains secure and our communication stays private in this ever-evolving digital landscape.</p>
<hr>
<h2 id="the-quantum-threat-to-blockchain-security-" tabindex="-1"><a class="heading-anchor" href="#the-quantum-threat-to-blockchain-security-" aria-label="Link to this section">#</a> <strong>The Quantum Threat to Blockchain Security -&gt;</strong></h2>
<p><figure class="post-figure"><img src="https://adityaseth.in/images/blog/quantum-cryptography-augmenting-security-in-distributed-ledger-technology-through-synergistic-70e15ae28b62/img-02.png" alt="" width="800" height="480" loading="lazy" decoding="async"></figure></p>
<blockquote>
<p><strong>As blockchain technology continues to gain traction across industries, the looming specter of quantum computing poses a significant threat to its security foundations. This section delves into the vulnerabilities of conventional cryptographic methods in the face of quantum computing advancements. By examining the potential exploits that quantum computers can leverage to compromise blockchain networks, we shed light on the urgent need to explore alternative security measures that can withstand the quantum threat. Prepare to delve into the intricacies of quantum computing’s impact on blockchain security and discover why proactive measures are imperative to safeguard the integrity and confidentiality of distributed ledger technology.</strong></p>
</blockquote>
<p><strong><em>Delving more into this topic:</em></strong></p>
<p>Picture a world where the security of our precious blockchain networks faces a new and formidable adversary. This threat arises from the incredible power of quantum computing, an emerging technology that operates in ways that seem almost magical.</p>
<p>In the realm of computers, we’re accustomed to bits, those tiny building blocks of information that can be either 0 or 1. But quantum computers work on a whole different level. They harness the extraordinary properties of qubits, which can exist in multiple states simultaneously. It’s like having a supercomputer that can explore countless possibilities all at once, making mind-boggling calculations seem like a piece of cake.</p>
<p>Now, you may be wondering how this quantum revolution affects the security of our beloved blockchain networks. Well, the answer lies in the heart of blockchain security - cryptography. Cryptographic algorithms, such as RSA and ECC, are the guardians that protect our data from prying eyes and ensure the trustworthiness of transactions on the blockchain.</p>
<p>Here’s where things get a little tricky. Quantum computers have the potential to crack these cryptographic algorithms that are the backbone of blockchain security. Let’s take the RSA algorithm as an example. It relies on the difficulty of factoring large numbers into their prime factors, a task that would take traditional computers an eternity to complete. However, with the help of a quantum algorithm called Shor’s algorithm, quantum computers can breeze through this computation, potentially jeopardizing the security of systems built on RSA.</p>
<p>But hold on, there’s more to it. Other cryptographic algorithms and hash functions, which are essential for maintaining the integrity and authenticity of data on the blockchain, may also be susceptible to attacks from quantum computers. This means that the very foundation on which our blockchain networks rest is under threat, and we must take action to protect the security and privacy of our valuable data.</p>
<p>Now, before we start panicking, it’s important to note that the quantum threat to blockchain security is not an immediate concern. Building large-scale quantum computers that can pose a real danger is a monumental task that requires substantial resources and expertise. Nevertheless, we must stay ahead of the curve and prepare ourselves for the quantum era.</p>
<p>To tackle this emerging threat, experts in cryptography are hard at work developing what we call quantum-resistant cryptographic algorithms. These cutting-edge algorithms are designed to withstand attacks not only from traditional computers but also from the formidable power of quantum computers. By embracing these new cryptographic algorithms, we can fortify the security of our blockchain networks and ensure that our data remains safe and confidential.<br>
<strong>What are these algorithms ? Let’s find out.</strong></p>
<hr>
<h2 id="quantum-resistant-algorithms-for-blockchain" tabindex="-1"><a class="heading-anchor" href="#quantum-resistant-algorithms-for-blockchain" aria-label="Link to this section">#</a> <strong><em>Quantum-Resistant Algorithms for Blockchain</em></strong></h2>
<p><figure class="post-figure"><img src="https://adityaseth.in/images/blog/quantum-cryptography-augmenting-security-in-distributed-ledger-technology-through-synergistic-70e15ae28b62/img-03.jpg" alt="" width="800" height="534" loading="lazy" decoding="async"></figure></p>
<blockquote>
<p><strong>In the ever-changing landscape of blockchain technology, the emergence of quantum computing has raised concerns about the vulnerability of traditional cryptographic algorithms. To counter these threats, researchers and experts have been hard at work developing quantum-resistant algorithms, also known as post-quantum or quantum-safe algorithms. These remarkable algorithms act as the stalwart guardians, standing tall to protect blockchain systems from the potential perils posed by quantum computers.</strong></p>
</blockquote>
<p>Now, let’s delve into a deeper understanding of quantum-resistant algorithms and how they work, using language that resonates with everyday individuals:</p>
<ol>
<li><strong>Lattice-based Cryptography:</strong> Think of a lattice as an intricate web, with interconnected points forming a strong mesh. Lattice-based cryptography is like hiding a treasure within this intricate web. The security lies in the complexity of finding the precise path through the web. It’s similar to navigating a maze with countless twists and turns. Even with the extraordinary power of quantum computers, finding the optimal path through the lattice remains an enormously challenging task. <strong>Popular lattice-based algorithms include NTRUEncrypt and NewHope.</strong></li>
<li><strong>Code-based Cryptography:</strong> Code-based cryptography is akin to using secret codes to safeguard valuable information. It’s like creating a secret language that only those with the key can understand. The security lies in the difficulty of deciphering these secret codes. It’s comparable to unraveling a cryptic puzzle with cleverly hidden clues. Even quantum computers encounter significant obstacles in deciphering these intricate codes, ensuring the safety of the encrypted data. <strong>Examples of code-based algorithms include McEliece and Niederreiter cryptosystems.</strong></li>
<li><strong>Hash-based Cryptography:</strong> Hash-based cryptography is like assigning a unique digital signature, or fingerprint, to data. Just as each person has a unique fingerprint, each piece of data possesses a distinct hash. It’s akin to transforming data into a distinct code that cannot be easily reversed. Even if a quantum computer attempts to crack the code, it faces an uphill battle in retrieving the original data from the hash. It’s like trying to unscramble a jumbled puzzle without the correct pieces. <strong>An example of a hash-based algorithm is the Lamport signature scheme, which uses one-time digital signatures to provide security against quantum attacks.</strong></li>
<li><strong>Multivariate Polynomial Cryptography:</strong> Multivariate polynomial cryptography involves solving complex mathematical problems to safeguard information. It’s like constructing a puzzle with numerous variables and equations. The security lies in the challenge of solving these equations, which becomes increasingly difficult with more variables and equations. It’s similar to solving an intricate riddle that demands sharp problem-solving skills. Even for quantum computers, the complexity of these puzzles poses a formidable challenge. <strong>The Rainbow and HFE (Hidden Field Equations) are examples of multivariate polynomial-based schemes.</strong></li>
<li><strong>Post-Quantum Digital Signatures:</strong> Digital signatures are crucial for ensuring the authenticity and integrity of data in blockchain networks. Post-quantum digital signature schemes are designed to be resistant to attacks from quantum computers. <strong>Examples of post-quantum signature schemes include XMSS (eXtended Merkle Signature Scheme) and SPHINCS (SPHINCS+), which are based on hash-based cryptography.</strong></li>
</ol>
<p>These quantum-resistant algorithms, working hand in hand with other state-of-the-art cryptographic techniques, play the role of diligent protectors, shielding blockchain systems from quantum threats. Researchers continuously study and refine these algorithms to ensure their effectiveness against emerging technologies.</p>
<hr>
<h2 id="future-outlook-of-quantum-cryptography-in-blockchain" tabindex="-1"><a class="heading-anchor" href="#future-outlook-of-quantum-cryptography-in-blockchain" aria-label="Link to this section">#</a> <strong><em>Future Outlook of Quantum Cryptography in Blockchain</em></strong></h2>
<p><figure class="post-figure"><img src="https://adityaseth.in/images/blog/quantum-cryptography-augmenting-security-in-distributed-ledger-technology-through-synergistic-70e15ae28b62/img-04.jpg" alt="" width="800" height="533" loading="lazy" decoding="async"></figure></p>
<p>Looking ahead, the future of quantum cryptography holds incredible potential for enhancing the security of distributed ledger technology, such as blockchain. As we explore the fascinating world of quantum computing and its impact on traditional cryptographic methods, several important aspects come into focus regarding the future of quantum cryptography in the context of blockchain.</p>
<ol>
<li><strong>Quantum-Safe Standards and Protocols:</strong> To ensure secure information exchange and transactions that can withstand the power of quantum computers, it’s crucial to develop and establish standards and protocols. These guidelines will help in implementing cryptographic algorithms that can resist attacks from both classical and quantum computers, ensuring long-term security for blockchain networks.</li>
</ol>
<p><strong>2. Research and Innovation:</strong> Ongoing research and innovation play a vital role in shaping the future of quantum cryptography for blockchain. Brilliant minds are actively working on new algorithms, cryptographic techniques, and protocols to defend against the potential threats posed by quantum computers. By constantly advancing the field of quantum-resistant cryptography, we can enhance the security of blockchain networks and protect sensitive data and transactions.</p>
<p><strong>3. Quantum Key Distribution (QKD):</strong> Quantum Key Distribution (QKD) is an exciting area of quantum cryptography that offers a unique approach to secure key exchange. By harnessing the principles of quantum mechanics, QKD enables the generation and distribution of cryptographic keys in an incredibly secure manner. It allows users to establish secret keys with an unprecedented level of security, protecting against eavesdropping and ensuring the confidentiality of blockchain transactions.</p>
<p><strong>4. Quantum-Secure Hardware:</strong> Developing quantum-secure hardware is crucial for ensuring the long-term security of blockchain networks. Quantum-resistant hardware solutions are designed to withstand attacks from quantum computers and provide secure storage and computation of cryptographic keys. By implementing specialized hardware modules, secure elements, and trusted execution environments, we can create a fortified environment where sensitive operations can be performed, safeguarding the integrity and confidentiality of blockchain transactions.</p>
<p><strong>5. Collaboration and Adoption:</strong> The future of quantum cryptography in blockchain relies on collaboration among different stakeholders. Researchers, industry players, blockchain developers, and regulatory bodies must work together to foster innovation, ensure interoperability, and promote the adoption of quantum-resistant cryptographic solutions. By sharing knowledge, addressing challenges, and establishing best practices, we can speed up the adoption of quantum-safe algorithms and protocols in blockchain networks, creating a more secure and resilient ecosystem.</p>
<blockquote>
<p><strong><em>In conclusion, the future of quantum cryptography in blockchain holds tremendous promise for enhancing security and strengthening the foundation of distributed ledger technology. Through the development of quantum-safe standards and protocols, ongoing research and innovation, the integration of Quantum Key Distribution, the advancement of quantum-secure hardware, and collaborative efforts across the blockchain community, we can pave the way for a future where blockchain networks are resilient against quantum threats. This will ensure the confidentiality, integrity, and long-term security of transactions and data, empowering the widespread adoption of blockchain technology in various sectors.</em></strong></p>
</blockquote>
<hr>
<h2 id="published-and-upcoming-articles" tabindex="-1"><a class="heading-anchor" href="#published-and-upcoming-articles" aria-label="Link to this section">#</a> <strong><em>Published and Upcoming Articles</em></strong></h2>
<p><figure class="post-figure"><img src="https://adityaseth.in/images/blog/quantum-cryptography-augmenting-security-in-distributed-ledger-technology-through-synergistic-70e15ae28b62/img-05.jpg" alt="" width="655" height="395" loading="lazy" decoding="async"></figure></p>
<p><strong>Upcoming Articles:</strong></p>
<ol>
<li><em>The Potential of Quantum Cryptography: Secure Communication in the Quantum Era</em></li>
<li><em>Quantum Cryptography Protocols: Exploring Beyond Quantum Key Distribution</em></li>
<li><em>Quantum Cryptanalysis: Unraveling the Challenges of Breaking Quantum Codes</em></li>
</ol>
<p><strong>Published Articles:</strong></p>
<ol>
<li><a href="https://medium.com/@adityaseth777/exploring-the-rising-world-of-biohacking-enhancing-human-abilities-through-technology-c3208538e0f2" target="_blank" rel="noopener"><em>Exploring the Rising World of Biohacking: Enhancing Human Abilities through Technology</em></a></li>
<li><a href="https://medium.com/@adityaseth777/quantum-cryptography-augmenting-security-in-distributed-ledger-technology-through-synergistic-70e15ae28b62" target="_blank" rel="noopener"><em>Quantum Cryptography: Augmenting Security in Distributed Ledger Technology through Synergistic Integration with Blockchain</em></a></li>
<li><a href="https://medium.com/@adityaseth777/its-a-rule-so-it-s-right-right-e656d4735804" target="_blank" rel="noopener"><strong><em>Debate Article:</em></strong> <em>It’s a rule so it’s right . . . right ?</em></a></li>
</ol>
<p><strong>_______________________________________________________________</strong></p>
<blockquote>
<p><strong><em>If you want to contact me, feel free to drop an e-mail at</em></strong> <a href="mailto:setha4195@gmail.com"><strong><em>setha4195@gmail.com</em></strong></a> <strong><em>or check out my website at</em></strong> <a href="https://adityaseth.in"><strong><em>adityaseth.in</em></strong></a> <strong><em>:)<br>
Also, here’s my</em></strong> <a href="https://adityaseth.in/linkedin"><strong><em>LinkedIn</em></strong></a><strong><em>.</em></strong></p>
<p><strong><em>Thank you everyone for reading,</em></strong></p>
<p><strong><em>Over and out,<br>
Aditya Seth.</em></strong></p>
</blockquote>
<p><strong>_______________________________________________________________</strong></p>
]]></content>
  </entry>
  <entry>
    <title type="text">Exploring the Rising World of Biohacking: Enhancing Human Abilities through Technology</title>
    <link rel="alternate" type="text/html" href="https://adityaseth.in/blog/exploring-the-rising-world-of-biohacking-enhancing-human-abilities-through-technology-c3208538e0f2"/>
    <id>https://adityaseth.in/blog/exploring-the-rising-world-of-biohacking-enhancing-human-abilities-through-technology-c3208538e0f2</id>
    <published>2023-05-25T09:00:00+05:30</published>
    <updated>2023-05-25T09:00:00+05:30</updated>
    <category term="personal"/>
    <summary type="text">A tour of biohacking&apos;s frontier - nootropics, brain-computer interfaces, CRISPR gene editing, and implants blurring where biology ends and technology begins.</summary>
    <content type="html"><![CDATA[<p class="post-lede">In our rapidly advancing technological landscape, a captivating movement known as biohacking has surfaced, captivating the imaginations of innovators and enthusiasts alike. Biohacking represents a fascinating intersection between technology and biology, holding the promise to revolutionize the way we perceive and augment human capabilities. This comprehensive article aims to explore the multifaceted world of biohacking, shedding light on its vast potential to push the boundaries of human potential and transform numerous facets of our lives.</p>
<h2 id="defining-bio-hacking-" tabindex="-1"><a class="heading-anchor" href="#defining-bio-hacking-" aria-label="Link to this section">#</a> Defining Bio-Hacking -&gt;</h2>
<p><strong><em>Biohacking represents an exhilarating movement that converges technology and biology to empower individuals to push the limits of their own capabilities. Let us delve into the core principles, historical roots, notable milestones, and diverse branches of biohacking, shedding extensive light on this captivating field.</em></strong></p>
<ol>
<li>
<p><strong>Core Principles and Motivations:</strong> <em>At its essence, biohacking revolves around the idea that individuals can actively take control of their own biology and optimize it through various means. The primary motivations behind biohacking include:</em></p>
</li>
<li>
<p><strong>Self-empowerment:</strong> <em>Harnessing the potential for personal growth, improvement, and self-optimization.</em></p>
</li>
<li>
<p><strong>Health and Wellness:</strong> <em>Exploring methods to enhance physical and mental well-being, including fitness, nutrition, and stress management.</em></p>
</li>
<li>
<p><strong>Curiosity and Exploration:</strong> <em>Venturing into uncharted territories to expand our understanding of the human body and mind.</em></p>
</li>
<li>
<p><strong>Pushing Boundaries:</strong> <em>Challenging conventional limitations to unlock new levels of performance and capabilities.</em></p>
</li>
</ol>
<p><strong>2. Tracing the Historical Roots:</strong> <em>The roots of biohacking can be traced back to diverse disciplines and movements throughout history, including:</em></p>
<ul>
<li><strong>Transhumanism:</strong> <em>A philosophical and cultural movement advocating for the enhancement of human abilities through science and technology.</em></li>
<li><strong>DIY Biology:</strong> <em>The emergence of do-it-yourself biology labs, fostering a culture of open experimentation and knowledge sharing.</em></li>
<li><strong>Quantified Self:</strong> <em>The practice of tracking and analyzing personal data for self-improvement, emphasizing self-awareness and data-driven decision-making.</em></li>
</ul>
<p><strong>3. Notable Milestones:</strong> <em>Biohacking has witnessed significant milestones that have shaped its evolution and impact, such as:</em></p>
<ul>
<li><strong>2005:</strong> <em>Launch of the Biohacker Manifesto, which laid down principles and ethical guidelines for the movement.</em></li>
<li><strong>2008:</strong> <em>The founding of the DIYbio community, fostering collaboration and democratizing access to biotechnology tools.</em></li>
<li><strong>2010:</strong> <em>The first Biohacker Spaces, such as Genspace and BioCurious, opened their doors, providing communal labs for experimentation.</em></li>
<li><strong>2017:</strong> <em>CRISPR-Cas9 gene-editing technology gained prominence, enabling precise genetic modifications and fueling advancements in biohacking.</em></li>
</ul>
<p><strong>4. Diverse Branches of Biohacking:</strong> <em>Biohacking encompasses various branches, each with its unique objectives and methodologies, including:</em></p>
<ul>
<li><strong>DIY Biology:</strong> <em>Enabling non-experts to conduct biological experiments, fostering a culture of open science and innovation.</em></li>
<li><strong>Grinder Biohacking:</strong> <em>Exploring body modifications through the use of implantable devices, sensory enhancements, and augmentation techniques.</em></li>
<li><strong>Citizen Science:</strong> <em>Engaging communities in collaborative research and data collection, accelerating scientific progress through decentralized efforts.</em></li>
</ul>
<hr>
<h2 id="cognitive-enhancement-" tabindex="-1"><a class="heading-anchor" href="#cognitive-enhancement-" aria-label="Link to this section">#</a> Cognitive Enhancement -&gt;</h2>
<p><strong><em>Unleashing the Power of Cognitive Enhancement: When it comes to cognitive enhancement, a vast array of captivating substances and cutting-edge technologies have emerged. Let us shed extensive light on the fascinating world of nootropics, brain-computer interfaces (BCIs), and neurofeedback, exploring their potential to enhance cognitive function and propel human capabilities to new heights.</em></strong></p>
<ol>
<li>
<p><strong>Nootropics:</strong> <em>Boosting Cognitive Performance Naturally Nootropics, also known as “smart drugs” or “cognitive enhancers,” are substances or techniques that aim to enhance cognitive function. Some key points to consider are:</em></p>
</li>
<li>
<p><strong>Exploring the science behind nootropics:</strong> <em>Nootropics interact with the brain’s neurotransmitters, receptors, and neuronal pathways to enhance cognitive processes such as memory, focus, and creativity. Natural nootropics include substances like caffeine, ginkgo biloba, and omega-3 fatty acids, which have shown potential cognitive benefits and are commonly found in foods or supplements. Synthetic nootropics, such as racetams or modafinil, are designed specifically for cognitive enhancement and have been studied for their effects on memory, attention, and mental clarity.</em></p>
</li>
<li>
<p><strong>Nootropic stacks and personalized approaches:</strong> <em>Nootropic stacks involve combining multiple substances to achieve synergistic effects and optimize cognitive performance. Personalized approaches to nootropics consider factors like individual brain chemistry, lifestyle, and goals to tailor the selection and dosages of nootropics for maximum benefits. It is important to note that the efficacy and safety of different nootropics vary, and it is recommended to consult with a healthcare professional before starting any nootropic regimen.</em></p>
</li>
</ol>
<p><strong>2. Brain-Computer Interfaces (BCIs):</strong> <em>Merging Mind and Machine Brain-Computer Interfaces (BCIs) enable direct communication between the human brain and external devices (closer to being a cyborg :)). Key aspects to look into include:</em></p>
<ul>
<li><strong>Understanding the fundamentals:</strong> <em>How BCIs function by detecting and interpreting brain signals, such as electroencephalography (EEG) or invasive techniques. BCIs detect and interpret brain signals to establish communication between the human brain and external devices. Electroencephalography (EEG) is a non-invasive technique commonly used in BCIs to measure electrical activity in the brain. Invasive techniques, such as implanting electrodes directly into the brain, offer more precise and detailed brain signal readings.</em></li>
<li><strong>Applications of BCIs:</strong> <em>BCIs have immense potential in assisting individuals with disabilities, allowing them to control prosthetic limbs or communicate through brain signals. In healthy individuals, BCIs can be used for cognitive enhancement, improving focus, memory, and attention through neurofeedback and brain training. BCI applications extend beyond medical fields, with potential uses in gaming, virtual reality, and neuroscientific research.</em></li>
<li><strong>Advancements in the field:</strong> <em>Non-invasive EEG headsets have become more accessible and user-friendly, enabling widespread adoption and home-based BCI experiments. Implantable neural interfaces, such as Utah arrays or cortical implants, offer high-resolution brain signal recording and are utilized in cutting-edge research and clinical trials. Emerging technologies like optogenetics and nanotechnology hold promise for future BCI advancements, enabling precise control and manipulation of brain activity.</em></li>
</ul>
<p><strong>3. Neurofeedback:</strong> <em>Unleashing the Brain’s Power through Biofeedback Neurofeedback involves using real-time feedback to train and enhance brain function. Important points to address are:</em></p>
<ul>
<li><strong>Biofeedback principles:</strong> <em>Neurofeedback utilizes the principles of operant conditioning to train the brain by providing real-time feedback on its own activity. The brain has the inherent ability to self-regulate and can learn to modify its own electrical patterns based on the feedback received. Understanding how neurofeedback leverages the brain’s ability to self-regulate through visual or auditory feedback.</em></li>
<li><strong>Targeted brainwave training:</strong> <em>Exploring specific brainwave frequencies, such as alpha, beta, or theta, and their connection to cognitive states like focus, relaxation, or creativity. Specific brainwave frequencies, such as alpha (8-12 Hz), beta (12-30 Hz), or theta (4-8 Hz), are associated with different cognitive states and mental processes. Neurofeedback focuses on training individuals to increase or decrease specific brainwave frequencies to achieve desired cognitive states, such as increased focus or relaxation.</em></li>
<li><strong>Applications and benefits:</strong> <em>Discussing how neurofeedback is employed for cognitive enhancement, stress reduction, attention disorders, and optimizing peak performance. Neurofeedback has been used successfully in cognitive enhancement programs to improve attention, memory, and cognitive flexibility. It has proven effective in reducing symptoms of stress, anxiety, and attention disorders, providing a non-invasive alternative to medication. Athletes, artists, and professionals seek neurofeedback for optimizing peak performance and unlocking their full potential in their respective fields.</em></li>
</ul>
<hr>
<p><figure class="post-figure"><img src="https://adityaseth.in/images/blog/exploring-the-rising-world-of-biohacking-enhancing-human-abilities-through-technology-c3208538e0f2/img-02.jpg" alt="" width="800" height="560" loading="lazy" decoding="async"></figure></p>
<h2 id="biohacking-and-health-" tabindex="-1"><a class="heading-anchor" href="#biohacking-and-health-" aria-label="Link to this section">#</a> Biohacking and Health -&gt;</h2>
<p><strong><em>Moving on a Journey of Biohacking and Health: Within the realm of biohacking, an intriguing frontier of possibilities exists for revolutionizing healthcare and promoting well-being. Let us delve into the transformative domains of personalized medicine and genetic engineering, biohacking for longevity and life extension, and the exploration of biohacked solutions for chronic diseases and disabilities, shedding extensive light on their potential to redefine our understanding of health.</em></strong></p>
<ol>
<li>
<p><strong>Personalized Medicine and Genetic Engineering:</strong></p>
</li>
<li>
<p><strong>Unveiling the promise of personalized medicine:</strong> <em>Advancements in genomics and molecular diagnostics have allowed for the analysis of an individual’s genetic profile, enabling tailored treatments and therapies based on their unique genetic makeup. Personalized medicine aims to provide targeted interventions, optimizing treatment efficacy while minimizing side effects by considering genetic variations and their impact on drug response. By identifying genetic markers associated with certain diseases, personalized medicine offers the potential for early detection, prevention, and customized treatment plans, revolutionizing the field of healthcare. Personalized medicine aims to optimize treatment outcomes, minimize adverse effects, and improve overall patient care through tailored therapies and interventions.</em></p>
</li>
<li>
<p><strong>Genetic engineering breakthroughs:</strong> <em>Techniques such as CRISPR-Cas9, TALENs, and zinc-finger nucleases have emerged as powerful tools for precise gene editing, allowing scientists to modify DNA sequences with unprecedented accuracy. These techniques hold immense potential in combating genetic diseases by correcting or removing defective genes responsible for specific conditions. Genetic engineering breakthroughs also offer opportunities for agricultural improvements, environmental remediation, and advancements in biotechnology, paving the way for innovative solutions in various sectors.</em></p>
</li>
<li>
<p><strong>Ethical considerations:</strong> <em>Genetic engineering raises ethical questions regarding the manipulation of the human genome, including concerns over unintended consequences, genetic discrimination, and the equitable distribution of access to genetic interventions. The concept of “playing god” refers to the moral dilemma of assuming the power to alter the fundamental building blocks of life and the potential implications it may have on the natural order. The ethical debate extends to discussions about designer babies, where genetic manipulation could be used for non-medical purposes, raising concerns about eugenics, societal values, and the potential for widening societal inequalities.</em></p>
</li>
</ol>
<p><strong>2. Biohacking for Longevity and Life Extension:</strong></p>
<ul>
<li><strong>Longevity and anti-aging strategies:</strong> <em>Cutting-edge research focuses on understanding the biological processes of aging and developing interventions to slow down age-related decline and promote healthy aging. Studies explore areas such as caloric restriction, cellular senescence, telomere maintenance, and genetic factors associated with longevity. Promising interventions include pharmacological agents, such as senolytics, and lifestyle interventions, such as exercise, calorie restriction, and stress reduction techniques.</em></li>
<li><strong>Lifestyle optimization:</strong> <em>Biohacking techniques for longevity involve optimizing various aspects of lifestyle, including nutrition, stress management, sleep quality, and physical activity. Nutritional optimization may include personalized diets, intermittent fasting, and targeted supplementation to support optimal cellular function and reduce age-related damage. Stress reduction techniques, like meditation and mindfulness practices, aim to mitigate the negative effects of chronic stress on the body and promote overall well-being and longevity.</em></li>
<li><strong>Extending human lifespan:</strong> <em>Scientific and technological advancements, such as regenerative medicine, genetic engineering, and nanotechnology, hold the potential to extend human lifespan beyond traditional limits. Research explores interventions to rejuvenate tissues and organs, manipulate genetic pathways associated with aging, and enhance cellular repair mechanisms. Emerging fields like cryonics and mind uploading also pose theoretical possibilities for preserving and transferring human consciousness, potentially allowing for indefinite lifespans.</em></li>
</ul>
<p><strong>3. Exploring Biohacked Solutions for Chronic Diseases and Disabilities:</strong></p>
<ul>
<li><strong>Biohacking for chronic disease management:</strong> <em>Innovative biohacked solutions are being explored to manage chronic conditions like diabetes, autoimmune disorders, and cardiovascular diseases. Examples include DIY closed-loop insulin delivery systems for diabetes, personalized immunotherapies for autoimmune disorders, and biohacked implants to monitor and regulate physiological parameters. Biohacking in chronic disease management aims to improve treatment effectiveness, enhance patient autonomy, and provide personalized interventions.</em></li>
<li><strong>Assistive technologies and biohacking:</strong> <em>Biohacking techniques can be applied to develop advanced assistive technologies for individuals with disabilities, such as prosthetics, sensory augmentation, and neurorehabilitation devices. Examples include biofeedback-driven prosthetic limbs, brain-computer interfaces for restoring motor function, and sensory-enhancing devices like bionic eyes or cochlear implants. Biohacking in assistive technologies aims to enhance mobility, sensory perception, and overall quality of life for individuals with disabilities.</em></li>
<li><strong>Bioelectronics and biohacked implants:</strong> <em>The integration of technology with the human body through bioelectronics and biohacked implants offers opportunities to monitor, regulate, and restore bodily functions in the context of chronic diseases and disabilities. Examples include bioelectronic devices for pain management, implantable neurostimulators for Parkinson’s disease, or brain implants for epilepsy control. Biohacking in bioelectronics and implants aims to improve patient outcomes, provide targeted interventions, and enhance overall well-being through the merging of biology and technology.</em></li>
</ul>
<hr>
<p><figure class="post-figure"><img src="https://adityaseth.in/images/blog/exploring-the-rising-world-of-biohacking-enhancing-human-abilities-through-technology-c3208538e0f2/img-03.jpg" alt="" width="617" height="601" loading="lazy" decoding="async"></figure></p>
<h2 id="communities-and-projects" tabindex="-1"><a class="heading-anchor" href="#communities-and-projects" aria-label="Link to this section">#</a> <strong><em>Communities and Projects:</em></strong></h2>
<p><em>Biohacking labs, hackerspaces, and citizen science initiatives have emerged as vibrant communities that provide dedicated spaces for individuals interested in exploring and experimenting with biohacking concepts and projects. These collaborative environments foster knowledge sharing, interdisciplinary collaboration, and access to specialized equipment and resources, enabling the development of innovative biohacking endeavors.</em></p>
<p><em>For example, Genspace in New York City is a well-known community lab that offers a shared workspace for biohackers, scientists, and enthusiasts. It provides access to cutting-edge equipment like PCR machines, microscopes, and DNA sequencers, allowing members to conduct various biohacking experiments and research projects. The lab organizes workshops, courses, and events to promote education and collaboration among its members.</em></p>
<p><em>Another notable example is the global hackerspace network called BioCurious. It serves as a hub for biohacking enthusiasts and provides a platform for collaboration, learning, and innovation. BioCurious operates as a community lab in California, offering open access to lab space, equipment, and resources for conducting biohacking experiments. It hosts events, workshops, and hackathons that bring together individuals from diverse backgrounds to explore biohacking projects and advance the field.</em></p>
<h2 id="inspiring-projects" tabindex="-1"><a class="heading-anchor" href="#inspiring-projects" aria-label="Link to this section">#</a> <strong><em>Inspiring Projects:</em></strong></h2>
<ol>
<li><strong>DIY Medical Devices:</strong> <em>Biohackers have developed innovative medical devices that can be built at a fraction of the cost of traditional options, making healthcare more accessible. For instance, the “Jaipur Foot” project aims to create affordable prosthetic limbs using 3D printing technology, benefiting individuals in underserved communities.</em></li>
<li><strong>Sustainable Biofabrication:</strong> <em>Biohackers are exploring eco-friendly alternatives to traditional manufacturing processes by using living organisms to create materials. An example is the development of bio-based materials like mushroom leather, which offers a sustainable and biodegradable alternative to animal leather for fashion and accessories.</em></li>
<li><strong>Community-Driven Environmental Initiatives:</strong> <em>Biohacking communities have initiated projects to tackle environmental challenges. For example, the “BioBlitz” project encourages citizen scientists to collect data on local biodiversity, contributing to conservation efforts and raising awareness about ecological health.</em></li>
</ol>
<hr>
<p><figure class="post-figure"><img src="https://adityaseth.in/images/blog/exploring-the-rising-world-of-biohacking-enhancing-human-abilities-through-technology-c3208538e0f2/img-04.png" alt="" width="234" height="416" loading="lazy" decoding="async"></figure></p>
<h2 id="the-future-human-machine-integration" tabindex="-1"><a class="heading-anchor" href="#the-future-human-machine-integration" aria-label="Link to this section">#</a> <strong>The Future - Human-Machine Integration:</strong></h2>
<p><em>In a world where science fiction often blends with reality, the idea of becoming a cyborg, reminiscent of characters from DC or the Marvel Cinematic Universe, may seem like a distant dream. However, recent advancements in biohacking and human-machine integration have brought us closer to the realm of merging biology and technology. From implantable devices to neural interfaces, the possibilities are both exciting and thought-provoking.</em></p>
<p><em>One fascinating example of human-machine integration is the development of brain-computer interfaces (BCIs). These innovative technologies allow direct communication between the human brain and external devices, opening up new avenues for individuals with disabilities. For instance, researchers have successfully used BCIs to help paralyzed individuals regain control over their limbs or enable individuals with neurodegenerative conditions to communicate and interact with the world around them. These advancements not only enhance quality of life but also showcase the potential of merging human capabilities with technological innovation.</em></p>
<p><em>Furthermore, the field of biohacking explores the customization and enhancement of human biology through the use of technology. Biohackers, often self-experimenters and enthusiasts, are pushing the boundaries of what it means to be human. They are exploring the integration of implantable devices, such as microchips or bioelectronic sensors, to monitor and regulate bodily functions. These innovations have the potential to revolutionize healthcare, enabling personalized treatment plans, early disease detection, and improved overall well-being.</em></p>
<h2 id="ethical-considerations" tabindex="-1"><a class="heading-anchor" href="#ethical-considerations" aria-label="Link to this section">#</a> <strong>Ethical Considerations:</strong></h2>
<blockquote>
<p>As we embark on this journey of human-machine integration and biohacking, it is essential to address the complex ethical considerations that arise. With great power comes great responsibility, as the famous Spider-Man quote reminds us. The moral implications of merging biology and technology are vast and require careful examination.</p>
</blockquote>
<p><em>One major concern is the potential for unequal access to these technologies. Ensuring equitable distribution and affordability of biohacking advancements is crucial to prevent a divide between those who can afford enhancements and those who cannot. Additionally, questions arise around privacy and data security. As we gather more personal health information through biohacking devices, safeguarding individuals’ privacy becomes paramount.</em></p>
<p><em>The issue of informed consent is also central to the ethical discussions surrounding biohacking. While self-experimentation is a core element of biohacking culture, it is important to establish ethical guidelines to ensure the well-being and safety of individuals. This includes informed consent, risk assessment, and transparency in reporting outcomes.</em></p>
<p><em>Furthermore, societal and philosophical debates surround the concept of human enhancement. Questions about what it means to be human, the potential loss of authenticity, and the blurring of natural boundaries arise. Deliberation is required to establish ethical frameworks that guide the responsible use of biohacking technologies and ensure they align with our shared values and long-term well-being.</em></p>
<hr>
<p><figure class="post-figure"><img src="https://adityaseth.in/images/blog/exploring-the-rising-world-of-biohacking-enhancing-human-abilities-through-technology-c3208538e0f2/img-05.jpg" alt="" width="275" height="183" loading="lazy" decoding="async"></figure></p>
<h2 id="conclusion-" tabindex="-1"><a class="heading-anchor" href="#conclusion-" aria-label="Link to this section">#</a> Conclusion :</h2>
<p><em>In conclusion, the realm of human-machine integration and biohacking presents a fascinating frontier where the boundaries between biology and technology blur. It is an arena where science fiction merges with reality, and the possibilities seem limitless. As we witness the development of groundbreaking technologies like brain-computer interfaces and implantable devices, we find ourselves standing on the precipice of transformative change.</em></p>
<p><em>Within this landscape of innovation, it is essential to tread carefully, mindful of the ethical implications that accompany such advancements. We must ensure that access to these technologies is equitable, bridging the gap between the privileged few and the broader population. Privacy and data security must be safeguarded, protecting the rights and autonomy of individuals in an increasingly interconnected world.</em></p>
<p><em>Furthermore, we must engage in thoughtful reflection and dialogue concerning the philosophical and societal implications of human enhancement. As we explore the frontiers of biohacking, we must navigate the delicate balance between progress and preserving our shared humanity. Ethical frameworks, rooted in principles of informed consent, transparency, and equity, must guide our endeavors.</em></p>
<p><em>By embracing these principles and fostering collaboration across disciplines, we can forge a future where the integration of biology and technology leads to positive and transformative outcomes. Together, we can unlock the potential of human-machine integration while upholding our collective values of fairness, inclusivity, and respect for human dignity.</em></p>
<p><em>In this pursuit, it is our responsibility to shape the trajectory of biohacking and human-machine integration, ensuring that these advancements serve the greater good and contribute to the well-being of individuals and society as a whole. In doing so, we can unlock the true potential of merging biology and technology to create a world where science and humanity coexist harmoniously.</em></p>
]]></content>
  </entry>
  <entry>
    <title type="text">It&apos;s a Rule So It&apos;s Right . . . Right?</title>
    <link rel="alternate" type="text/html" href="https://adityaseth.in/blog/its-a-rule-so-it-s-right-right-e656d4735804"/>
    <id>https://adityaseth.in/blog/its-a-rule-so-it-s-right-right-e656d4735804</id>
    <published>2022-08-28T09:00:00+05:30</published>
    <updated>2022-08-28T09:00:00+05:30</updated>
    <category term="personal"/>
    <summary type="text">A short, personal reflection on why we follow arbitrary rules without question, and what it means to break one on purpose.</summary>
    <content type="html"><![CDATA[<h2 id="the-question" tabindex="-1"><a class="heading-anchor" href="#the-question" aria-label="Link to this section">#</a> The Question</h2>
<blockquote>
<p>Why do we set rules in place? Maybe no one knows. But as has been the nature of human mind to be inquisitive, we are curious about that. If someone tells us to return home by 6 pm in the evening, we would become curious. Why? Is it because the adult person here is making decisions? Who made the rule that older meant smarter and henceforth can understand the feelings and emotions of all humans of any age? We don’t know. But a rule’s a rule, so it must be right, right? Let’s dwell further on this issue.</p>
</blockquote>
<h2 id="a-real-example" tabindex="-1"><a class="heading-anchor" href="#a-real-example" aria-label="Link to this section">#</a> A Real Example</h2>
<blockquote>
<p>So, moving on to the scenario of real life, at this particular time in society, any 6-8 year-old child would become grouchy and grumpy when the someone makes them understand a rule that is in fact pretty much common sense. C’mon, we would be angry too. You can’t deny that.</p>
<p>So, after this naturally, you might want to come forward with a new set of rules but that definitely doesn’t mean either they make sense or you actually have the appropriate sense to make them. But regardless and irrespective of that, that’s actually how our “modern” world works every day. Why not think unconventionally or revolutionarily? Why do we really bother if someone tells us ‘You must do it as others are doing in the traditional old school methods.’??</p>
</blockquote>
<h2 id="breaking-the-rule" tabindex="-1"><a class="heading-anchor" href="#breaking-the-rule" aria-label="Link to this section">#</a> Breaking the Rule</h2>
<blockquote>
<p>There are so many rules and regulations and rituals that you follow on a day-to-day basis, now think about each rule or regulation clearly, and make sure you continue with rules that make some sense or help benefit you or the society around you, do not follow regulations that have no meaning and are just been followed by everyone because someone told you” Well it’s a “rule” “.<br>
Moreover, since I’m writing on this topic, I thought to break the rule which would serve fair to the topic. So, I did not stay trapped in any arbitrary rule of 100-150 words but broke it to write something meaningful yet really important in this modern-day avant-garde world.<br>
Thank you for reading,<br>
Aditya Seth.</p>
</blockquote>
]]></content>
  </entry>
</feed>